This article was co-authored by Eric Shipe. Eric Shipe is a Kitchen and Bath Designer and the Owner of Bath + Kitchen based in Washington DC. Eric and his team specialize in cabinetry, design, and remodels. They serve homeowners, interior designers, architects, and contractors with a refined process, creative ideas, 4K photo-realistic renderings, and 360 Panoramic views. Bath + Kitchen was featured in Best of Houzz 2017-2020. Eric holds a BA in Economics and Business Administration from Ursinus College.
There are 7 references cited in this article, which can be found at the bottom of the page.
This article has been viewed 91,610 times.
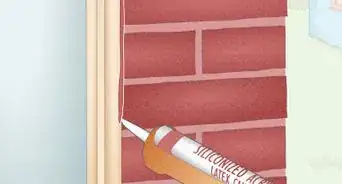
Silicone caulk is a flexible type of sealant that's often used to seal openings in high-humidity areas like kitchens and bathrooms. Unlike ordinary caulk, which requires special solvents to remove, silicone caulk lines can easily be stripped using a couple simple tools. Just heat the bead for 30-40 seconds with an ordinary hair dryer to soften it. Then, score the ends with a utility knife and gently pull up as much as you can using a pair of pliers. When you're done, wipe the area thoroughly with mineral spirits to clear away any remaining residue.
Steps
Loosening the Old Caulk
-
1Grab a hair dryer and set it to the lowest heat setting. You probably have one of the most effective tools for removing silicone caulk sitting around in your bathroom right now—an ordinary hair dryer. A hair dryer can generate enough heat to soften old, stiff silicone caulk without the risk of damage to surrounding surfaces.[1]
- To work safely and save energy, it's a good idea to start with the least amount of heat possible and work your way up as needed.[2]
-
2Heat the caulk for 30-40 seconds. Turn on your hair dryer and place the nozzle directly up against the bead of old caulk you want to remove. Wave the heat stream back and forth slowly over an 8–10 in (20–25 cm) section to begin warming it up.[3]
- Within about half a minute, the heat from the hair dryer will have partially melted the caulk, causing it to become gummy and flexible.[4]
- If the hair dryer doesn't seem to be having much effect after about 40 seconds, try turning it up to the next highest heat setting.
Warning: Prolonged exposure to heat could cause permanent damage to plastic and similar materials, so be careful not to heat any single area for too long.
Advertisement -
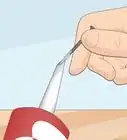
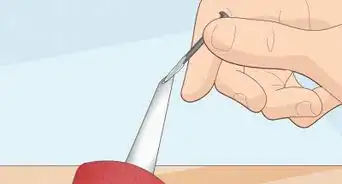
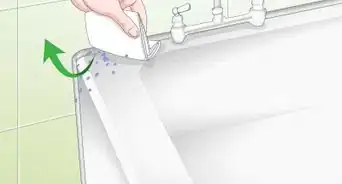
3Score the bead every 2–3 inches (5.1–7.6 cm) with a utility knife or razor. Drag the blade of your razor or utility knife lightly over the width of the caulk line, being careful not to scratch the material on either side. Once you've separated the softened caulk, pry up 1 end with the corner of your blade.[5]
- A utility knife will be your best option, as the long handle and slender blade offers greater precision and control.[6]
- For safety reasons, it's not recommended that you use a loose razor blade to do your scoring. If you have no other option, however, be sure to wear thick gloves to protect your hands and work cautiously.
-
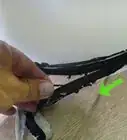
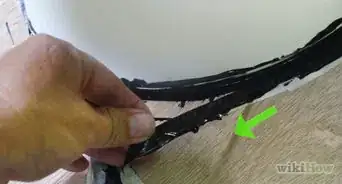
4Pull up as much of the caulk as you can using a pair of pliers. Set your utility knife or razor blade down on your work surface and take hold of the loose end of the bead with your pliers. Then, peel the caulk back to remove each section.[7]
- Avoid tugging or twisting the caulk as it comes up. This will make it more likely to break into smaller sections, which you'll then have to remove individually.
- If you don't have a pair of pliers on hand, you can try stripping the bead using your thumb and index finger—just don't forget to slip on a pair of gloves first!
-
5Loosen the remaining caulk with a putty knife or glass scraper. Chances are, you'll encounter at least one stubborn section of the bead that refuses to budge. When this happens, simply wedge the end of your scraper under the caulk at a shallow angle and push it along using short strokes. It should then come away without difficulty.[8]
- If you don't have one of these other tools handy, pick up a cheap grout remover tool from your local home improvement center. These are typically made of hard plastic and don't cost more than a few dollars.[9]


Getting Rid of Silicone Caulk Residue
-
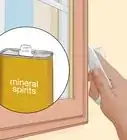
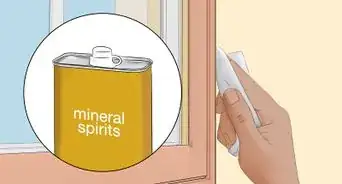
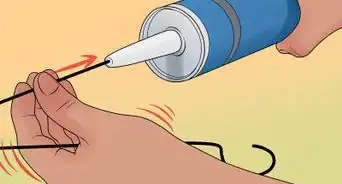
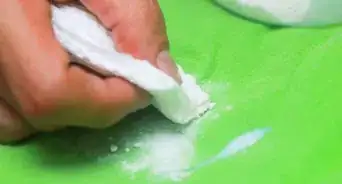
1Wet the entire area with mineral spirits. Dip one corner of a scouring pad or sponge into a container of mineral spirits and use it to apply the solvent directly to the affected surface. Any type of applicator will get the job done. However, you'll get the best results using an abrasive item, as the rough texture will help wear down tough residue.[10]
-
2Allow your cleaner to sit for up to 5 minutes on your work surface. Give the mineral spirits or bleach a few minutes to fully soak in. As it does, it will slowly eat away at the remaining bits of caulk, which you'll then be able to wipe away with ease.[13]
- Both mineral spirits and bleach give off powerful fumes that can be harmful if inhaled. Be sure to open all doors and windows in your work area and leave the air conditioning or fan running while soaking your caulk to create as much ventilation as possible.
Tip: If you're still having trouble breaking up stuck-on residue, try covering the residue with rags soaked in rubbing alcohol and leaving them overnight.[14]
-
3Scrub the area thoroughly to remove all traces of caulk. Dig into the residue firmly, pressing your fingertips into your scrubber for added leverage. For more efficient cleaning, make sure each section has been thoroughly saturated with mineral spirits or bleach.[15]
- Caulk is designed to stay put once applied, so it may take a little patience and elbow grease to get the last of it up.
-
4Rinse and dry the area before applying new caulk. Once your work surface is clean, wipe it down thoroughly with warm water to wash away the mineral spirits or bleach. Allow the exposed joint to air-dry overnight, or use your hair dryer to speed up the drying process. Afterward, it will be ready for a fresh bead of sealant.[16]
- It's important to make sure that the area is completely free of caulk or mold. If there's any residue left over, the fresh sealant may not be able to adhere properly.


Expert Q&A
-
QuestionWhat is the easiest way to remove caulking?
 Eric ShipeEric Shipe is a Kitchen and Bath Designer and the Owner of Bath + Kitchen based in Washington DC. Eric and his team specialize in cabinetry, design, and remodels. They serve homeowners, interior designers, architects, and contractors with a refined process, creative ideas, 4K photo-realistic renderings, and 360 Panoramic views. Bath + Kitchen was featured in Best of Houzz 2017-2020. Eric holds a BA in Economics and Business Administration from Ursinus College.
Home Improvement SpecialistTry using a caulk removal tool. This type of tool is handy, as it works with latex, acrylic, and silicone caulk. -
QuestionHow do you remove old caulk from shower?Eric ShipeEric Shipe is a Kitchen and Bath Designer and the Owner of Bath + Kitchen based in Washington DC. Eric and his team specialize in cabinetry, design, and remodels. They serve homeowners, interior designers, architects, and contractors with a refined process, creative ideas, 4K photo-realistic renderings, and 360 Panoramic views. Bath + Kitchen was featured in Best of Houzz 2017-2020. Eric holds a BA in Economics and Business Administration from Ursinus College.
Home Improvement SpecialistUse a hairdryer and a straight razor. Set your hairdryer to a low setting to melt the caulk. Then, scrape it off with a straight razor blade. Just make sure that the silicone caulk isn't between pieces of plastic, or it will cause damage.
Things You'll Need
Loosening the Old Caulk
- Hair dryer
- Utility knife or razor blade
- Needle-nosed pliers
- Putty knife or glass scraper
- Grout remover tool (optional)
Getting Rid of Silicone Caulk Residue
- Scouring pad or sponge
- Mineral spirits
- Clean, lint-free rags (optional)
- Bleach (optional)


References
- ↑ Eric Shipe. Home Improvement Specialist. Expert Interview. 11 June 2021.
- ↑ https://www.homerepairtutor.com/easily-remove-silicone-caulk/
- ↑ https://www.youtube.com/watch?v=Ry8E-BQxW14&feature=youtu.be&t=54
- ↑ Eric Shipe. Home Improvement Specialist. Expert Interview. 11 June 2021.
- ↑ https://www.thisoldhouse.com/ask-toh/removing-silicone-caulk
- ↑ Eric Shipe. Home Improvement Specialist. Expert Interview. 11 June 2021.
- ↑ https://www.thisoldhouse.com/ask-toh/removing-silicone-caulk
- ↑ https://www.epa.gov/pcbs/summary-tools-and-methods-caulk-removal
- ↑ Eric Shipe. Home Improvement Specialist. Expert Interview. 11 June 2021.
- ↑ https://www.thisoldhouse.com/ask-toh/removing-silicone-caulk
- ↑ http://www.saylesschool.org/MSDS/Oderless%20Mineral%20Spirits.pdf
- ↑ https://www.homerepairtutor.com/easily-remove-silicone-caulk/
- ↑ https://www.homerepairtutor.com/easily-remove-silicone-caulk/
- ↑ https://www.bobvila.com/articles/how-to-remove-caulk/
- ↑ https://www.thisoldhouse.com/ask-toh/removing-silicone-caulk
- ↑ https://www.bobvila.com/articles/how-to-remove-caulk/
About This Article

To remove silicon caulking, first turn on a hairdryer to the lowest setting, and place the nozzle against the caulk for 30 to 40 seconds. Once the caulk appears softer, score it every 2 inches with a utility knife or razor. Then, peel each section of caulk back with pliers to remove it. If some tough parts refuse to budge, wet the blade of your knife with some water and push it along the area in short strokes. Before you apply new caulk, remember to rinse and dry the area so the fresh sealant can stick properly. For tips on how to remove silicon caulk residue, read on!