X
This article was co-authored by wikiHow staff writer, Jack Lloyd. Jack Lloyd is a Technology Writer and Editor for wikiHow. He has over two years of experience writing and editing technology-related articles. He is technology enthusiast and an English teacher.
This article has been viewed 206,330 times.
Learn more...
Your computer's firewall is largely responsible for blocking incoming connections that could potentially harm your computer. You can view and alter your firewall settings on any computer, but keep in mind that the firewall application is best applied to PCs; Mac users usually need not enable or use the built-in firewall program.
Steps
Method 1
Method 1 of 2:
Checking Firewall Settings on a PC
-
1Open your Start menu. Windows' default firewall program is located in the "System and Security" folder of the Control Panel app, but you can easily access your firewall's settings by using the Start menu's search bar.
- You can also tap the ⊞ Win key to do this.
-
2Type "firewall" into the search bar. Doing so will automatically search your computer for applications matching your typing.Advertisement
-
3Click the "Windows Firewall" option. You should see this at the top of the search window.
-
4Review your firewall settings. You should see two sections entitled "Private networks" and "Guest or public networks" with green shields to the left of them, signifying that your firewall is active.
- Clicking on either of these sections will prompt a drop-down menu with details about your current private or public networks.
-
5Click the "Advanced Settings" option. This is to the left of the main menu; clicking it will open your firewall's advanced settings menu, from which you can view or alter the following:
- "Inbound Rules" - Which incoming connections are automatically allowed.
- "Outbound Rules" - Which outgoing connections are automatically allowed.
- "Connection Security Rules" - Baselines for which connections your computer will allow and which ones it will block.
- "Monitoring" - An overview of your firewall's basic monitoring guidelines.
-
6Exit the Advanced Settings menu when you're finished. You have successfully checked your PC's firewall settings!
- Note that you can also click the "Turn Windows Firewall on or off" in the same option menu in which you found Advanced Settings. Be wary of disabling your firewall, especially when connected to a public network.


Advertisement
Method 2
Method 2 of 2:
Checking Firewall Settings on a Mac
-
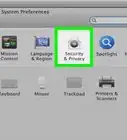
1Click the Apple icon in the top left corner of your screen. To access your firewall settings, you'll need to open the firewall menu from within the Apple menu.
-
2Click "System Preferences". You should see this option in the Apple menu's drop-down list.
-
3Click the "Security & Privacy" tab. This should be at the top of the System Preferences screen in a list of system options.[1]
- This option may just say "Security" depending on which OS version you're running.
-
4Click the "Firewall" tab. You'll find this in the row of options (e.g., "General", "FileVault", etc.) at the top of your Security menu.
-
5Unlock the Firewall menu. Since your firewall is potentially responsible for your Mac's security, you'll need to provide admin credentials before being able to view or alter firewall settings. To do this:
- Click the lock icon (bottom left corner of the menu).
- Enter your administrator name.
- Enter your administrator password.
- Click "Unlock".
-
6Click "Turn On Firewall" to enable your Mac's firewall. Since Macs don't have the same default security flaws as PCs, your Mac's firewall will be disabled by default.
-
7Click the "Firewall Options" button. This may also be entitled "Advanced". You can customize your firewall's settings from here, including the following:
- "Block all incoming connections" - Click this option if you want to refuse all requests to share things like your screen or your files. Basic Apple functionality apps will still come through.
- "Automatically allow signed software to receive incoming connections" - Adds all Apple-certified apps to your "Allowed incoming connections" list at the top of your firewall's Advanced menu.
- "Enable stealth mode" - Prevents your computer from responding to "probing" requests.
-
8Add programs to your firewall's block or accept list. By adding apps to your accept list, they will be automatically allowed when requesting permission to run. To do this:
- Click the "+" below the incoming connections window.
- Click the name of an app you'd like to allow.
- Repeat for as many apps as you like.
- You can also click the "-" while an app is selected to remove it from your block or accept list.
-
9Click "OK" when you're done. Doing so will exit the Firewall Options menu and save your changes!


Advertisement
Warnings
- Modifying your firewall can have serious security repercussions. Avoid changing firewall settings unless you know what you're doing.⧼thumbs_response⧽
Advertisement

-Step-26-Version-2.webp)


References
About This Article
Jack Lloyd
wikiHow Technology Writer
This article was co-authored by wikiHow staff writer, Jack Lloyd. Jack Lloyd is a Technology Writer and Editor for wikiHow. He has over two years of experience writing and editing technology-related articles. He is technology enthusiast and an English teacher. This article has been viewed 206,330 times.
How helpful is this?
Co-authors: 2
Updated: October 21, 2021
Views: 206,330
Categories: Computer Networking
Advertisement