This article was co-authored by wikiHow staff writer, Travis Boylls. Travis Boylls is a Technology Writer and Editor for wikiHow. Travis has experience writing technology-related articles, providing software customer service, and in graphic design. He specializes in Windows, macOS, Android, iOS, and Linux platforms. He studied graphic design at Pikes Peak Community College.
The wikiHow Tech Team also followed the article's instructions and verified that they work.
This article has been viewed 3,000,836 times.
Learn more...
This wikiHow teaches you how to connect two computers. You can connect two Mac or PC computers using an ethernet cable to share files or internet access between the two computers. You can also share files between computers using either an ethernet connection or Wi-Fi.
Things You Should Know
- Use Wi-Fi to share between two Windows computers or two Macs.
- Use an Ethernet cable to connect Mac-to-Mac, Windows-to-Windows, or Mac-to-Windows.
- Use a USB-to-USB Data Transfer Cable. Make sure both of your computers have appropriate USB ports to complete the transfer.
Steps
Sharing and Accessing Files on Windows Using Wi-Fi
-
1
-
2Open the Advanced Sharing Settings menu. Use the following steps to open Advanced Sharing Settings menu:
- Click the Windows Start button.
- Click the Settings/Gear icon.
- Click the Network & Internet icon.
- Click Ethernet in the menu bar to the left.
- Click Change advanced sharing settings below "Related Settings" on the right.
Advertisement -
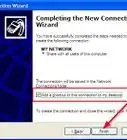
3Click Private. This displays the network sharing options for Private networks.
-
4Turn on both network discovery and file and printer sharing. To do so, click the radio option next to "Turn on network discovery," and "Turn on file and printer sharing."
- Network discovery allows your computer to been seen and see other computers using private accounts on your computer.
- File and printer sharing allows you to share files and printers over a network.
-
5Click Guest or Public. This is the second sharing option below "Private" in the Advanced Sharing Settings menu. This displays the network sharing options for guest and public accounts on your computer.
-
6Turn on network discovery and file and printer sharing. To do so, click the radio option next to "Turn on network discovery," and "Turn on file and printer sharing."
-
7Click All Networks. This is the third sharing option below "Guest and Public." This displays the advanced sharing options for all networks your computer is connected to.
-
8Turn on network sharing. To do so, click the radio option next to "Turn on sharing so anyone can read and write files in the public folders." This allows you to share files over the network.
-
9Turn password-protected sharing on or off. If password-protected sharing is turned on, other users will need to enter your computer username and password to access your shared folders. If it is turned off, anyone on the network can access your shared folder. To turn it on, click the radio option next to "Turn password protected sharing on." If you are okay leaving it turned off, click the radio option next to "Turn password protected sharing off."
-
10Share a folder over the network. In order for the other computer to be able to access your files, you need to share them. Use the following steps to share a folder:
- Press Windows Key + E to open File Explorer.
- Right-click a file or folder you want to share.
- Click Properties.
- Click the Sharing tab at the top.
- Click Share.
- Select Everyone in the drop-down menu and click Add.
- Set the permission level to "Read/Write" (or just "Read" if you don't want the other computer to be able to modify the files).
- Click Share.
-
11Access shared files from another computer. In order to access shared files on another computer, you will need to know the login username and password for the other computer. You can access files on another Windows computer or a Mac. Use the following steps to access shared files from another computer:[1]
- Press Windows key + E to open File Explorer.
- Click Network in the panel to the left.
- Click the computer you want to access. If you don't see the computer listed, type "\\" followed by the computer name in the address bar at the top.
- Enter the computer's username and password and click Ok.
- Click the user whose files you want to access.
- Open the folder with the files you want to access.


Sharing Files from Windows to Windows Via Ethernet Cable
-
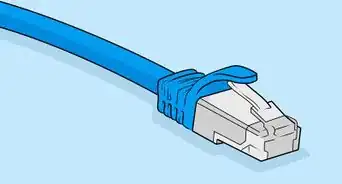
1Connect the two computers with an Ethernet cable. Use an Ethernet cable to connect your two computers to one another.
-
2Open "Network and Sharing Center" on both computers. You'll need to do this on both computers to ensure they are configured properly. Use the following steps to open the "Network & Sharing Center" on a Windows 10 computer:
- Click the Windows Start button.
- Click the Settings/Gear icon.
- Click the Network & Internet icon.
- Click Ethernet in the menu bar to the left.
- Click Network and Sharing Center below "Related Settings" on the right.
-
3Click Ethernet on both computers. It's below "Internet" on the right side. This displays your Ethernet status.
- If you don't see "Ethernet" on the right side, click Change adapters settings on the left and right-click the connected "Ethernet" connection. Then click Properties.
-
4Click Properties on both computers. It's the first button at the bottom of the Status window.
-
5Select "Internet Protocol version 4 (TCP/IPv4)" and click Properties. This displays the internet protocol properties. Do this for both computers.
-
6Select the radio option next to "Use the following IP addresses." This allows you to manually input a unique IP address for both computers.
-
7Input a unique IP address for both computers and click Ok. You can leave the subnet mask as "255.255.255.0" for both computers. Enter the following IP addresses on each computer:[2]
- Computer 1: 192.168.1.2
- Computer 2: 192.168.1.1
-
8Enable Local Security Policy editor (Windows 10 Home Edition only). You'll need to edit the privacy settings for your Ethernet connection. If you are using Windows 10 Pro or Enterprise Edition, you can skip this step. However, if you are using Windows 10 Home Edition, you will need to download a batch file is used to enable Local Security Policy editor.[3]
- Go to https://www.itechtics.com/enable-secpol-msc/ in a web browser.
- Scroll down and click "GPEdit Enabler for Windows 10 Home Edition." You may receive a warning from your antivirus software. It's safe to download.
- Right-click the downloaded file in your Downloads folder and click Run as Administrator.
- Wait for the script to finish processing.
-
9Open the Local Security Policy editor. In order to be able to share files between the two computers, the ethernet connection must be set to "Private." This needs to be done on both computers. Use the following steps to open the Local Security Policy editor.
- Click the Windows search bar in the taskbar at the bottom.
- Type secpol.msc.
- Click the "secpol.msc" file.
-
10Click Network List Manager Policies. It's the fourth option in the Local Group Policy editor. It's the option that doesn't have any sub-folders. Do this on both computers.
-
11Double-click Unidentified Networks. This displays the properties window for your unidentified networks.
-
12Select "Private" and click Apply followed by Ok. This sets your unidentified networks to Private. The Ethernet connection should now read as "Private" in the "Network and Sharing Center." Again, this needs to be done on both computers.
-
13Share a folder with the other computer. In order for the other computer to be able to access your files, you need to share them. Use the following steps to share a folder:
- Press Windows Key + E to open File Explorer.
- Right-click a file or folder you want to share.
- Click Properties.
- Click the Sharing tab at the top.
- Click Share.
- Select Everyone in the drop-down menu and click Add.
- Set the permission level to "Read/Write" (or just "Read" if you don't want the other computer to be able to modify the files).
- Click Share.
-
14Access shared files from another computer. In order to access shared files on another computer, you will need to know the login username and password for the other computer. Use the following steps to access shared files from another computer:
- Press Windows key + E to open File Explorer.
- Click Network in the panel to the left.
- Click the computer you want to access. If you don't see the computer listed, type \\[computer-name] in the address bar at the top.
- Enter an username and password and click Ok.
- Click the user whose file you want to access.
- Open the folder with the files you want to access.


Sharing and Accessing Files on a Mac Using Wi-Fi
-
1
-
2
-
3Click System Preferences…. You'll find this option in the drop-down menu. Doing so opens the System Preferences window.
-
4Click Sharing. It's in the System Preferences window. A new window will open.
-
5Click File Sharing and ensure the checkbox next to it is checked. Ensure the checkbox next to "File Sharing" in the menu to the left is checked. This enables Files Sharing. Then click File Sharing in the menu to display the File Sharing menu.
-
6Click + below "Shared Folders." This opens a Finder window that allows you to select a folder you want to share.
-
7Select a folder you want to share and click Add. Use the Finder window to navigate to a folder you want to share. Click it to select it. Then click Add in the lower-right corner.
-
8Set the folder permissions as desired. To set the folder permissions click the user you want to access the folder (or click everyone). Then use the drop-down menu to select "read/write" or "read only". Read/write allows other users to access and modify the files in the folder. Read only only allows users to view the files but not modify them.
-
9Access shared folders. You'll need to know the name of the computer you want to access and the username and password if they have password protection turned. You can do this with both Windows and Mac computers. You'll also need to know the name of the computer you want to access. Use the following steps to access a shared folder via Wi-Fi on a Mac:
- Open the Finder.
- Click Go in the menu bar at the top.
- Click Connect to Server at the bottom of the drop-down menu.
- Click Browse and select the computer you want to access. If you don't see the computer you want to access, enter smb://[computer-name]/ below "Server address" and click Ok.
- Enter the username and password and click Ok.
- Click the folder you want to access and click Ok.


Sharing Files from Mac to Mac Via Ethernet
-
1Connect the two computers. Use an Ethernet cable to connect your two Mac computers to one another.
- Unless one or both of the Macs are iMacs (desktop computers), you'll need two Ethernet to USB-C adapters to plug into your Macs' Thunderbolt 3 ports before you can connect them via Ethernet. The Thunderbolt port is a small pill-shaped port that has an icon that resembles a lightning bolt.
- If there is no ethernet port on the computer you want to connect, you may need to use an ethernet-to-USB adapter.
-
2Click Go on both computers. Clicking it prompts a drop-down menu.
- If you don't see Go, click the desktop to force it to appear.
- Make sure that you're doing this on the Mac from which you want to transfer files.
-
3Click Connect to Server. You'll find this option near the bottom of the drop-down menu.
-
4Click Browse. It's near the bottom of the Connect to Server window. A pop-up window with nearby computers will appear.
- If you aren't able to find the other computer through "Browse," enter smb://[computer-name] below "Server address" to connect to it manually.
-
5Double-click the second Mac's name. You'll find this in the pop-up window.
-
6Enter the second computer's password when prompted. This will allow you to connect to the second computer.
-
7Click Connect. It's in the lower-right side of the pop-up window.
-
8
-
9Select the computer you want to access. It should be listed in the side panel to the left in the Finder under "Shared."
-
10Select the files you want to move and press ⌘ Command+C. This copies the files you selected from the other Mac.
-
11Navigate to where you want to save the files and press ⌘ Command+V. This pastes the files on the current Mac.


Sharing Files Between Windows and Mac Via Ethernet
-
1Connect the two computers. Use an Ethernet cable to connect your two computers to one another.
- You'll need an Ethernet to USB-C adapter to plug into your Mac's Thunderbolt 3 port before you can attach an Ethernet cable to the Mac. The Thunderbolt port is a small pill-shaped port that has an icon that resembles a lightning bolt.
- If there is no ethernet port on the computer you want to connect, you may need to use an ethernet-to-USB adapter.
-
2Enable file sharing on the Windows computer. Use the following steps to enable File Sharing on Windows:
- Click the Windows Start menu.
- Click the Gear/Settings icon.
- Click Network & Internet.
- Click Ethernet in the menu on the left.
- Click Network and Sharing Center below "Related Settings" on the right.
- Click Change advanced sharing settings.
- Click Turn on network discovery. for both private and public networks.
- Click Turn on file and printer sharing for both private and public networks.
- Click Save changes.
-
3Share a folder. Use the following steps to share a folder on Windows:
- Press Windows Key + E to open File Explorer.
- Right-click a folder you want to share and click Properties.
- Click the Share tab.
- Click Share.
- Select Everyone from the drop-down menu and click Add.
- Select Read/Write as the permission level.
- Click Share.
-
4Enable file sharing on the Mac computer. Use the following steps to enable File Sharing on a Mac:
- Open the Apple menu
- Click System Preferences...
- Click Sharing
- Check the "File Sharing" box.
- Change the "Everyone" permissions from "Read Only" to "Read & Write".
-
5Share a folder from your Mac. Click the + icon below the list of shared folders, then double-click the folder that you want to share.
- You may have to click Add to add the folder to the list of shared folders.
-
6Access the Mac's files from the Windows computer. You can do this from within the File Explorer:
- Open Start.
- Click File Explorer.
- Click the Mac's name below the Network heading on the left side of the File Explorer.
- Open the shared folder.
- Select the files that you want to save, then press Ctrl+C
- Go to a folder on your computer and then press Ctrl+V.
-
7Access the Windows computer's files from the Mac. You can do this from within the Finder using the following steps:
- Open the Finder.
- Click your Windows computer's name in the lower-left side of the window.
- Open the shared folder.
- Select the files that you want to save, then press ⌘ Command+C
- Go to a folder on your Mac and then press ⌘ Command+V.


Transfering Files Using a USB-to-USB Data Transfer Cable
-
1Purchase a USB-to-USB data transfer cable. USB-to-USB data transfer cables have a USB-A connector on both ends. They allow you to transfer data between two computers. To do this, you will need special data transfer software. This may come with the USB-to-USB data transfer cable, or it can be purchased or downloaded online.
- Check to make sure the software you are using to transfer files is compatible with your operating system. Especially if you are using a Mac computer or an older operating system.[4]
- You will need to use the same data transfer software on both computers.
-
2Install the data transfer software on both computers. If the data transfer cable you purchased came with a CD or DVD, you can use that to install the data transfer software on both computers. If it did not come with a CD or DVD, or your computer(s) don't have an optical disk drive, consult the user's manual that came with the data transfer cable for instructions on how to download the software online.
-
3Connect the USB-to-USB data transfer cable to both computers. Plug one end of the USB cable to a free USB port on one computer. Then connect the other end of the USB cable to a free USB port on the second computer.
-
4Start the data transfer software on both computers. Click the icon for your data transfer software on both computers to launch it. It may be on your desktop, Windows Start menu, or Applications folder on Mac.
-
5Select the option to transfer files. Each file transfer program may be a little different. Some may have the option to sync all files between both computers so that both computers have the same files. There may also be an option to transfer everything from one computer to another. Select the option that allows you to choose which files you want to transfer. This may be a drag-and-drop option or an option to allows you to click the files you want to transfer in File Explorer or the Finder.
-
6Select the files you want to transfer. Either navigate to and click the files you want to transfer to select them, or use the drag-and-drop interface to click and drag the files you want to transfer into the data transfer software.
-
7Transfer the files you select. After selecting the files you want to transfer, click Ok, Send, Transfer or similar to send the files to the other computer.[5]
Sharing Internet from Windows
-
1Connect the two computers with an Ethernet cable. Use an Ethernet cable to connect your two computers to one another.
- You'll need an Ethernet to USB-C adapter to plug into your Mac's Thunderbolt 3 port before you can attach an Ethernet cable to a Mac. The Thunderbolt 3 port is a small, pill-shaped port that has a lightning bolt icon above it. On Macbooks, it is generally found on the side. On iMacs, it is generally found on the back.
- If your computer does not have an ethernet port, you may need to get an ethernet-to-USB adapter for your computer.
-
2
-
3Open the "Network Connections" window. Use the following steps to open the "Network Connections" window on the host computer:
- Click the Windows Start button.
- Type "Network Connections."
- Click View Network Connections.
-
4Right-click the internet connection you are connected to and click Properties. Doing so prompts a drop-down menu to appear. Click Properties at the bottom of that menu.
-
5Click the Sharing tab. This allows you to set your sharing options for your computer.
-
6Click the checkbox next to allow internet sharing. It's the checkbox next to "Allow other network users to connect through this computer's internet connection." It's the first option at the top of the window.
-
7Select the method you are using to share your internet connection. Use the drop-down menu below "Home network connection:" to select how you will be sharing your internet. If you are using an ethernet cable, you will need to select "Ethernet."
-
8Click Ok followed by Yes. This saves your internet sharing settings.
-
9Right-click "Ethernet" and click Properties. This displays the Properties menu for the Ethernet connection.
-
10Select "Internet Protocol version 4 (TCP/IPv4)" and click Properties. This displays the internet protocol properties.
-
11Select the radio option next to "Use the following IP addresses." This allows you to manually assign an IP address for the host computer.
-
12Change the IP address to 192.168.0.1 and click Ok. Enter the IP address in the spaces next to "IP Address." You can leave the Subnet Mask as "255.255.255.0." Click Ok when you are finished. This is all you need to configure on the computer that is hosting an internet connection.[6]
-
13Open "Network Connections" on the other computer. Now jump on the computer that is receiving an internet connection (the client computer) and use the following steps to open the "Network Connections".
- Click the Windows Start menu.
- Type "Network Connections."
- Click View Network Connections.
-
14Right-click "Ethernet" and click Properties. This displays the Properties menu for the Ethernet connection.
-
15Select "Internet Protocol version 4 (TCP/IPv4)" and click Properties. This displays the internet protocol properties.
-
16Select the radio option next to "Use the following IP addresses" and "Use the following DNS server address." This allows you to manually assign an IP address for the client computer as well as enter the IP address for the host computer.
-
17Assign the following IP information to the client computer and click Ok. You can leave the Subnet mask as it is, but the IP address must be unique from the host computer. You also need to include the host computer's IP address as the default gateway and DNS server. This allows the client computer to access the internet through the host computer's internet access. Assign the following information to the second computer:
- IP address: 192.168.0.2
- Subnet Mask: 255.255.255.0
- Default Gateway: 192.168.0.1
- Preferred DNS server: 192.168.0.1


Sharing Internet from a Mac
-
1Connect the two computers with an Ethernet cable. Use an Ethernet cable to connect your two Mac computers to one another.
- If connecting a Mac to another Mac, you'll need two Ethernet to USB-C adapters to plug into your Macs' Thunderbolt 3 ports before you can connect them via Ethernet. The Thunderbolt port is a small pill-shaped port with a lightning bolt icon above it.
- If you cannot connect an ethernet cable to one of the computers, you may need an ethernet-to-USB adapter.
-
2Open the Apple menu on the host computer. The host computer is the computer that is sharing it's internet connection with another computer. The host computer should be connected to the internet either via Wi-Fi or another ethernet connection. Click the Apple logo in the top-left corner of the screen. A drop-down menu will appear.
-
3Click System Preferences…. You'll find this option in the drop-down menu. Doing so opens the System Preferences window.
-
4Click Sharing. It's in the System Preferences window. A new window will open.
-
5Check the "Internet Sharing" option. This option is in the list on the left side.
-
6Click the "Share your connection from" drop-down box. It's in the middle of the window. A drop-down menu will appear.
-
7Click Wi-Fi. This option is in the drop-down menu.
- If your computer is connected to the internet through a connection other than Wi-Fi, be sure to select the connection type you are using to access the internet instead.
-
8Check the "Ethernet" box. Doing so shares your Mac's Internet connection with the computer to which it is currently connected via Wi-Fi.


Community Q&A
-
QuestionIs it possible to connect computers with different operating systems to a network?
 Community AnswerYes, absolutely. It may be a little more work to share files and resources, but this is a very common home network situation.
 -
QuestionHow do I share one PC's internet to another PC that doesn't have an internet connection?
 Community AnswerFollow the instructions above. This clearly indicates how to use a twisted pair wire to communicate between the two machines.
 -
QuestionHow do I connect computers together that are on different levels of the house?
 Community AnswerThat depends on how your house was wired. If it is a modern house, the cables built into or near the electrical outlets should be your answer. Find the correct adapter and plug in the first computer. Then hook up the second with a reverse connector. Plug the second machine into that connector. Then boot up the first machine while the second machine is still on; one is always the master, the others are just pawns.
Warnings
- Transferring files over Wi-Fi is almost always slower than using a cable.⧼thumbs_response⧽
- You can only transfer files and folders from one computer to another. You cannot transfer installed programs and applications.⧼thumbs_response⧽

-Connection-Step-12-Version-5.webp)


-Step-26-Version-2.webp)


References
- ↑ https://www.youtube.com/watch?v=o0Ovbq8dqcs
- ↑ https://www.maketecheasier.com/connect-two-windows-computer-on-lan/
- ↑ https://www.itechtics.com/enable-secpol-msc/
- ↑ https://www.techwalla.com/articles/how-to-transfer-data-from-pc-to-pc-using-usb-cable
- ↑ https://www.youtube.com/watch?v=m2U6s1JgY8c
- ↑ https://www.youtube.com/watch?v=z3KhO9-hbWQ
About This Article

1. Connect the two computers with an Ethernet cable.
2. Open the search bar and type ″control panel.″
3. Click Control Panel.
4. Click Network and Internet.
5. Click Network and Sharing Center.
6. Click Change adapter settings.
7. Select the Wi-Fi and Ethernet connections.
8. Right-click the Wi-Fi connection.
9. Click Bridge Connections.


-Connection-Step-12-Version-5.webp)