This article was co-authored by Maggie Moran. Maggie Moran is a Professional Gardener in Pennsylvania.
There are 7 references cited in this article, which can be found at the bottom of the page.
This article has been viewed 75,568 times.
Composting reduces your trash output and helps your plants grow faster, but it can be difficult if you don't have a big yard. You can compost indoors no matter how small your space is using compost containers, worm composting, or the bokashi method--each of them can help you live a greener lifestyle!
Steps
Composting with an Indoor Bin
-
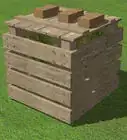
1Find a container for your compost. For a basic indoor compost bin, you don’t need anything fancy--any sturdy, closeable container will do. It can be made of plastic, metal, or wood, as long as it's non-porous. You can use a plastic bin, garbage can, bucket, or even a specialty composting box. Composting bins can be any size, but for indoors, keeping your bin under 5 gallons (19 l) will prevent unpleasant smells.[1]
-
2Drill holes in the bottom of your container. The number of holes depends on the size of your composter, but you should have enough for the compost to drain evenly--about one hole every 2.5 inches (6.4 cm).[2]Advertisement
-
3Put the container on a tray. You’ll need a tray under your composter to catch any liquid draining from the container--you don’t want that on your floor! The tray should be watertight and large enough to hold about 1 cup (240 ml) of liquid.[3]
-
4Store your composter. You can put your composter anywhere, but it’s best to keep it somewhere out of the way to prevent accidental turnovers. This is especially important if you have kids or pets! A cabinet or closet is a good solution. Composting can happen under any temperature or humidity condition, but for best results, keep it in a dry area with a consistent temperature.[4]
-
5Add a layer of soil to your composter. The thickness of the layer depends on how big your composter is--a good rule of thumb is to use a layer of soil about one quarter as thick as the depth of your container.[5]
-
6Put shredded newspaper on top of the soil. Shredded paper helps absorb excess liquid and helps speed up the composting process. Add enough newspaper to cover the layer of soil, and cover your composter.[6]
-
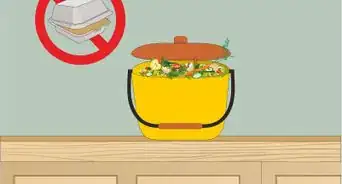
7Save your food scraps. Use a sealable container like a coffee can to save your food scraps for composting. You can also compost coffee grounds, coffee filters, tea bags, and napkins.[7]
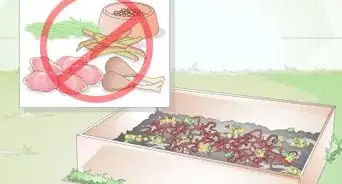
- Don’t use meat, fish, or dairy scraps in your composter! They will rot indoors, creating an unpleasant smell and ruining your compost.
- Cut the food into smaller pieces to make the process go faster. They should be no larger than 2 inches (5.1 cm).
-
8Mix the scraps with shredded newspaper. When your scrap container is nearly full, mix in a few handfuls of shredded newspaper to absorb extra liquid.
-
9Add the mixture to the composter. Spread the food and paper mixture evenly across the top of your compost pile. You can add a thin layer of soil to the top to prevent fruit flies, but this is optional.[8]
-
10Mix the compost and add new soil once a week. Every week, use a trowel or scoop to mix the layers of compost. When you’re done mixing, add a new layer of soil about 1 inch (2.5 cm) thick.[9]
-
11Wait at least a week after your composter is filled. Once your composter is filled up, let it sit sealed up for at least a week to make sure all the food has been composted. When you’re ready to use it, mix it one more time with your trowel.[10]
-
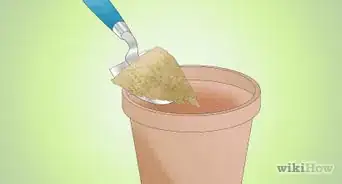
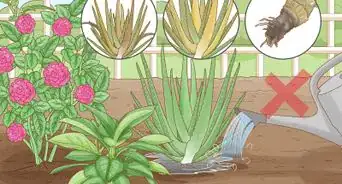
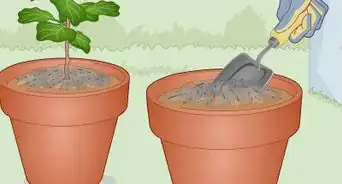
12Add your compost to your garden or houseplants. Spread the compost over your garden or houseplants. If you are worried about animals or children disturbing the compost, you can add a layer of soil to the top, but this is optional. If you want to start new seeds, make sure the seeds are in the soil, not the compost.[11]


Making a Worm Composter
-
1Gather your supplies. Worm composting (also known as vermicomposting) is a bit more complicated than the standard method, so you’ll need a few more things.[12]
- A plastic bin with a lid and a minimum volume of about 18 gallons (68 l).
- A second plastic bin, shorter and wider than the first bin.
- A drill.
- Screen material. Don't use metal screens--they'll rust!
- Waterproof glue.
- Shredded newspaper, enough to make a 3 inches (7.6 cm)layer in your bin.
- 1 pound (0.45 kg) of dirt.
- A spray bottle full of water.
- A trowel or scoop.
- A small container with a lid, about 1 gallon (3.8 l).
- 1 pound (0.45 kg) of worms, either red wrigglers or earthworms. You can buy either kind online, at a bait shop, or a local composting group.[13]
-
2Drill holes in the taller bin. You’ll need two 1 inch (2.5 cm) holes about 2 inches (5.1 cm) from the top of the bin--one on one side, and one on the opposite side. Then, drill a 1⁄8 inch (3.2 mm) hole on the bottom corner of each side. This lets extra liquid drain out so your worms can thrive.[14]
-
3Cover the holes with screen material. You don’t want your worms to escape into your house! Cover each hole with the screen material, and secure it with waterproof glue. Make sure the glue is completely dry before continuing with your composter.[15]
-
4Put the tall bin inside the short bin. The short bin will collect the drained liquid and any runaway worms.[16]
-
5Mix the soil, paper, and water. Combine the soil with your shredded newspaper, and spray it with water until the entire mixture is damp.[17]
-
6Put the mixture in the tall bin. Spread it over the bottom of the bin until it’s completely covered. Make sure it’s very damp, but not wet enough to form puddles. Put the container somewhere out of the way with no dampness and a constant temperature (any temperature is fine).[18]
-
7Add your worms and wait for a week. You can just put all of your worms on the top of the mixture--they’ll burrow their own way down. Leave them alone for about a week to allow them to get used to their new home. You don’t need to feed them during this week--they’ll gather nutrients from the soil.[19]
-
8Add food scraps once a week. Save your food scraps in a sealable container and add them to the composter once a week. Don’t add more often than this--your worms need time to break down the scraps.[20]
- Don’t use animal products! Worms won’t be able to break them down before they rot.
- Cut up your scraps as small as you can, to less than 1⁄2 inch (1.3 cm) each. This makes it easier for the worms to eat.
- If your worms aren’t eating a specific item, take it out of the composter.
-
9Drain the outside bin monthly. It doesn’t need to be completely dried out. Just scoop or siphon out any excess liquid to make sure it doesn’t soak back into the composter.[21]
-
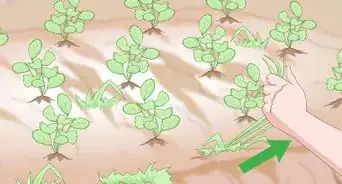
10Start feeding the worms on one side of the bin for at least two weeks. When your bin is almost full, start adding your food scraps on one side of the composter only. This will “train” your worms to stay on that side so you can remove the compost on the other side. Do this for about two weeks, until most or all of your worms are on the same side of the container.[22]
-
11Scoop out the compost from the other side of the bin. Take the compost from the opposite side of the section your worms are gathered in. It’s okay if a couple of worms are removed--you can pick them out and put them back in the container, or simply bring them along, especially if you plan to use the compost outdoors.[23]
-
12Use your compost on your garden or houseplants. You can spread this compost directly on your soil. If you want to plant new seeds, make sure they’re in the soil and not the compost.[24]


Using the Bokashi Method
-
1Gather your supplies. You’ll need a few things to get started with the bokashi process:[25]
- A medium to large tarp, at least 5 feet (1.5 m) across.
- A 5 gallons (19 l) bucket with a siphon.
- An airtight container that can hold at least 5 gallons (19 l).
- A spray bottle with a funnel.
- 10 pounds (4.5 kg) of organic wheat bran.
- 3.17 gallons (12.0 l) of warm water.
- 1 cup (240 ml) molasses.
- 1 cup (240 ml) effective microbes, or EM. You can buy EM online or at some specialty garden stores. If you are buying online, make sure the shop is based in your country to avoid customs issues.
-
2Mix the molasses, EM, and warm water. Pour all three together into the bucket and stir it until everything is dissolved. Make sure the water is warm--molasses won’t dissolve in cold water!
-
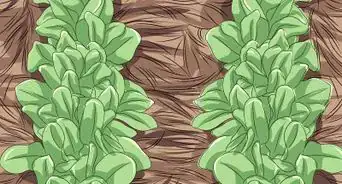
3Spread the bran out on the tarp. Lay the tarp down on a flat surface and spread the bran out evenly over the tarp, enough so that the bran is about 1.5 inches (3.8 cm) thick.
-
4Spray the water mixture onto the bran. Use the funnel to transfer the water mixture bit by bit into the spray bottle, then spray it over the bran until the bran is wet all over. It should be very damp to the touch, but not wet enough to form puddles.
-
5Mix the water and bran. Use your hands to mix the bran and the water mixture together--you don’t want to leave any dry spots!
-
6Pour the bran mixture into your airtight container. Be careful transferring the bran into the bucket--you don’t want any spills! Make sure you seal the container after you’re done pouring the bran.[26]
-
7Let the mixture sit for one month. Put the sealed container somewhere out of the way with no dampness and a constant temperature (any temperature is fine). Keep it in the airtight container for about a month. Resist the urge to open it up--the warm, moist, airless atmosphere is essential!
-
8Dry the mixture on the tarp. After a month, open your container and spread the bokashi bran onto your tarp. Let it dry for about two days, then put it back in the airtight container. It’s now ready to be used for compost! You can get started right away, but the bokashi will keep for up to two years if you need to wait longer.[27]
-
9Save your scraps. The bokashi method lets you compost things that aren’t recommended for traditional compost, like meat, fish bones, eggshells, and coffee grounds. Keep a sealable container (like a coffee can) in your kitchen and put all your food waste in it. Don’t use food that’s begun to rot--this can ruin your bokashi. As soon as you have enough scraps to cover the bottom of your bucket, you’re ready to compost![28]
-
10Spread the scraps in a bucket. When you have enough scraps, pour them into the bottom of your bucket and spread them across the bottom. Your food scrap layer should be between 1 inch (2.5 cm) and 3 inches (7.6 cm) thick. Press the layer down as much as possible with a dinner plate or your gloved hands.
-
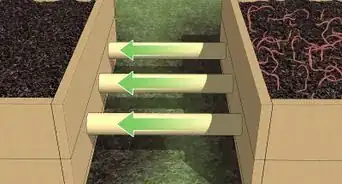
11Layer the bran mixture over the scraps. Make sure the food layer is completely covered by the bran! It should be about as thick as the food layer, but it’s okay if they aren’t perfectly even. Keep repeating layers of food and bran until the bucket is completely full, and don’t forget to press each layer! Use the siphon to drain away excess liquid while you’re pressing.
-
12Seal the bucket for two weeks. Once the bucket is full, put the lid on and let it sit for about two weeks. Don’t open it during this period except to drain liquids out once or twice. You may notice a smell similar to sauerkraut--that’s okay! Bokashi is basically a form of pickling, so you may also notice that your food waste still looks like the original food and not like traditional compost. This is okay too!
- Watch out for a decaying smell--that’s a sign that the bokashi has rotted and you’ll need to start over.[29]
-
13Mix the bokashi with soil. Once you’ve waited a few weeks, you’re ready to use your compost! Most compost sits on top of the soil, but bokashi should be underground because it’s so acidic. If you are using your compost for your houseplants, put about 3 inches (7.6 cm) of soil at the bottom of a large planter or plastic tub. Pour your bokashi over it until you have about 6 inches (15 cm) of space left, then fill that space with more soil.
- If you are planting outside, you can simply bury the bokashi under about 6 inches (15 cm) of soil.[30]
-
14Let the bokashi sit for at least two weeks. You should wait at least two to four weeks before planting anything in your bokashi compost. Bokashi is highly acidic and needs time to neutralize--if you put your plants in it right away, they could die![31]
-
15Plant your plants! You can plant directly in the container, or you can scoop out the bokashi and soil and transfer it to smaller planters. Be sure to cover the bokashi with a layer of soil about 2 inches (5.1 cm) if using a planter. Hardier plants are best for bokashi compost, but any plant can thrive--just be sure to mix it with the right soil for your plant! If you want to plant new seeds, make sure the seeds are in the soil, not in the compost--you can add a layer of bokashi above or below the seed. Water and care for the plant as usual.[32]


Expert Q&A
Did you know you can get premium answers for this article?
Unlock premium answers by supporting wikiHow
-
QuestionWhat foods can and can't be composted indoors?
 Maggie MoranMaggie Moran is a Professional Gardener in Pennsylvania.
Home & Garden SpecialistCommon household trash like veggies, coffee, and tea bags, as well as fruit skins and plant trimmings can be composted. Things like meat or bones, fat, and dairy are things that shouldn't be composted.
Support wikiHow by unlocking this expert answer.
-
QuestionHow long does it take for a compost pile to compost?Maggie MoranMaggie Moran is a Professional Gardener in Pennsylvania.
Home & Garden SpecialistDepending on the size and materials in the pile, it can take between 3 months and up to 2 years.Support wikiHow by unlocking this expert answer.
-
QuestionDo you have to use worms for composting?Maggie MoranMaggie Moran is a Professional Gardener in Pennsylvania.
Home & Garden SpecialistWorms do not need to be added to compost for the process to work. Granted, with the process involved, worms will find the compost eventually.Support wikiHow by unlocking this expert answer.
Things You'll Need
Traditional Composting
- Non-porous bin with a lid, around 10 gallons (38 l)
- Tray that fits under the bin
- Drill
- At least 1 pound (0.45 kg) of soil
- At least 1⁄4 pound (0.11 kg) of shredded newspaper
- Food scraps
Worm Composting
- Plastic bin with a lid and a minimum volume of about 18 gallons (68 l)
- Second plastic bin, shorter and wider than the first bin
- Drill
- Screen material
- Waterproof glue
- Shredded newspaper, enough to make a 3 inches (7.6 cm)layer in your bin
- 1 pound (0.45 kg) of dirt
- Spray bottle full of water
- Trowel or scoop
- Small container with a lid, about 1 gallon (3.8 l) or smaller
- 1 pound (0.45 kg) of worms, either red wrigglers or earthworms
- Food scraps
Bokashi Method
- Medium to large tarp, at least 5 feet (1.5 m) across.
- 5 gallons (19 l) bucket with a siphon.
- Airtight container that can hold at least 5 gallons (19 l).
- Spray bottle with a funnel.
- 10 pounds (4.5 kg) of organic wheat bran.
- 3.17 gallons (12.0 l) of warm water.
- 1 cup (240 ml) molasses.
- 1 cup (240 ml) effective microbes, or EM
Warnings
- Do not use items that may have been sprayed by pesticides, such as grass clippings.⧼thumbs_response⧽


References
- ↑ https://www.thespruce.com/tips-for-indoor-composting-2539618
- ↑ https://www.planetnatural.com/composting-101/indoor-composting/
- ↑ https://www.planetnatural.com/composting-101/indoor-composting/
- ↑ https://www.thespruce.com/tips-for-indoor-composting-2539618
- ↑ https://www.planetnatural.com/composting-101/indoor-composting/
- ↑ https://www.planetnatural.com/composting-101/indoor-composting/
- ↑ https://www.thespruce.com/tips-for-indoor-composting-2539618
- ↑ https://www.thespruce.com/tips-for-indoor-composting-2539618
- ↑ https://www.thespruce.com/tips-for-indoor-composting-2539618
- ↑ https://www.planetnatural.com/composting-101/indoor-composting/
- ↑ https://www.thespruce.com/tips-for-indoor-composting-2539618
- ↑ https://www.epa.gov/recycle/how-create-and-maintain-indoor-worm-composting-bin
- ↑ https://www.epa.gov/recycle/how-create-and-maintain-indoor-worm-composting-bin
- ↑ https://www.epa.gov/recycle/how-create-and-maintain-indoor-worm-composting-bin
- ↑ https://www.epa.gov/recycle/how-create-and-maintain-indoor-worm-composting-bin
- ↑ https://www.rodalesorganiclife.com/garden/make-quick-compost
- ↑ https://www.rodalesorganiclife.com/garden/make-quick-compost
- ↑ https://www.epa.gov/recycle/how-create-and-maintain-indoor-worm-composting-bin
- ↑ https://www.epa.gov/recycle/how-create-and-maintain-indoor-worm-composting-bin
- ↑ https://www.rodalesorganiclife.com/garden/make-quick-compost
- ↑ https://www.rodalesorganiclife.com/garden/make-quick-compost
- ↑ https://www.epa.gov/recycle/how-create-and-maintain-indoor-worm-composting-bin
- ↑ https://www.epa.gov/recycle/how-create-and-maintain-indoor-worm-composting-bin
- ↑ https://www.rodalesorganiclife.com/garden/make-quick-compost
- ↑ http://www.the-compost-gardener.com/bokashi-composting.html
- ↑ http://www.the-compost-gardener.com/bokashicomposting.html
- ↑ http://www.the-compost-gardener.com/bokashicomposting.html
- ↑ https://www.planetnatural.com/composting-101/indoor-composting/bokashi-composting/
- ↑ https://www.planetnatural.com/composting-101/indoor-composting/bokashi-composting/
- ↑ http://www.the-compost-gardener.com/bokashicomposting.html
- ↑ http://www.the-compost-gardener.com/bokashicomposting.html
- ↑ http://www.the-compost-gardener.com/bokashicomposting.html
About This Article

You can easily set up an indoor compost to turn your food scraps into nutrient-rich fertilizer. All you need is a sturdy, sealable container, a tray, soil, and a few scraps of newspaper. You’ll need to drill a few holes in the bottom of your container and place it on a tray to allow your compost to drain evenly. Fill about a quarter of the container with soil and sprinkle some shredded newspaper on top to help absorb the excess moisture. Then, add your food scraps, coffee grounds, and tea bags to the container instead of throwing them in the trash. Avoid putting any meat, fish or dairy in your compost, since these will create an unpleasant smell. Once a week, mix the compost and add a little more soil. When your compost is full, spread it onto your garden or houseplants to give them a nutrients boost. For more tips from our Gardening co-author, including how to make an indoor worm composter, read on!