X
wikiHow is a “wiki,” similar to Wikipedia, which means that many of our articles are co-written by multiple authors. To create this article, volunteer authors worked to edit and improve it over time.
This article has been viewed 93,566 times.
Learn more...
Wireless internet (WiFi) has a lot of uses on the Playstation 3 (PS3) game console. You can use it to play games online, buy or download games, watch a TV show or movie, browse the internet, and more! Start at step one to learn how to connect your console to the internet.
Steps
Part 1
Part 1 of 3:
Setting up:
-
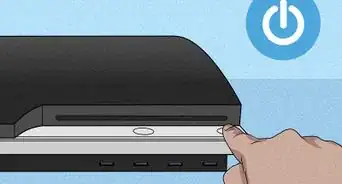
1Power on the system. Hit the power button, or turn on the controller and wait for it to load.
-
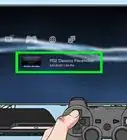
2Tab to settings. Scroll to the left until you've reached a toolbox icon named settings.Advertisement
-
3Scroll to network settings. A picture of a globe and wrench named network settings. Press X to bring up the menu.
-
4Scroll to the third option on the menu. Press the X button again.
-
5Press ✕ for OK. A message will appear saying, "Adjust settings for connection to the internet. If making a wired connection, you must have an Ethernet cable connected." Press X again.
-
6Choose between easy and custom. Another menu will pop up asking for you to choose between an easy or custom setting. For those who don't know much about internet connections, your best bet is easy.
-to-a-PlayStation-3-Step-1.jpg)
-to-a-PlayStation-3-Step-2.jpg)
-to-a-PlayStation-3-Step-3.jpg)
-to-a-PlayStation-3-Step-4.jpg)
-to-a-PlayStation-3-Step-5.jpg)
-to-a-PlayStation-3-Step-6.jpg)
Advertisement
Part 2
Part 2 of 3:
Easy Setup
-
1Select connection method. A menu will pop up asking whether you want wired or wireless. If you want a wired plug an Ethernet cable into the back of the system and everything will automatically set. Press wireless for WiFi.
-
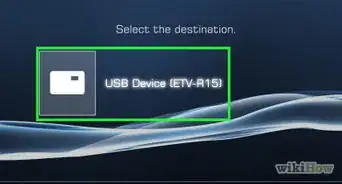
2Choose WLAN settings. The first option asks whether you want to scan for your SSID, (WiFi name) enter it manually, or automatically connect. The easiest is to hit scan and choose your network name from the list that pops up, but you can also type in the name of yours manually, or use the connect automatically button on the back of your router.
-
3SSID. The option to change your SSID presents itself if you wish to. If not, hit the right arrow key to continue.
-
4Choose security. On the WLAN security setting menu that pops up, choose the option that your WiFi has. No security, (Unlocked with no password) WEP, or WPA-PSK/WPA2-PSK (password protected).
-
5Enter your password. If your internet has a password hit the X button and enter it into the popup menu. When done hit the right arrow key.
-
6Save your settings. Hit X again to enter your settings into the system and save them.
-
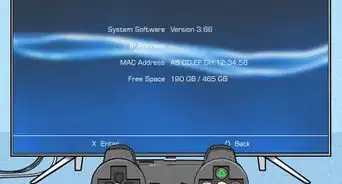
7Optional test connection. If you want to make sure your internet is working properly hit the X button when prompted (If not just hit the back button, you're done). A menu will pop up showing you.
- Whether it was able to obtain the IP address.
- Whether it was able to connect to the internet.
- Whether it was able to connect to the Play Station Network server.
- Whether UPnP was available or not.
- The NAT type.
- The connection speed in Mbps, for downloads.
- The connection speed in Mbps, for uploads.
-to-a-PlayStation-3-Step-7.jpg)
-to-a-PlayStation-3-Step-8.jpg)
-to-a-PlayStation-3-Step-9.jpg)
-to-a-PlayStation-3-Step-10.jpg)
-to-a-PlayStation-3-Step-11.jpg)
-to-a-PlayStation-3-Step-12.jpg)
-to-a-PlayStation-3-Step-13.jpg)
Advertisement
Part 3
Part 3 of 3:
Custom Setup
-
1Choose custom setup. Hit X on wireless.
-
2Select connection method. A menu will pop up asking whether you want wired or wireless. If you want a wired plug an Ethernet cable into the back of the system and everything will automatically set. Press wireless for WiFi.
-
3Choose WLAN settings. The first option asks whether you want to scan for your SSID, (WiFi name) enter it manually, or automatically connect. The easiest is to hit scan and choose your network name from the list that pops up, but you can also type in the name of yours manually, or use the connect automatically button on the back of your router.
-
4SSID. The option to change your SSID presents itself if you wish to. If not, hit the right arrow key to continue.
-
5Choose security. On the WLAN security setting menu that pops up, choose the option that your WiFi has. No security, (Unlocked with no password) WEP, or WPA-PSK/WPA2-PSK (password protected).
-
6Enter your password. If your internet has a password hit the X button and enter it into the popup menu. When done hit the right arrow key.
-
7Select IP address setting. Automatic, manual, or PPPoE are the options. Scroll and hit the right arrow key when you've found the right one.
-
8Select DHCP host name. In most cases, this doesn't need to be changed. Set or do not set and press the right arrow key.
-
9Select DNS Setting. Scroll to Automatic or Manual and hit the right arrow key over which one you want.
-
10Select MTU. Scroll to whether you want the MTU to be automatic or manual and hit the right arrow key. Enter the MTU number if manual.
-
11Select whether to use a proxy server. Scroll to Do not use or use and hit the right arrow key. Punch in the address and port number if you choose to use.
-
12Select to enable or disable UPnP. Scroll and hit the right arrow key.
-
13Press ✕. Hit the X button to enter your settings into the system and save them.
-
14Optional test connection. If you want to make sure your internet is working hit the X button when prompted (If not just hit the back button, you're done). A menu will pop up showing you.
- Whether it was able to obtain the IP address.
- Whether it was able to connect to the internet.
- Whether it was able to connect to the Play Station Network server.
- Whether UPnP was available or not.
- The NAT type.
- The connection speed in Mbps, for downloads.
- The connection speed in Mbps, for uploads.
-to-a-PlayStation-3-Step-14.jpg)
-to-a-PlayStation-3-Step-15.jpg)
-to-a-PlayStation-3-Step-16.jpg)
-to-a-PlayStation-3-Step-17.jpg)
-to-a-PlayStation-3-Step-18.jpg)
-to-a-PlayStation-3-Step-19.jpg)
-to-a-PlayStation-3-Step-20.jpg)
-to-a-PlayStation-3-Step-21.jpg)
-to-a-PlayStation-3-Step-22.jpg)
-to-a-PlayStation-3-Step-23.jpg)
-to-a-PlayStation-3-Step-24.jpg)
-to-a-PlayStation-3-Step-25.jpg)
-to-a-PlayStation-3-Step-26.jpg)
-to-a-PlayStation-3-Step-27.jpg)
Advertisement
Community Q&A
-
QuestionHow do I download God of War Ascension with my already-hacked PlayStation 3 Super Slim?
 Community AnswerIf it is already hacked, then many files won't work.
Advertisement


About This Article
Advertisement