This article was co-authored by wikiHow Staff. Our trained team of editors and researchers validate articles for accuracy and comprehensiveness. wikiHow's Content Management Team carefully monitors the work from our editorial staff to ensure that each article is backed by trusted research and meets our high quality standards.
This article has been viewed 151,851 times.
Learn more...
The internal hard drive of a computer contains most of the information a user wants to transfer from one computer to another when they've purchased a new unit. Using only a screwdriver, some background knowledge, and a carefully chosen enclosure or docking station, converting an internal hard drive to an external unit is deceptively easy allowing you to transfer files from the old hard drive to the new one.
Steps
Selecting an Enclosure Kit
-
1Identify the style of your internal hard drive. The two main designs of hard drives are SATA (usually from new laptops/desktops and have a card edge connector) and PATA(from older laptops/desktops and have two rows of pins on the end. PATA hard drives may be labeled ATA). These designs are not interchangeable.
- SATA hard drives are identifiable by the two flat connectors while PATA hard drives use two rows of pins as connectors.
-
2Determine the dimensions of your hard drive. Laptop computers usually have hard drives that are 2.5 inches (6.35 cm) in diameter while desktops usually have hard drives that are 3.5 inches (8.89 cm). This can easily be checked with a ruler or tape measure.
- The height of a 2.5-inch drives varies. Most are 9.5 mm, but some are 12.5 mm, so take note when choosing an enclosure.
Advertisement -
3Choose the type of material for your hard drive enclosure. The two most commonly available types of enclosures are made out of aluminum or plastic. There are many properties to consider here including the style of hard drive (SATA or PATA), the enclosure's ability to cool the drive, a material used in constructing the enclosure, connection type, and cost.


Assembling the Enclosure Kit
-
1Remove the internal hard drive from the computer. Turn off the computer then open the case and remove the hard drive.
-
2Open the enclosure. The enclosure is most likely secured with Philips head screws at each corner. Removing them is easily done with a Philips head screwdriver.
-
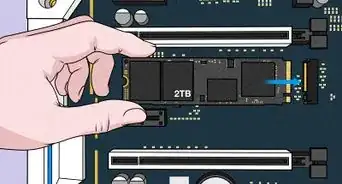
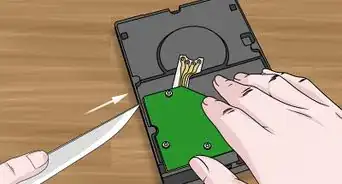
3Place the hard drive onto the circuit board. The hard drive should slide onto the circuit board.
-
4Line up the male-female (opposite) power and data connectors. Male connectors protrude outwards and should align with female connectors that they slide into.
-
5Push the male-female connectors together. They should slide together with minimal effort. Be careful not to force the connection as the connectors can be fragile.
- If you are experiencing issues pushing the connectors together, check to make sure the connectors are aligned correctly.
-
6Place the unit back into the enclosure. Once the hard drive and circuit board are connected, place the unit back into the enclosure.
-
7Close the enclosure. Replace and re-tighten the screws that hold the enclosure together.
-
8Plug the external drive into your computer. To use the external drive, simply plug it into the appropriately labeled/sized port on the computer.
- Depending on the size of the hard drive you may have dual cables, one to connect to the computer and another to connect to a power supply.


Using an Docking Station
-
1Select a docking station. Selecting a docking station is much like selecting an enclosure above. However, there are a few differences. Most notably docking stations fit both 2.5 inch and 3.5 inch hard drives and are only available for SATA designs.
-
2Remove the internal hard drive from the computer. How to remove a hard drive.
-
3Insert the hard drive into the docking station.
- Line up the male-female power and data connectors and push them together firmly.
-
4Connect the docking station to a computer. Most docking stations include a USB cable that allows you to connect the docking station and the computer.
-
5Turn on the docking station. Docking stations are externally powered and require to be plugged in with an AC adapter.


Warning
- Hard drives are easily damaged by static. It is recommended that they are handled outside of any enclosure on an anti-static environment.
- Internal hard drives mounted in a docking station are easily susceptible to dust and overheating and are not recommended for extended use.
Things You'll Need
- Internal hard drive
- Hard drive enclosure or docking station
- Philips-head screwdriver
- Anti-static matt (recommended)


References
About This Article