X
This article was co-authored by wikiHow Staff. Our trained team of editors and researchers validate articles for accuracy and comprehensiveness. wikiHow's Content Management Team carefully monitors the work from our editorial staff to ensure that each article is backed by trusted research and meets our high quality standards.
This article has been viewed 54,127 times.
Learn more...
A circle is defined by any three non-collinear points.[1] This means that, given any three points that are not on the same line, you can draw a circle that passes through them. It is possible to construct this circle using only a compass and straightedge.
Steps
Part 1
Part 1 of 3:
Setting up the Points
-
1Draw your three points. If you have the coordinates of the points, map them on a coordinate plane. If you are not working with specific points, you can draw your own on a piece of paper.
- For example, you might draw points A, B, and C in any position you'd like.
-
2Determine whether your points are noncollinear. Noncollinear means that they are not on the same line. You can draw a circle from any three points, as long as they are not on the same line.[2]
- If you aren’t sure whether the points are collinear, lay a straightedge across them. If the straightedge passes through all three points, the points are collinear, and you cannot use them to draw a circle.
Advertisement -
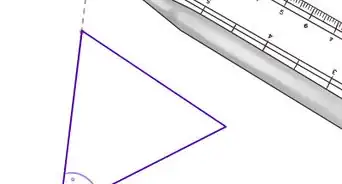
3Draw two line segments between any two sets of points. Use a straightedge to connect all of the points.[3]
- For example, you might draw line segments AB and BC.


Advertisement
Part 2
Part 2 of 3:
Drawing Perpendicular Bisectors
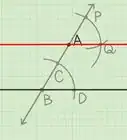
-
1Draw an arc centered at the first endpoint of the first line segment. To do this, place the compass tip on the first endpoint. Open the compass to a little more than halfway across the line segment. Draw an arc across the line segment.[4]
-
2Draw an arc centered at the second endpoint. Without changing the width of the compass, place the compass tip on the second endpoint. Draw a second arc across the line segment.[5]
- The two arcs should intersect above and below the line.
-
3Draw a line connecting the intersections of the arc. Line up a straightedge with the intersection of the arcs above the line, and the intersection of the arcs below the line. Draw a line connecting these two points. The line you draw is a perpendicular bisector. It bisects the line at a right angle.[6]
-
4


Advertisement
Part 3
Part 3 of 3:
Drawing the Circle
-
1Set the compass width to the circle’s radius. The radius of a circle is the distance from the center to any point on the circle’s edge.[9] To set the width, place the tip of the compass on the center of the circle, and open the compass to any one of your original points.[10]
- For example, you might set the tip of the compass on the circle center, and reach the pencil to point B.
-
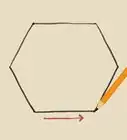
2Draw the circle. Swing the compass around 360 degrees so that it draws a complete circle. The circle should pass through all three points.
-
3Erase your guidelines. For a neat circle, make sure to erase your line segments, arcs, and perpendicular bisectors.


Advertisement

References
- ↑ https://www.khanacademy.org/math/geometry-home/triangle-properties/perpendicular-bisectors/v/three-points-defining-a-circle
- ↑ http://jwilson.coe.uga.edu/EMAT6680Su06/Byrd/Assignment%20Nine/CyclicQuad.pdf
- ↑ http://www.mathopenref.com/const3pointcircle.html
- ↑ http://www.virtualnerd.com/geometry/triangle-relationships/perpendicular-angle-bisectors/construct-perpendicular-bisector-example
- ↑ https://www.mathsisfun.com/geometry/construct-linebisect.html
- ↑ http://www.virtualnerd.com/geometry/triangle-relationships/perpendicular-angle-bisectors/construct-perpendicular-bisector-example
- ↑ http://www.mathopenref.com/const3pointcircle.html
- ↑ https://www.khanacademy.org/math/geometry-home/triangle-properties/perpendicular-bisectors/v/three-points-defining-a-circle
- ↑ http://www.coolmath.com/reference/circles-geometry
About This Article

wikiHow Staff
wikiHow Staff Writer
This article was co-authored by wikiHow Staff. Our trained team of editors and researchers validate articles for accuracy and comprehensiveness. wikiHow's Content Management Team carefully monitors the work from our editorial staff to ensure that each article is backed by trusted research and meets our high quality standards. This article has been viewed 54,127 times.
Co-authors: 16
Updated: March 3, 2021
Views: 54,127
Categories: Featured Articles | Drawing Shapes
Advertisement