This article was co-authored by wikiHow Staff. Our trained team of editors and researchers validate articles for accuracy and comprehensiveness. wikiHow's Content Management Team carefully monitors the work from our editorial staff to ensure that each article is backed by trusted research and meets our high quality standards.
This article has been viewed 277,631 times.
Learn more...
While there is no "Draw Circle" tool in GIMP, there are several ways you can create circles using the tools provided. The Path tool will create a vector circle that you can add a border to. You can use the Select tool to create a circular border from the Ellipse Select function. You can use that same basic function to create a solid circle with no border.
Steps
Creating a Bordered Circle with the Path Tool
-
1Click the Ellipse Select Tool in the Toolbox. You'll find this in the upper-left corner of the Toolbox. It looks like an oval with a dashed border.
-
2Click and drag on your canvas to begin creating an ellipse. By default, you'll be creating a freeform ellipse shape.Advertisement
-
3Press and hold .⇧ Shift while dragging to make a circle. Holding ⇧ Shift after you start dragging will allow you to make a perfect circle instead of a freeform ellipse. If it doesn't work at first, you may need to start a new ellipse and try again.
- If you need to make a circle of a specific size, use the "Size" fields in the bottom section of the Toolbox.
-
4Click the Select menu from the GIMP menu bar and choose "To Path." This will create a vector object from your circle.
-
5Click the Select menu again and choose "None." The circle you created will seemingly disappear. This is normal.
-
6Select the color you want to use for the border in the color picker. Click the current foreground color in the Toolbox and select the color you want to use as the border for the circle.
-
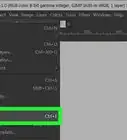
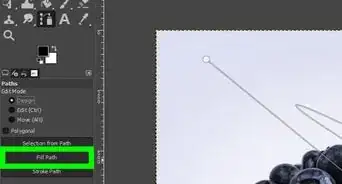
7Click the Edit menu and select "Stroke Path." A new window will appear. You'll be converting the circle to a
-
8Set the width of the circle border in the "Line width" field. By default, this will be pixels but you can change it to another unit of measurement.
- You can choose to create the stroke with different tools for a more artistic effect.
-
9Click "Stroke" to create the circle. The circle will be created with the border in the color and size you selected.
-
10Fill the circle with another color if you'd like. You can use the Bucket Fill Tool to fill the circle with a different color after creating it. Select the color you want to use from the color picker, then click inside the circle with the Bucket Fill Tool selected.


Creating a Bordered Circle with the Select Tool
-
1Click the Ellipse Select Tool in the Toolbox. You'll find this in the upper-left corner of the Toolbox window. The button has an oval with a dotted border.
-
2Click and drag on the canvas to start creating an ellipse. The Ellipse tool can create ovals and circles.
-
3Hold .⇧ Shift while dragging to make a perfect circle. The shape will snap into a perfect circle. If this isn't working correctly, try releasing and starting over, GIMP can be difficult at times. Make sure to not hold ⇧ Shift until after you start dragging.
- If you need to make the circle a specific size, use the "Size" fields in the "Tool Options" section of the Toolbox.
-
4Click the Select menu in the GIMP menu bar and choose "Border." A new menu will appear which allows you to select the selection you just created, essentially allowing you to create an outline.
-
5Enter the size you want to use for your circle border. For a thin border, enter "1" for a single-pixel border. Larger numbers will add that number of pixels to each side of the selection. For example, entering "2" will result in a border that is four pixels wide.
- You can change the unit of measurement if you prefer working with different units.
-
6Select the color you want to use for the circle border as the foreground color. Click the foreground color in the Toolbox and use the color picker to choose the color you want to use for the circle's border.
-
7Click the Edit menu and select "Fill with FG color." This will fill the circle's border with the color you selected. Your circle now has a border color and a transparent center.
-
8Fill the center with a different color if you'd like. You can use the Bucket Fill Tool to fill the circle with a different color if you want to. Select the color you want to use as the foreground color, then select the Bucket Fill Tool and click the inside of the circle.[1]


Creating a Borderless Circle
-
1Click the Ellipse Select Tool in the Toolbox. While this tool is normally creating an ellipse-shaped selection, you can use it to create circles as well. You'll find this tool in the upper-left corner of the Toolbox window.
-
2Start creating an ellipse by clicking and dragging. Click and drag on your canvas to begin creating an ellipse shape.
-
3Hold .⇧ Shift after you start dragging to create a circle. This will snap the ellipse into a perfect circle shape. Make sure to keep holding ⇧ Shift as you release your mouse button. If this doesn't work properly the first time, try starting a new ellipse.
- You can specify the exact size of the circle by using the "Size" fields in the "Tool Options" section of the Toolbox. Make sure the height and width are the same to make a perfect circle.
-
4Choose the color you want to fill the circle with. Click the foreground color box in the Toolbox to open the color picker. This color will fill the circle. The circle will be borderless.
-
5Click the Edit menu in the GIMP menu bar and select "Fill with FG color." The circle will fill with the color you selected.


Community Q&A
-
QuestionHow can I draw curvy lines in Gimp?
 Vincenzo PerniceCommunity AnswerSelect "Paths tools". When you click two or more times in different spots of your document, you create a line between two points (be sure that you are in the correct layer). Then click on this line, and drag this as you want to modify it into a curvy line.


About This Article

1. Click the Ellipse Select tool.
2. Click and drag to create the shape.
3. Hold Shift as you draw to create a perfect circle.
4. Click the Select menu.
5. Click To Path.
6. Click Select again and choose None.
7. Select a color and click Edit > Stroke Path.
8. Select your preferences and click Stroke.