This article was co-authored by Andrea Beaulieu and by wikiHow staff writer, Jessica Gibson. Andrea Beaulieu is a Professional Tailor, Fashion Designer, and the Owner of MOORE, a Brooklyn, New York based storefront and apparel workshop for gender-neutral, contemporary streetwear as well as custom-tailored products. Andrea has over 20 years in the fashion design and marketing industries and specializes in pattern making, draping, and the construction of garments. She holds a BS in Fashion Design and Merchandising from the University of North Carolina at Greensboro.
There are 10 references cited in this article, which can be found at the bottom of the page.
wikiHow marks an article as reader-approved once it receives enough positive feedback. In this case, several readers have written to tell us that this article was helpful to them, earning it our reader-approved status.
This article has been viewed 471,824 times.
Whether you've embroidered a pillow, mended a shirt, or sewn a blanket, you'll need to know how to end your stitching. If you're sewing by hand, simply make a loop into the last stitch you made and draw the needle through it. When you pull tightly, you'll make a knot that secures the stitch. Ending a stitch on a machine is even easier; just make a few backstitches and then cut the thread!
Steps
Hand-Stitching
-
1Flip the fabric over. Turn the material over so the wrong side is facing you. Any knots you make will be visible on this side, but not on the right side of the fabric. You should also be able to see the length of nearby stitches you just made.[1]
Tip: Try to leave at least 6 inches (15 cm) of thread on your needle so that you can secure a stitch without losing the end of the thread.
-
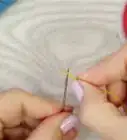
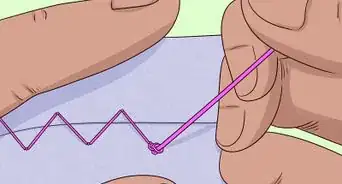
2Slide the needle under the nearest stitch and pull it to make a loop. Insert your needle under the stitch that's closest to your thread and pull it so it comes out the other side. Then, pull until the thread forms a loop that's at least 1 inch (2.5 cm) wide.[2]
- If you don't leave enough thread on the needle, it might be difficult to make the loop. To make it easier, tie more thread to the end of the thread on your needle. Then, slide the needle onto the extended thread.
Advertisement -
3Insert the needle through the loop and pull it tightly to make a knot. Bring the needle over the loop so the loop looks like a closed circle. Then, push the needle through the loop and keep pulling so the loop closes to form a knot.[3]
- If you pull the thread up at this point, you should see 3 small threads at the base of your knot.
-
4Tie the thread through another loop to double knot the stitch. If you're working with thick fabric or just want to ensure that the stitches are secure, insert your needle through the same stitch to make another loop. Then, pull the needle through the loop and pull it tightly to make another knot.[4]
- Remember that these knots won't be visible on the right side of your fabric.
-
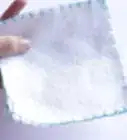
5Trim the excess thread and turn your fabric over. Take a pair of sharp scissors and cut close to the knot you just made. It's fine if a little thread sticks out from the stitch since you won't see this side of the fabric. Then, flip the fabric over to see the stitches you made.[5]
- Don't worry if you trim close to the knot; as long as you pulled the knot tight, it won't loosen over time.[6]


Machine-Stitching
-
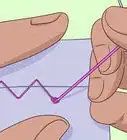
1Machine stitch your fabric until you're 3⁄4 inch (1.9 cm) from an edge. You can use any type of stitch you like, such as straight or zigzag. Sew until you almost reach the end of your fabric and you're ready to finish.[7]
- If you're not used to sewing and ending stitches on a machine, practice with a few scraps of fabric until you feel comfortable handling the machine.
-
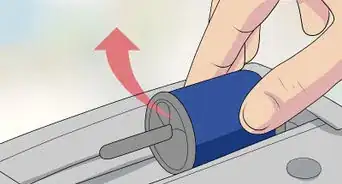
2Press the reverse button. Depending on the type of sewing machine you're using, the reverse button should be close to your stitch dial. It may look like a small circle with a u-turning arrow which indicates that the machine will make stitches in the reverse direction.[8]
- Some machines require you to hold down the reverse button while you're making the stitches. Check to see if you need to do this or if you only have to press the button to start and stop reverse stitching.
-
3Make 3 to 5 backstitches. Once you've pressed the reverse button, use the hand wheel or foot pedal to sew 3 to 5 backstitches. The machine will work these stitches directly over the straight or zigzag stitches that you already made. This will secure what you've just sewn.[9]
- The hand dial will give you more control than the foot pedal when making just a few stitches.
Tip: To make your end stitches even more secure, you can adjust your stitch length. Make them shorter so they don't pull out or unravel as easily as long ones.
-
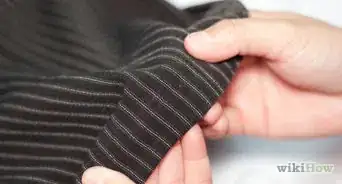
4Forward stitch to the end of the fabric. Let go of the reverse button and straight or zigzag stitch over the stitches you just made. Keep stitching until you reach the edge of the fabric. Your stitches are now locked in place.[10]
- The end of your fabric will now have 3 lines of thread that overlap to end the stitch.
-
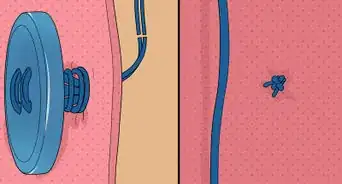
5Lift up the needle and cut the thread. Use the handwheel to lift the needle and lift the presser foot lever up. Now you can slide your sewn fabric out from under the needle and cut the thread near the last stitch.[11]
- Some machines have a small thread cutter built into the side of the machine. To use this cutter, press the thread down on the blade to trim it.
Expert Q&A
-
QuestionHow do you end a stitch on a sewing machine?
 Andrea BeaulieuAndrea Beaulieu is a Professional Tailor, Fashion Designer, and the Owner of MOORE, a Brooklyn, New York based storefront and apparel workshop for gender-neutral, contemporary streetwear as well as custom-tailored products. Andrea has over 20 years in the fashion design and marketing industries and specializes in pattern making, draping, and the construction of garments. She holds a BS in Fashion Design and Merchandising from the University of North Carolina at Greensboro.
Professional Tailor & Fashion DesignerCut your thread close to the fabric, not the needle. That way, your machine will still be set up to stitch. If you cut too close to the needle, you could pull out the thread. -
QuestionWhy do my ending stitches keep coming loose when I'm using a machine?Andrea BeaulieuAndrea Beaulieu is a Professional Tailor, Fashion Designer, and the Owner of MOORE, a Brooklyn, New York based storefront and apparel workshop for gender-neutral, contemporary streetwear as well as custom-tailored products. Andrea has over 20 years in the fashion design and marketing industries and specializes in pattern making, draping, and the construction of garments. She holds a BS in Fashion Design and Merchandising from the University of North Carolina at Greensboro.
Professional Tailor & Fashion DesignerBefore you end your stitches, back stitch a few times, then go forward to the end of the fabric again. This will secure your thread so it won't unravel. -
QuestionI'm confused. When I make the loop, do I pull through both pieces of fabric or just the one? Like when I make it a loop, do I just do one layer of fabric? I'm used to a sewing machine.
 Cathy MackenzieCommunity AnswerLoop? As in back stitch loop to end a stitch? Both pieces of fabric for strength, in my opinion.
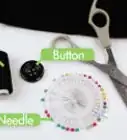
Things You'll Need
Hand-Stitching
- Thread
- Needle
- Fabric
- Scissors
Machine-Stitching
- Sewing machine
- Fabric
References
- ↑ https://www.stitchandsew.net/end-stitch-sewing-hand/
- ↑ https://youtu.be/f58woIqfz3o?t=6
- ↑ https://youtu.be/f58woIqfz3o?t=15
- ↑ https://youtu.be/f58woIqfz3o?t=26
- ↑ https://youtu.be/f58woIqfz3o?t=40
- ↑ Andrea Beaulieu. Professional Tailor & Fashion Designer. Expert Interview. 1 May 2020.
- ↑ http://www.sewing.org/learn_to_sew/learn-to-sew-securing-stitches.html
- ↑ https://youtu.be/QVfyNZmJOzk?t=243
- ↑ Andrea Beaulieu. Professional Tailor & Fashion Designer. Expert Interview. 1 May 2020.
About This Article

To end a stitch when you're sewing by hand, make sure to leave about 6 inches of excess thread. Then, insert the needle under the nearest stitch and pull it until it forms a loop that's at least 1 inch wide. After you make the loop, insert the needle through the loop and pull it tight to create knot. If you're working with thick fabric or want extra security, insert your needle through the same stitch, make another loop, and pull the needle through the loop to knot it again. Finally, cut the extra thread close to the knot you just made so the back of the fabric looks clean. For tips on ending a stitch using a sewing machine, keep reading!