This article was co-authored by Kpoene Kofi-Bruce. Kpoene Kofi-Bruce is a tailor, couture wedding gown designer, and the Creative Director of Mignonette Bridal and Ette the Wedding Tailor in Chicago, Illinois. With nearly two decades of experience as a wedding gown designer, small business owner, and vintage sewing enthusiast, Kpoene specializes in wedding gown design and the social history of wedding dresses. She received a BA in Creative Writing from Middlebury College and studied the business of fashion at the Fashion Institute of Technology. She is also a graduate of the Goldman Sachs 10KSB program and the Chicago Fashion Incubator and has written about wedding fashion for Jezebel, Catalyst, the Sun Times, and XO Jane.
There are 9 references cited in this article, which can be found at the bottom of the page.
This article has been viewed 418,056 times.
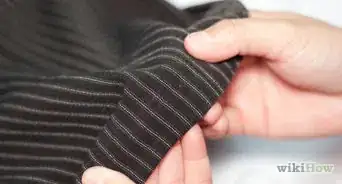
Torn seams are among the most common problems plaguing sewn goods, and can happen with just about any type of fabric, from low-end to high-end. Although a torn seam can be a frustrating obstacle to encounter, fixing a torn seam is typically a simple and easy process, and will have your damaged item back to good as new in a hurry. To mend a torn seam, you must located and identify the tear, identify the type of fabric you are working with, choose the correct hand stitch to repair the seam with, or repair the garment with a machine.
Steps
Repairing the Seam by Hand
-
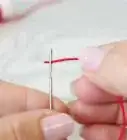
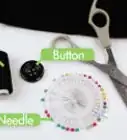
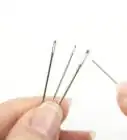
1Gather a needle and thread. Choose a needle and thread according to the item you are trying to repair. If you are working with a delicate fabric such as chiffon, lace, or silk, choose a thin needle and correspondingly thin thread.[1] If you are working with a heavier fabric, such as denim or canvas, you will need a thick needle and thick thread. If the seam will be visible, be sure to choose a color corresponding to the surrounding fabric.[2]
-
2Thread the needle. Loop the thread through the eye of your needle. If the edge of the thread is frayed or otherwise impaired, trim back until the thread is smooth with a blunt end. If necessary, wet the end of the thread before passing through the head of the needle.[3]
- You can either loop a single piece of thread through the eye of the needle, or two ends of the thread to create a thicker sewing tool. As can be expected, a thicker gathering of thread will be better for heavy-duty fabrics.
Advertisement -
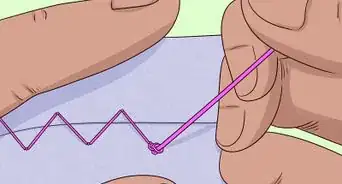
3Cut the thread, leaving several inches of extra space. When measuring the amount of thread to use, double the length of the seam, and add another inch or two. While you may wind up with too much thread, it is far better to have too much thread than to have too little, as you may be able to see where your stitch starts and stops in the middle of the torn area.[4]
-
4Choose your stitch. Different stitches work well for different fabrics and problems. A simple whip stitch is wonderful for delicate fabric, while a running stitch will do well with a sturdy fabric. If you are dealing with an exposed seam, a backstitch will provide a discreet means of repair.[5]
- If you are a beginner, a running stitch is likely to be the easiest option, as it involves going in a single, straight line.
- A backstitch is another good beginner option. To backstitch, push your needle through the fabric, pull your thread all the way through, and push your needle up through the bottom of the fabric ¼ an inch (.635 cm), before placing your needle at your starting point and pulling the thread all the way through again. Continue this process to create a clean backstitch.
-
5Repair your seam. Once you’ve chosen your stitch, begin to repair your seam, holding the fabric taut to prevent wrinkling or snagging. Try to keep your stitches as even and uniform as possible, favoring a tighter stitch rather than a loose one. While a loose stitch will be faster and easier, you run the risk of the repaired seam weakening and reopening quickly.[6]
-
6Finish with a firm knot. Once you have reached the edge of the torn seam, tie a firm knot to prevent further fraying and damage. If your knot is too loose, your newly-repaired seam may begin to unravel, while a tight knot may cause snagging. Smooth the fabric to make sure there are no wrinkles or problems, then tie a knot to lie flush against the fabric.
- Tying the knot will be easier if you keep the needle intact and pull the needle through the loop you’ve made for your knot. This is especially true if you have only an inch or so of extra thread.
-
7Test the result. Turning the fabric right-side-out, gently pull apart the area you’ve mended, making sure there are no ripples, remaining holes, or snags. If you do find a snag, use a seam-ripper to remove your thread, and start again.
- While you do want to check to make sure your seam is solid, avoid yanking on the seam, as this can damage even the most well-constructed item of clothing.


Repairing With a Sewing Machine
-
1Wind your bobbin with the appropriate color. Choose the color that best suits your seam, whether it is visible or not. Although the color may not seem important initially, if the fabric in question is even a tiny bit sheer, a dark or light thread will be immediately visible. Choose a color as close to the fabric or existing thread as possible.
-
2Choose your sewing machine’s settings. New and old sewing machines come with a wide array of settings, ranging from the length of a stitch to the type of stitch being used. Consult your machine’s manufacturer’s booklet or instruction manual to determine how to choose a setting, and which setting is the optimal setting for your fabric.[7]
-
3Place the fabric beneath the machine’s foot. Place the fabric in need of repair below the foot, beginning ¼-½ inch in front of the torn seam. If possible, line the existing thread up with the machine’s needle to keep the appearance of the seam uniform.
-
4Slowly feed your fabric through the machine. Gently press down on the machine’s pedal, feeding your fabric through the machine carefully and slowly. Again, though you may think it is best to get the job done quickly, the needle could snag even a thick fabric if it is passed through too quickly. Take your time.
- Remove your pins as you go, making sure they do not pass beneath the machine’s needle. Although it could skip over the pin, you run the risk of breaking the needle when it hits the pin.
-
5Run back over the final ½ inch (1.27 cm) of the fabric. Once you have reached the end of the tear, go back over your fabric to close the thread loop. Once you have done that, lift the foot, and remove the fabric from beneath the foot.[8]
- ½ an inch (1.27 cm) is more than enough space. Going over any more of the fabric may result in accidentally ripping up your repaired stitches.
-
6Remove excess thread. Snip the thread from the bobbin and needle, and trim any excess fabric or thread from the newly-mended area. If there are frayed edged, be sure to trim those too, as leaving a frayed edge behind could result in additional fraying.[9]
- Be sure to remove your fabric from the machine slowly; you must cut the thread from the bobbin and needle before trimming up any leftover thread.


Expert Q&A
-
QuestionHow do you sew French seams?
 Kpoene Kofi-BruceKpoene Kofi-Bruce is a tailor, couture wedding gown designer, and the Creative Director of Mignonette Bridal and Ette the Wedding Tailor in Chicago, Illinois. With nearly two decades of experience as a wedding gown designer, small business owner, and vintage sewing enthusiast, Kpoene specializes in wedding gown design and the social history of wedding dresses. She received a BA in Creative Writing from Middlebury College and studied the business of fashion at the Fashion Institute of Technology. She is also a graduate of the Goldman Sachs 10KSB program and the Chicago Fashion Incubator and has written about wedding fashion for Jezebel, Catalyst, the Sun Times, and XO Jane.
Couture Bridal DesignerYou will need the following items iron, a pair of small very sharp scissors, pins, and a cutting surface. The first step would be to place your fabric with the wrong sides facing each other you are sewing your first seam on the outside of the garment. Sew your seams together as usual. Then take your scissors and cut away the seam allowance, leaving about ⅛” of the material left. Next, fold your fabric together at the seam so that what you just sewed is sandwiched between the two layers of fabric. (your right sides should be together now). Press with the iron along that seam line. Pin if needed to keep the seam nice and straight. Next, sew along that seam line again, using your normal seam allowance. When you are done, press along the seam with the iron. This is a difficult process, therefore I recommend practicing before you cut your actual fabric. -
QuestionWhat should I do if I don't have any thread and needle? Can I use hot glue?
 Heather Kenyon-HaffTop AnswererHot glue may or may not work, depending on the hot glue and fabric. It may discolor the fabric. It will leave a glue residue that may be hard, sharp or uncomfortable against the skin. It also may be a temporary fix.
 -
QuestionHow do I repair a large hole?
 Community AnswerRepairing a large hole requires the same process as a small one, but may require more finesse. Instead of hand-stitching, use a sewing machine to repair a large hole, as the stitches on a sewing machine will be easier to keep uniform and small. To use a machine, turn your fabric inside-out, align the torn area, and run your sewing needle over the hole. Finish up by going back over the final 1/2 inch (1.27 cm) of the mend to close the stitch.
Warnings
- If at all possible, avoid quick fixes such as staples and loose stitches. Both can cause damage to the fabric.⧼thumbs_response⧽
- Make sure to read your instruction manual before using a larger or smaller needle with your sewing machine; some machines require certain brands and installation techniques.⧼thumbs_response⧽
- If the seam is torn and thoroughly shredded, you may need to visit a seamstress for a patch or repair.⧼thumbs_response⧽
References
- ↑ Kpoene Kofi-Bruce. Couture Bridal Designer. Expert Interview. 28 January 2021.
- ↑ https://dengarden.com/interior-design/Leather-Seam-Repairs-Made-Easy
- ↑ http://www.startsewing.co.uk/howtomendrippedseam.html
- ↑ http://marysews.com/alteration-tip-access-points-lined-garments/
- ↑ http://lifehacker.com/five-basic-hand-stitches-you-should-know-for-repairing-1723233194
- ↑ http://www.valetmag.com/style/how-tos/2012/mend-a-ripped-seam-090512.php
- ↑ http://sympathink.com/reviews/best-sewing-machine/
- ↑ https://www.theguardian.com/lifeandstyle/2014/may/22/how-to-mend-a-ripped-seam
- ↑ https://www.ifixit.com/Guide/How+to+Repair+a+Torn+Seam+in+your+Patagonia+Clothing/19464
About This Article

To repair a torn seam, try using a needle and thread. First, put some thread that's about twice as long as the seam onto the needle to make sure you've got enough for the stitches. Then, sew the seam closed, making the stitches as small as possible for a professional look. For a faster approach, use a sewing machine. Start by winding thread around your bobbin that's as close to the color of your garment as possible. this will ensure that your repair is less visible when it's done. Then, slowly feed your fabric through the machine as it sews the seam closed. For tips on how to set your sewing machine to repair a seam, keep reading!