This article was co-authored by Seleh Rahman. Seleh Rahman is a Tailor, Furrier, and the Owner of Seleh de Federal Hill in Baltimore, Maryland. With over 45 years of experience, Seleh specializes in fur, alterations, and fashion illustration. Seleh studied Fashion Design and Tailoring at Bay College of Maryland. He holds certifications in fur, design, and tailoring.
There are 14 references cited in this article, which can be found at the bottom of the page.
This article has been viewed 34,160 times.
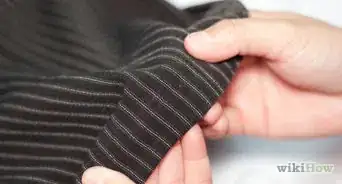
Whether you have lost a coat button, or want to update a coat with new buttons, you can easily sew buttons onto your coat. This is a simple hand-sewing task that anyone can complete in a matter of minutes. Choose the buttons you want to sew onto the coat and get started!
Steps
Attaching the Button
-
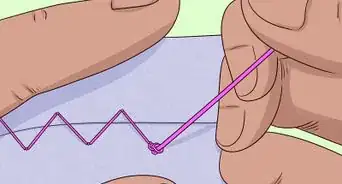
1Thread a needle and tie a knot at the end. Cut an 18 in (46 cm) length of thread. Insert the freshly-cut end of the thread through the eye of the needle. Pull the end of the thread through the eye until the ends are even. Then, tie a double knot to secure the 2 ends of thread together.[1]
- Make sure to choose a matching color 100% polyester thread to sew buttons onto your coat. This is a strong, durable thread that will keep your buttons secure.
Tip: If you have trouble getting the thread to go through the eye, lick the end, wet it with a drop of water, or rub the thread against the side of a candle. This will stiffen the thread and make it easier to push it through the eye.
-
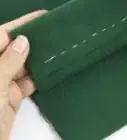
2Mark the location of the button with a pin or chalk. Find the spot on the coat where you want to sew on the first button. Then, insert a pin through the coat fabric at this location. Push the pin through going from the front to the back of the fabric. Or, if you prefer, make a mark on the front and back of the fabric with a piece of chalk.[2]
- Use a pin or chalk to mark the locations of any other buttons you need to sew onto the coat.
Advertisement -
3Push the needle up through the back of the coat next to the pin. Insert the needle into the fabric right next to the pin or through the chalk mark. Pull the needle all the way through the fabric. Then, pull until the thread is taut and the knot is up against the back of the coat fabric.[3]
- Remove the pin after you have inserted the needle through the fabric.
- Be careful not to pull on the thread too hard or the knot might come through the coat fabric.
-
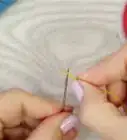
4Insert the end of the needle through 1 of the button holes. Hold the needle so that the front side is facing out and the back side is facing the coat fabric. Then, push the needle up through 1 of the holes in the button. Bring the thread all the way through the hole until the button is pressed against the coat fabric.[4]
- Hold the button in place with your thumb until you have finished securing it.
-
5Place a toothpick over the button to provide some slack in the thread. Lay a toothpick across the top of the button. Position the toothpick so that you will have to sew over it to go through the next button hole. Hold the toothpick in place with your thumb.[5]
- The toothpick will help to ensure that you do not sew the button on too tightly, which could make it hard to button the coat.
- If you don't have a toothpick, then a pin will also work.
-
6Bring the needle back down through the opposite button hole. Find the button hole directly across from the button hole that you sewed up through. Push the needle down through this hole and into the coat fabric directly beneath it. Pull the needle until the thread is all the way through the fabric and taut against the toothpick.[6]
- When sewing on 4-hole buttons, make sure to check the other buttons on the coat to see how the stitches are oriented. They may be criss-crossing each other or side-by-side. Use the same technique when you sew on additional buttons.[7]
-
7Sew up through the coat fabric and button hole again. Go through the same button hole for a 2-hole button, or go through an adjacent button hole for a 4-hole button. Follow the same stitch pattern as the other buttons on the coat if you are sewing on 4-hole buttons.[8]
- After your second stitch, remove the toothpick by sliding it out from under the stitches.
-
8Continue sewing through the button holes and fabric 3 more times. Repeat the same process to continue sewing the button onto the coat. Do a total of 3 to 4 stitches for each button hole to ensure that your button will be secure.[9] [10]
- Repeat the sewing process for any additional buttons you want to sew onto the coat.


Securing the Button
-
1Push the needle back up through the fabric. After you have finished sewing through the button holes 3 or 4 times, insert the needle through the back side of the coat fabric under the button. However, do not bring the needle up through a button hole this time. Bring the needle up through the fabric and out to the side of the button. Pull the needle until the thread is taut.[11]
-
2Wrap the thread around the base of the button 3 times. This will form a shank around the base of the button, which will make the button more secure and also make it easier to fasten. Move the needle in a counterclockwise motion around the base of the button.[12] [13]
Tip: Keep the thread taut as you wrap it around the base of the button, but don't pull too hard or the thread may break.
-
3Insert the needle back down through the fabric. Push the needle into the fabric under the button, but not through a button hole. Try to insert the needle through the fabric right next to where you brought it out. Pull until the thread is taut.[14]
-
4Cut the thread and tie the ends in a knot. Cut the thread right next to the eye of the needle. Then, separate the 2 strands and tie them together 2 times to form a knot. Cut the excess thread about 0.25 in (0.64 cm) from the knot.[15]
- Your button is secured! Repeat the process for any additional buttons you want to sew onto your coat.


Expert Q&A
-
QuestionWhat supplies do you need to sew a button?
 Seleh RahmanSeleh Rahman is a Tailor, Furrier, and the Owner of Seleh de Federal Hill in Baltimore, Maryland. With over 45 years of experience, Seleh specializes in fur, alterations, and fashion illustration. Seleh studied Fashion Design and Tailoring at Bay College of Maryland. He holds certifications in fur, design, and tailoring.
Professional Tailor & FurrierYou'll need thread, a needle, and button backing. The button backing goes on the back of the coat and helps provide some extra security. -
QuestionCan I skip backing on a thick wool coat?Seleh RahmanSeleh Rahman is a Tailor, Furrier, and the Owner of Seleh de Federal Hill in Baltimore, Maryland. With over 45 years of experience, Seleh specializes in fur, alterations, and fashion illustration. Seleh studied Fashion Design and Tailoring at Bay College of Maryland. He holds certifications in fur, design, and tailoring.
Professional Tailor & FurrierNo, you have to have a button backing if you're going to secure the button firmly. You're going to run out of room in the button to run thread through the holes enough times to fix them in place strongly. -
QuestionHow many times should I be running thread through the 4 holes on the front of a button?Seleh RahmanSeleh Rahman is a Tailor, Furrier, and the Owner of Seleh de Federal Hill in Baltimore, Maryland. With over 45 years of experience, Seleh specializes in fur, alterations, and fashion illustration. Seleh studied Fashion Design and Tailoring at Bay College of Maryland. He holds certifications in fur, design, and tailoring.
Professional Tailor & FurrierYou typically want to aim for about 3-4 loops. You won't have a whole lot of room for more than that, but 1-2 loops will be too weak a lot of the time.
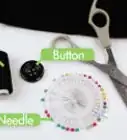
Things You'll Need
- Needle
- 100% polyester thread
- Scissors
- Pin
- Toothpick
- Button
References
- ↑ https://www.youtube.com/watch?v=wGLvyP2llvg&feature=youtu.be&t=17
- ↑ https://www.youtube.com/watch?v=NsnQIIIj9NE&feature=youtu.be&t=21
- ↑ https://www.youtube.com/watch?v=NsnQIIIj9NE&feature=youtu.be&t=34
- ↑ https://www.youtube.com/watch?v=NsnQIIIj9NE&feature=youtu.be&t=42
- ↑ https://www.realsimple.com/beauty-fashion/clothing-care/sew-button-on-jacket?slide=110619#110619
- ↑ https://www.youtube.com/watch?v=wGLvyP2llvg&feature=youtu.be&t=75
- ↑ https://www.youtube.com/watch?v=wGLvyP2llvg&feature=youtu.be&t=65
- ↑ https://www.youtube.com/watch?v=wGLvyP2llvg&feature=youtu.be&t=86
- ↑ https://www.youtube.com/watch?v=wGLvyP2llvg&feature=youtu.be&t=102
- ↑ Seleh Rahman. Professional Tailor & Furrier. Expert Interview. 25 June 2021.
- ↑ https://www.youtube.com/watch?v=wGLvyP2llvg&feature=youtu.be&t=110
- ↑ https://www.realsimple.com/beauty-fashion/clothing-care/sew-button-on-jacket
- ↑ Seleh Rahman. Professional Tailor & Furrier. Expert Interview. 25 June 2021.
- ↑ https://www.youtube.com/watch?v=wGLvyP2llvg&feature=youtu.be&t=130
- ↑ https://www.youtube.com/watch?v=wGLvyP2llvg&feature=youtu.be&t=143
About This Article