This article was co-authored by Jason Phillip. Jason Phillip is a handyman specializing in mounting and hanging objects onto walls. With over five years of experience professionally mounting and installing objects through his company, Jason's Handyman Services, Jason's work includes working with mounting window AC units, designing art gallery walls, installing kitchen cabinets, and replacing light fixtures on drywall, brick, and plaster. He has been rated a "Top Pro" every year since 2016 by Thumbtack for being one of the highest-rated, most popular professionals on Thumbtack.
There are 7 references cited in this article, which can be found at the bottom of the page.
This article has been viewed 49,816 times.
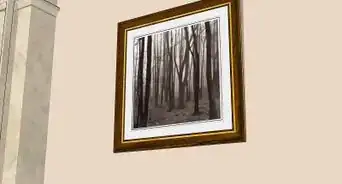
Acrylic prints are a fabulous way to level up any interior space. They're resilient, chic, and simple to hang. Most acrylic prints come with standoff bolts, which are easy to install and make your print appear as if it's floating on the wall. You can also hang acrylic prints using French cleats, hooks, or wire, and we'll show you how to use each of these methods to proudly display your new art.
Steps
Standoff Bolts
-
1Position the acrylic print on the wall and make sure it's level. Before you can start installing the acrylic print with standoff bolts, decide where you'd like to place it on the wall. If the acrylic print is large, have someone help you. Position the acrylic print on the wall where you'd like it to be placed and use a level to make sure all of the sides are even.[1] [2]
- For large prints, have the second person hold the acrylic print up against the wall while you use the level, or vice versa.
-
2Mark the 4 pre-drilled holes using a pencil. When you order an acrylic print from a company, they should have drilled holes into the acrylic print in each of the corners for you. After the print is positioned on the wall, use a pencil to trace the edges of each pre-drilled hole so that you'll know where to place the anchors. You should end up with 4 circles on the wall.[3]
- If you're installing a large acrylic print, have one person hold the print up against the wall while you trace the holes.
- You can put the acrylic print down once you've finished tracing the holes.
Advertisement -
3Drill the anchors into the wall where the circles are drawn. The circles that you outlined are where you'll place each anchor. Use a drill to drill in each anchor, making sure they're flush against the wall. If your acrylic print didn't come with anchors, you can purchase drywall anchors at a home improvement store or online.[4] [5]
-
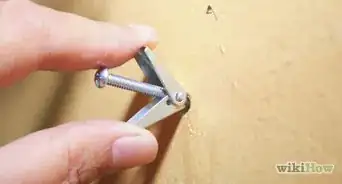
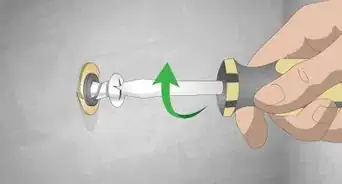
4Unscrew the standoff bolt and slide the wall screw through the base. Standoff bolts come in 2 main pieces. Unscrew the standoff cover and set it down for safe keeping — this is the smaller of the 2 main pieces. Take the base of the standoff bolt, or the larger piece, and put a wall screw through it so that it's ready to be installed into the wall.[6]
- Standoff bolts should come with your acrylic print if you ordered this type of installment.
-
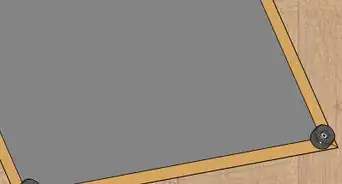
5Use a drill to attach the standoff bolt to the wall. Position the base of the standoff against the wall, right on top of the anchor. Using the wall screw that you slid through the base, drill the base into the wall. Make sure that it's nice and tight against the wall so that it can support the weight of the acrylic print.[7]
- Repeat this process with all of the other standoff bases, making sure they're all drilled into the wall snugly.
-
6Place the acrylic print on the wall using the bases to line it up. Position the acrylic print onto the wall, lining up the bolts where the pre-drilled holes are in the acrylic print. Have someone else hold the acrylic print on the wall so that you're free to attach the covers, or vice versa.[8]
-
7Put on the protective washers and screw the caps into the bases. The standoff bolts should come with slim, clear protective washers. Place those on the standoff caps before screwing them into the bases. When screwing in the caps, don't tighten them completely.[9]
-
8Check to make sure the print is level and tighten the caps. Use a level to make sure that your acrylic print is straight, and make any necessary adjustments. Once you're satisfied with the position of the print, tighten the standoff caps so that they won't come undone.[10]


Wire
-
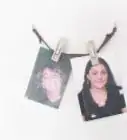
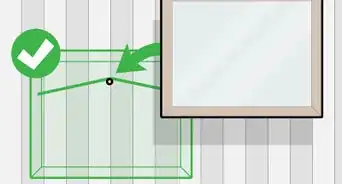
1Measure the distance from the top of the print to the wire, if desired. If you'd like to be as exact as possible in your placement of the acrylic print, you'll need to measure it beforehand. Use a tape measure or ruler to measure the distance from the top of the acrylic print to the wire. Pull up on the wire so that it resembles how it will when it's hanging. This will help you get a more accurate measurement.[11]
- If you plan on using 1 piece of hardware to hold up the print, pull upwards in the middle of the wire. If you plan on using 2 pieces of hardware, position 2 fingers where the hardware would be installed and pull up on the wire to help your measurement.
-
2Mark where the hardware should be installed on the wall. Use a pencil to mark where you're going to drill in the screw, nail, hook, or other piece of hardware to hold up the print. Use a level to make sure your markings are even if you're installing more than 1 piece of hardware.[12]
-
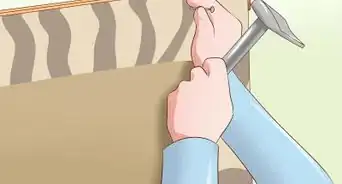
3Install the appropriate hardware into the wall to hold your acrylic print. Choose hardware that will support the weight of your acrylic print. For example, hooks are best for lighter prints while nails and screws are good for heavier prints. Use a hammer, screwdriver, or drill to install the hardware into the wall securely.[13]
- Read the box that the hardware comes in to see how much weight the hardware can hold.
-
4Hang the print on the wall using the wire. Once the hardware is installed, all you have to do is hang the acrylic print on the wall! Position the print so that the wire is hanging securely on the installed hardware. Adjust the acrylic print so that it's level and straight.[14]


Hooks with Aluminum Mounts
-
1Position and mark the acrylic print on the wall. Decide where you'd like to hang the acrylic print and position it on the wall. Use a level to make sure the print is straight. Once you're holding it where you'd like it to hang, mark the top of the print on the wall using a pencil.[15]
- When marking the wall, you only need to draw a few short lines to indicate where the top of the print ends. Press lightly when using the pencil to avoid leaving dark marks.
-
2Measure the distance from the top of the print to the aluminum strip. To figure out where to install the hooks, you'll need to do some measuring. Use a ruler or tape measure to measure the distance from the top of the acrylic print to the spot where a hook would be in the aluminum strip. Write down the measurement so that you don't forget.[16]
-
3Mark where the hooks should go using a pencil and level. Use the measurement you took to mark where the hooks should be placed using a pencil. You can either draw a light, horizontal line to indicate where hooks should go, or draw little dots for each individual hook. Use a level to make sure you'll be hanging the print evenly with the hooks.[17]
- How many hooks you have will depend on how large and heavy your print is. If your acrylic print came with hooks, use the recommended amount.
-
4Use a drill to install the hooks in the wall. Once you've marked where they should all go, drill the hooks into the wall using screws. Screw the hooks in tightly against the wall to ensure they'll be able to carry the weight of your print.[18]
-
5Hang the acrylic print on the wall using the hooks. If you've finished installing the hooks, it's time to hang the print on the wall. Hang the print by hooking the aluminum strip to the hooks. Make sure all of the hooks are engaged and the print is even.[19]


French Cleats
-
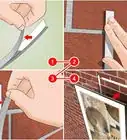
1Use a level to position the back mount on the wall. Decide where you'd like your acrylic print to hang, and hold up the back mount to the wall. Use a level to make sure the back mount is even.[20]
-
2Mark the screw holes to see where the anchors will be drilled. While holding the back panel up against the wall evenly, use a screw to mark where the anchors will go. Either push the screw through the screw hole slightly so that it makes an indentation in the wall, or drill the screw into the wall just enough so that it makes a small hole before taking the screw back out.[21]
-
3Drill the drywall anchors into the wall. Using the indentations from the screws as your guide, drill the drywall anchors into the wall. They should be drilled in right where you marked the holes. Make sure the drywall anchors are flush against the wall.[22]
-
4Place the back mount on the wall, aligning it with the drywall anchors. With the drywall anchors drilled into the wall, position the back mount on the wall as well. The beveled side of the back mount should be facing the wall and the flat side should face you. Make sure the screw holes line up with the wall anchors.[23]
-
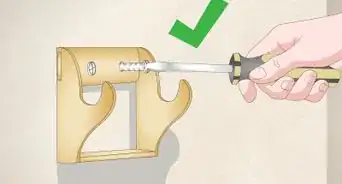
5Slide the screws into the holes and drill them into the drywall anchors. Once the back mount is aligned with the anchors, slide the screws into the holes of the back mount. Drill the screws into the anchors completely, making sure the back mount is stable and snug against the wall.[24]
-
6Hang the acrylic print on the wall by sliding it on the back mount. The beveled side of the back mount should line up with the beveled part of the acrylic print. Simply hang the print on top of the mount and it should slide right into place.[25]


References
- ↑ Jason Phillip. Handyman. Expert Interview. 2 July 2020.
- ↑ https://www.youtube.com/watch?v=UPcKaHiOUxs
- ↑ https://www.youtube.com/watch?v=UPcKaHiOUxs
- ↑ Jason Phillip. Handyman. Expert Interview. 2 July 2020.
- ↑ https://www.youtube.com/watch?v=UPcKaHiOUxs
- ↑ https://www.bigacrylic.com/standoff-info/
- ↑ https://www.youtube.com/watch?v=UPcKaHiOUxs
- ↑ https://www.youtube.com/watch?v=UPcKaHiOUxs
- ↑ https://www.youtube.com/watch?v=UPcKaHiOUxs
- ↑ https://www.youtube.com/watch?v=UPcKaHiOUxs
- ↑ https://www.todayshomeowner.com/hanging-pictures-right-the-first-time/
- ↑ https://www.todayshomeowner.com/hanging-pictures-right-the-first-time/
- ↑ https://www.todayshomeowner.com/hanging-pictures-right-the-first-time/
- ↑ https://www.todayshomeowner.com/hanging-pictures-right-the-first-time/
- ↑ https://www.youtube.com/watch?v=QRrswqddiew
- ↑ https://www.youtube.com/watch?v=QRrswqddiew
- ↑ https://www.youtube.com/watch?v=QRrswqddiew
- ↑ https://www.youtube.com/watch?v=QRrswqddiew
- ↑ https://www.youtube.com/watch?v=QRrswqddiew
- ↑ https://www.youtube.com/watch?v=L7al2QN0XmM
- ↑ https://www.youtube.com/watch?v=xQofD63-ea8
- ↑ https://www.youtube.com/watch?v=L7al2QN0XmM
- ↑ https://www.youtube.com/watch?v=L7al2QN0XmM
- ↑ https://www.youtube.com/watch?v=L7al2QN0XmM
- ↑ https://www.youtube.com/watch?v=L7al2QN0XmM
About This Article