This article was co-authored by wikiHow staff writer, Glenn Carreau. Glenn Carreau is a wikiHow Staff Writer, currently based in Los Angeles. With over four years of experience writing for several online publications, she has covered topics ranging from world history to the entertainment industry. Glenn graduated with honors from Columbia College Chicago, earning a B.A. in Interactive Arts and Media and a minor in Professional Writing. Today, Glenn continues to feed her lifelong love of learning while serving wikiHow's many readers.
There are 7 references cited in this article, which can be found at the bottom of the page.
This article has been viewed 81,967 times.
Learn more...
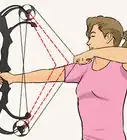
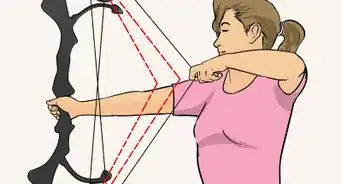
Are you hoping to hone your archery talents but aren't sure of the right way to hold your bow? You're not alone. There are many misconceptions about bow grip, and we're here to clear them up. Developing a proper archery grip is pretty simple, yet it has a considerable effect on your ability to shoot arrows! Read on for a comprehensive guide to holding an archery bow.
Steps


Community Q&A
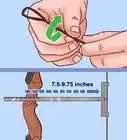
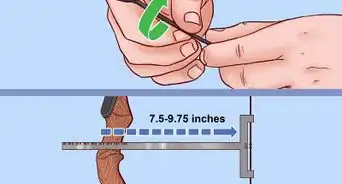
-
QuestionHow do I hold the arrow?
 Community AnswerYou don't. Just hold the handle and put the arrow in its holder and clip it to the straight string in front of the loop. If you have a release, clip that onto the loop itself. Then pull the latch on the release, or use your fingers and let go. (Assuming you have a compound bow.)
 -
QuestionI am ambidextrous. Which hand do I use?
 Community AnswerIt depends on whether or not your bow is a left or right handed bow. If it doesn’t make a difference, then choose whichever side is more comfortable. I would suggest to use your left hand on the grip on the bow because most bows are made for that hand—I would say the majority of the population is right handed, and in some countries the left hand is “unholy.”


References
- ↑ https://legendarchery.com/blogs/archery-bowhunting-blog/115639172-easy-ways-to-grip-your-compound-bow-properly
- ↑ https://archeryforbeginners.com/blog/left-or-right-hand-bow/
- ↑ https://archery360.com/2019/05/08/form-breakdown-grip/
- ↑ https://archery360.com/2019/05/08/form-breakdown-grip/
- ↑ https://archery360.com/2019/05/08/form-breakdown-grip/
- ↑ https://archery360.com/2019/05/08/form-breakdown-grip/
- ↑ https://archery360.com/2019/05/08/form-breakdown-grip/
- ↑ https://youtu.be/fN2wTXMWCH0?t=237
- ↑ https://www.mossyoak.com/our-obsession/blogs/how-to/10-archery-tips-from-11-time-repeat-asa-shooter-of-the-year-levi-morgan
About This Article