wikiHow is a “wiki,” similar to Wikipedia, which means that many of our articles are co-written by multiple authors. To create this article, 20 people, some anonymous, worked to edit and improve it over time.
There are 8 references cited in this article, which can be found at the bottom of the page.
wikiHow marks an article as reader-approved once it receives enough positive feedback. In this case, 87% of readers who voted found the article helpful, earning it our reader-approved status.
This article has been viewed 199,452 times.
Learn more...
Archery has become a popular sport recently. The recurve bow’s popularity is in part due to it being the weapon of choice for Katniss Everdeen, the protagonist of The Hunger Games. By choosing the right bow and arrows for your body and purpose, along with practice and coaching, you will be able to hit targets accurately and consistently.
Steps
Selecting a Bow
-
1Decide on the purpose of your bow. Recurve bows are used for one of two purposes: for target archery or for hunting. These bows are essentially the same, with one fundamental difference: the draw weight. This is the amount of power you’ll need to draw the bow. Decide if you’ll use your bow primarily for target archery or for hunting.[1]
- Your bow will need a higher draw weight for hunting.
-
2Choose a suitable draw weight. Draw weight on a bow correlates to how hard you have to pull in order to draw back the string on the bow. To select your ideal draw weight an adult beginner should start between 18 and 24lbs of draw weight. Children should start even lower. [2]
- Choosing a low draw weight will result in less speed and power in your shooting but will allow you to get proper form and technique.
- If you're a beginner, shoot with a lighter bow with regard to the draw weight. Don't choose a bow that's too hard to pull back. If it seems too easy, move up a weight.
- Younger people should also choose a lower draw weight.
Advertisement -
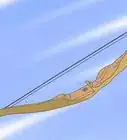
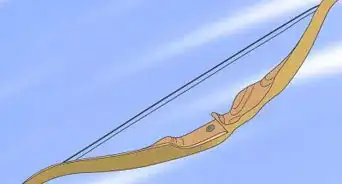
3Opt for a bow length that, when placed on the ground sits with the end of the top limb between your nose and forehead. Bows come in different lengths. The average teenager and adult should use a 66 or 68 inch bow. [3]
-
4Decide if you want a take-down bow. A take-down bow is one that dismantles for easy portability. The bow’s two limbs can be separated from the rest of the bow. This also allows for easier servicing of the bow.
- A take-down bow also makes the draw weight flexible. You don’t need to buy a whole new bow if you decide to raise your draw weight; rather, you’d just need to purchase new limbs for the bow.[4]
-
5Try out a few different bows. It is a good idea to see how well you can hold and shoot a bow before you settle on purchasing it. Try out some different options at a local archery shop. This place will likely have several sample brands and styles.
-
6Ask an expert to fit you for a bow. If you are going to purchase a bow, consult an expert at the sporting goods store to fit you for a bow that takes height, draw strength, and handedness into consideration.


Choosing Arrows for Your Bow
-
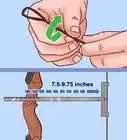
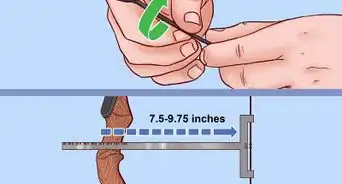
1Measure your draw length. Your draw length is the length that your arm can draw the bowstring back in order to shoot the arrow. Spread your arms out to either side of your body and hold them parallel to the ground. Have someone measure the exact number of inches from one middle fingertip on one arm to the middle fingertip on your other arm. Divide this number by 2.5. This gives you your approximate draw length, it should be checked by a professional before you purchase anything. [5]
- Your arrow length will be 1-2 inches more than your draw length.
-
2Choose the arrow material and weight. Most arrows are made of either aluminum, wood, or carbon, which keeps them relatively lightweight. Fiberglass arrows are an option for youth bows and bowfishing. The arrow weight can vary in the shaft. The heavier the arrow shaft, the deeper it will sink into a target. If you are using an arrow for target practice, you don’t need the arrow to sink in very far. If you are using it for hunting, however, you do need the arrow to sink in through skin and bone.
- Carbon arrows may explode, so if it hits something hard, flex it listening for cracking sounds. If you hear them, don't shoot the arrow. Many people have had arrows through their hands because of this.
- Aluminum and wood arrows will bend if they hit something hard, although they can be straightened.
-
3Consider whether to get vanes or fletchings. Vanes are plastic rudders that steer an arrow. You can shoot them using a whisker biscuit rest or fur rests. Fletchings are feathers. They are used when shooting off the shelf to avoid deflection of the arrow.
- If you are shooting outdoors, opt for vanes, as they are rain-proof.
-
4Make sure that hunting arrows for large game (deer, elk, etc..) have broadheads. If you are planning to get arrows for hunting, make sure they have suitable heads made of strong materials with good piercing power.
- For small game, use judo, field, or blunt tips. Broadheads will rip apart your game and ruin it.


Gathering Other Equipment
-
1Get a target. Shooting a recurve bow is not as simple as picking up the bow and some arrows alone. If you plan on practicing someplace like your backyard as opposed to a range, then you will need to purchase a suitable target that won’t ruin your arrows. Targets are available online or at sporting goods stores.
- Alternately, make your own target with 2 firm hay bales. Wrap them in shade cloth to tighten them up.[6]
-
2Buy an armguard. An armguard goes on the forearm of the arm that's holding the bow. Its purpose is to protect your arm if the string hits it. These can be purchased at sporting goods stores, outdoor stores and online.
-
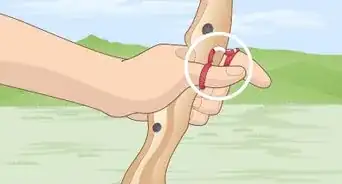
3Buy a finger tab. A finger tab is a strap of leather that protects your fingers from the tension of the string as you pull it back. Your finger tab goes on the fingers that will be drawing back your bowstring with your pointer finger above the arrow and middle and fourth below. You can also touch your thumb to your pinkie behind the string to keep them out of the way.[7]
- You can also choose a glove for the same purpose, although they are more expensive and not used by Olympic archers since they may make extra contact with the string, throwing off the accuracy.
-
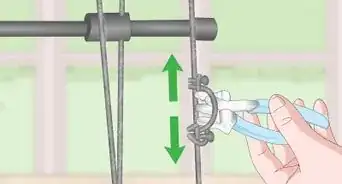
4Purchase a bow stringer. Put the string on a bow with this. It will bend your bow limbs if you string without one. They are a necessity when participating in archery.
-
5Consider optional training equipment. Depending on the bow you rent/purchase, it may or may not come with additional parts helpful for beginners, such as a sight and a clicker. A clicker should really be avoided for a beginner as proper technique is best achieved without it. [8]


Finding the Right Stance
-
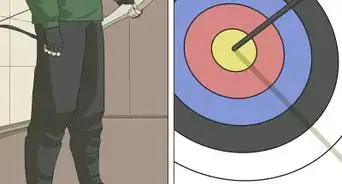
1Stand perpendicular to the target. If you are right-handed, stand with your left hip pointing toward the target (vice versa if you are left-handed). Keep your body remains vertical. Don’t lean to one side or the other. Rather, imagine that your body is aligned with a center vertical line to keep yourself straight.
-
2Straddle the shooting line. The shooting line is a line that marks a particular distance from the target. Stand with your feet shoulder-width apart, centering yourself over the shooting line.[9]
- Keeping your feet firmly planted at shoulder-width also maximizes your stability as you shoot.
-
3Turn your head toward the target. Look directly at the target by turning your head toward it. Be sure not to turn the rest of your body, which should instead remain perpendicular to the target. Keep your chest in and shoulders down, making sure not to hunch up your shoulders.[10]
-
4Hold the bow with a firm yet comfortable grip. If you are right-handed, hold the bow with your left hand on the hand grip. Most recurve bows have handles, so you will know where to hold the bow. Note that your life line should be perpendicular to the ground when you hold your bow.
- The knuckles on your hand should be at an approximately 45-degree angle.
- Don’t hold your bow with a death grip. This will cause inaccuracy in your shooting.[11] Stay relaxed so that every movement will be smooth.


Drawing and Shooting the Bow
-
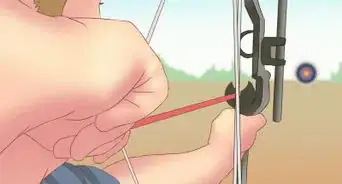
1Load an arrow onto your bow. You need to load the arrow by fitting the notch at the end of the arrow onto the bowstring. Do this before lifting your bow and without actually drawing the string. This is called "nocking" the arrow.
-
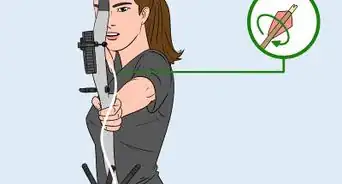
2Lift the bow to shoulder height. As you lift, ensure that the arm holding the bow is straight and locked at the elbow.[12] If your elbow is bent at all, it will be much more difficult to draw the bow.
- Put the one odd color vane between your riser and the arm holding your bow. If the nock isn't positioned where you can do this, the arrows aren't meant for recurve. You can still shoot it, but your accuracy may suffer slightly.
- Keeping the elbow of your bow arm straight additionally helps to keep your arm away from the bowstring as you release.[13]
-
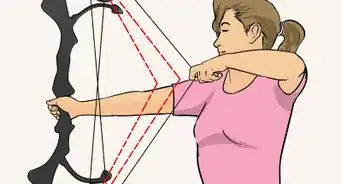
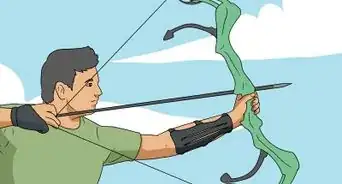
3Pull the bowstring back. You should pull back far enough that your hand rests right under your jawbone. Your bowstring should touch your face around the corner of your mouth. This is called an anchor point.[14] Check again as you draw back that you are not twisting your torso to face the target.
- Don't be afraid of the string and touch it to your face. Unless you wrap it behind your ear, it will not hurt you in any way.
- Try to practice letting the stronger muscles in your back do most of the work as you draw the bow as opposed to your arm muscles. Have a person push your elbow forward while you try to resist to experience this.[15]
- Don't chicken wing by placing your elbow below the arrow. Keep it up and aligned with the arrow.
-
4Take aim. You want to aim with your dominant eye while keeping your other eye closed.[16] Your dominant eye is much more reliable for your aim to the target.
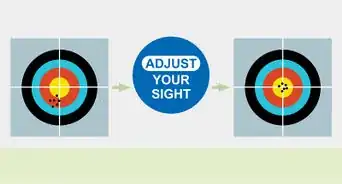
- If your bow has a sight, use the notches in the sight to help you line up your target. Also check your aim with your eyes, so you don't get tunnel vision.
-
5Relax your fingers off the string to loose. Don’t jerk the string back, or the arrow won't fly straight. Keep your release as smooth and gentle as possible, thinking of the action more like relaxing your fingers off the string as opposed to letting it go.[17]
- Don't move your hand or arm while you shoot. "Helping" the arrow doesn't actually help at all.
-
6Stay in position until the arrow hits the target. Once you release the string, the arrow still must accelerate off the bow, and any movement during the fraction of a second can disrupt the intended flight path of the arrow. Train yourself not to jerk or flinch by holding your position until you hear the arrow hit the target.[18]


Community Q&A
-
QuestionI have been told never aim directly at the bullseye because the sight line vs flight line is different. Why?
 Community AnswerIf you close one eye when you aim (as a lot of people do), you'll need to aim a bit towards whichever side your open eye is on. Also, the arrow will fall a bit, especially at long range. Shifting your aim correctly is a matter of experience.
 -
QuestionDo I look at the arrow head to shoot an arrow from a sightless bow?
 Community AnswerThere are several schools of thought on this one. You can be as elaborate as calculating how far down the tip needs to be to hit a particular spot and always line up to that. You can also shoot "instinctively" and only look at the target, letting your body move to the right position. I tend to shoot in-between. I'll focus on the target and use the tip as a "double-check" to get me in the ballpark. Mostly, I suggest experimentation; it's all about what works best for you.
 -
QuestionHow do I pull my arrows properly after shooting them?
 Community AnswerFirst, do NOT grasp the arrow on the fletching (also called vanes or feathers). Ideally, get hold of the arrow just in front of the fletching. Pull the arrow straight out of the target. Do NOT pull at an angle as you will run the risk of ruining it by bending it (if it is aluminum) or breaking it (if wood, carbon, or fiberglass). If the arrow penetrates the target very deeply so that the fletching is covered, then it must be pulled out from the backside of the target or else it may destroy the fletching. Broad head arrows are not suitable for target practice as they will need to be extracted from the backside of the target every time.
Warnings
- Inform those around you when you’re shooting and make sure that no one is walking around or behind your target. Alert everyone you are shooting and immediately lower the bow if there is danger.⧼thumbs_response⧽
- Be very careful, especially if you've never shot a bow before.⧼thumbs_response⧽
References
- ↑ http://www.bestrecurvebowguide.com/how-to-choose-a-recurve-bow/
- ↑ http://www.huntersfriend.com/bow_sizing_adjustment_guide.html
- ↑ http://www.bestrecurvebowguide.com/how-to-choose-a-recurve-bow/
- ↑ http://www.bestrecurvebowguide.com/how-to-choose-a-recurve-bow/
- ↑ http://www.bestrecurvebowguide.com/how-to-choose-arrows-for-your-bow/
- ↑ http://www.archeryessentials.com.au/HowdoImakeanarcherytarget.htm
- ↑ https://www.youtube.com/watch?v=QHKcE2OTu-w
- ↑ http://www.abbeyarchery.com.au/p/ARTC990/What+is+a+clicker.html
- ↑ https://www.youtube.com/watch?v=QHKcE2OTu-w
- ↑ http://www.bestrecurvebowguide.com/how-to-shoot-a-recurve-bow-basic-guide/
- ↑ http://www.outdoorlife.com/blogs/hunting/2014/03/how-shoot-recurve-tips-proper-grip
- ↑ http://www.bestrecurvebowguide.com/how-to-shoot-a-recurve-bow-basic-guide/
- ↑ http://www.bestrecurvebowguide.com/how-to-shoot-a-recurve-bow-basic-guide/
- ↑ http://www.bestrecurvebowguide.com/how-to-shoot-a-recurve-bow-basic-guide/
- ↑ http://www.bestrecurvebowguide.com/how-to-shoot-a-recurve-bow-basic-guide/
- ↑ http://www.bestrecurvebowguide.com/how-to-shoot-a-recurve-bow-basic-guide/
- ↑ http://www.bestrecurvebowguide.com/how-to-shoot-a-recurve-bow-basic-guide/
- ↑ http://www.bestrecurvebowguide.com/how-to-shoot-a-recurve-bow-basic-guide/
About This Article
Shooting a recurve bow is relatively simple once you know what to do. When shooting a recurve bow, you’ll need to stand side-on to your target with your feet shoulder-width apart. Then, nock your arrow onto the string. Make sure no one is in front of you before you raise your bow. Hold it in front of you with a straight arm and pull the string back to your jaw. Close your non-dominant eye and line the arrow up with your target. To release the arrow, just gently open your fingers. Use an armguard, and a finger tab if you want to do longer archery sessions, to protect your skin from the bowstring. For more tips, including how to choose a suitable recurve bow for your needs, read on!