wikiHow is a “wiki,” similar to Wikipedia, which means that many of our articles are co-written by multiple authors. To create this article, 26 people, some anonymous, worked to edit and improve it over time.
This article has been viewed 194,977 times.
Learn more...
Straw bales, a thick layer of Styrofoam, a hillside — there are plenty of objects to shoot, but most wear out quickly or damage your arrows. Take a couple hours off shooting and build a "lifetime" target that will last at least a few years. For a quick, portable target, just stuff packing materials into a box.
Steps
Cheap Box Target
-
1Find a large cardboard box. This should be at least 12 inches (30cm) thick to stop the arrows, or 18 inches (46cm) thick if you're using high velocity arrows or high draw weights. The other dimensions are up to you, although beginners and children usually need a target about 18 x 18 inches (46x46cm).
- Don't try this method if you're firing high-powered crossbows or compound bows.
-
2Stuff with shrink wrap or plastic bags. Practically any store gets rid of shrink wrap in huge quantities. Ask an employee, and you might be able to pick it up for free. Alternatively, stuff with plastic bags or expanding insulation foam. Pack as much as you can into the box.Advertisement
-
3Tape the box shut. Seal the box completely with packing tape or duct tape. You've just made a portable archery target out of free or very cheap components.
-
4Test the target. Test the target in an open area with no one standing nearby. Shoot from closer than you usually do, to make sure there's a margin of safety. If the arrow travels through the target, use a larger box and make sure the stuffing is tightly packed.
- Always use field point arrowheads when target shooting. Broad head arrows may break on impact.


Durable Target
-
1Plan a lumber frame. This is a hollow frame, with no front or back. Use 2x12 lumber (38x286mm) so the target will be deep enough to stop most arrows. The width and height are up to you, but don't go larger than a 3 x 3 ft (0.9x0.9m) shooting area if you want to keep it portable.
- For a longer outdoor lifespan, use kiln dried boards, and/or treat them with weather protection.[1]
- Use longer boards than necessary for the sides, extending them below the shooting area. This lets you raise the target or attach casters to make it more portable.
-
2Cut a hole to allow for stuffing. Cut a large hole in the board that will form the top of the frame. After assembly, you'll stuff the target through this hole.
-
3Screw the lumber together. Archery practice puts a lot of force on the target. Fasten the frame with wood screws at least 3½" (9cm) long.
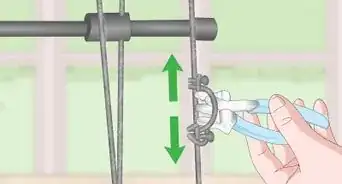
- For an extra-sturdy frame, run all-thread through the left and right sides of the frame. Tighten with an oversized washer, ordinary washer, and nut in that order. tighten again after your first test shoot, as the frame can jolt out of place.
-
4Staple on chicken wire. Cover the front and back openings of the frame with chicken wire to hold the stuffing. Wrap it around the sides and staple many times to the frame.[2]
- The chicken wire will bulge over time from the force of the arrows. To reduce the amount of re-packing, you can reinforce with three or four tie-wires on the interior of the chicken wire.
- This can be the weakest point in the target. Some people prefer using nylon window screen material.[3]
- If you'll be using shrink wrap or other stuffing that can come out the mesh reinforce the chicken wire with several layers of thick cardboard.
-
5Gather stuffing. You'll need a huge amount of material to stop an average arrow. Here are a few common options, which you may be able to find in bulk at some used stores and rag stores, or by asking for waste at any retail store:
- Shrink wrap, foam, plastic bags, or other compressible packing material.
- Old carpet, cut into strips the depth of the frame
- Blankets, feed bags, burlap sack, and other spare fabric
- Shredded rubber (from a landscaping store)
- Clothing, after removing all buttons, zippers, metal objects, screen-printed fabric, and anything else that might chip the arrow or melt.[4] Denim, other fabric, or double-layer material (e.g. pockets) may make the arrow stick in the target; avoid it or place it at corners where arrows are unlikely to hit.[5]
-
6Compress the stuffing. Pack the stuffing as tightly as you can as you insert it into the frame. Any time you notice a gap, push in smaller scraps of stuffing through the chicken wire or from above. Frequently compress as you stuff with a sledgehammer or other weight, or tie it down with a ratchet strap and tighten periodically.[6]
-
7Cover the shooting surface. Adding the cover is the final step to a good archery target. The cover will need occasional replacement as it gets beat up, so attach it underneath easily removed 1x4 planks (19x84mm). Here are a few common options:
- Weed barrier / ground cloth
- Tyvek
- Tarps (may be noisy and stain the arrows)[7]


Community Q&A
-
QuestionDoes the durable target stop 400 fps crossbow bolts?
 Alex DongCommunity Answer400 fps, your target will need more than just plastic bags and foam on the inside. Research it to see what materials you need.
Things You Need
Quick Box Target
- Cardboard box (at least 12"/30cm thick)
- Shrink wrap, plastic bags, or insulation foam
- Tape
Durable Target
- 2x12 lumber
- 1x4 lumber
- 3½" wood screws
- Threaded rods (optional)
- Stuffing (clothes, fabric, shrink wrap, carpet, etc.)
Warnings
- Micro-diameter arrows may pass completely through the target, even the durable version.⧼thumbs_response⧽


References
- ↑ http://archeryreport.com/2011/04/diy-lifetime-archery-target/
- ↑ http://archeryreport.com/2011/04/diy-lifetime-archery-target/
- ↑ http://www.archerytalk.com/vb/showthread.php?t=1192384&highlight=lifetime+target
- ↑ http://archeryreport.com/2011/04/diy-lifetime-archery-target/
- ↑ http://www.archerytalk.com/vb/showthread.php?t=1976481
- ↑ https://www.archerytalk.com/threads/diy-lifetime-target-no-advertising-please.2006261/
- ↑ http://archeryreport.com/2011/04/diy-lifetime-archery-target/
- ↑ https://www.youtube.com/watch?v=w64N-aduJ6Q
About This Article
To make an archery target, try using a cardboard box. All you'll need to do is stuff the box with shrink wrap or plastic bags, tape it shut, and place it where you'll be doing your target practice. For a more durable target, you can build a frame. You'll need lumber, chicken wire, and some material for stuffing. Once you have your supplies, you'll need to nail the frame together, attach the chicken wire, and stuff the material inside. For tips on how to add a cover to your target, read on!