This article was co-authored by wikiHow Staff. Our trained team of editors and researchers validate articles for accuracy and comprehensiveness. wikiHow's Content Management Team carefully monitors the work from our editorial staff to ensure that each article is backed by trusted research and meets our high quality standards.
This article has been viewed 21,004 times.
Learn more...
An ice maker is a great addition to any kitchen and can be simple to install with the right materials. Attach copper tubing to your cold water pipe to create a dedicated cold water line for your new appliance. Run this line to the back of your refrigerator or under-counter ice maker and secure it with a compression joint. Be careful during the installation process to prevent water damage, contact with electric wiring, or damage to other plumbing.
Steps
Installing a Dedicated Cold Water Line
-
1Locate the closest cold water source. To install an ice maker you will have to tap into the closest-located cold water pipe. Find this cold water source, which may be found under a sink, below the floor, or in a wall. If you need to drill through the floor or wall to reach the pipe, it is best to hire a professional who will know how to avoid wires, ducts, or other plumbing.[1]
- If you do not know where the pipe is located, ask your contractor, a former resident, or landlord.
- You will need to install a cold water line for either a refrigerator ice maker or an under-counter ice maker.
-
2Shut off the water and drain the pipe. Turn off the main water valve before starting your project by turning it clockwise. This valve will likely be located on a perimeter wall of your home, in your basement, or near an outdoor water meter. Open the cold water faucet to let water drain out of the pipe.[2]Advertisement
-
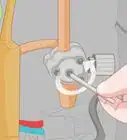
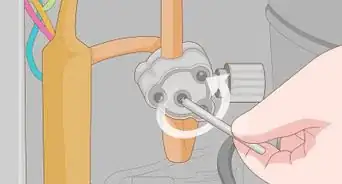
3Attach a saddle valve to a clean spot on the cold water pipe. A saddle valve is a valve that hugs a water line on both sides and supplies a low pressure stream from it. Wipe the area of your cold water pipe that you will attach the valve onto with a clean, wet cloth. Place a saddle valve onto the pipe and tighten its clamps so that it grips the pipe.
- You can purchase a saddle valve at any hardware store.
-
4Screw the valve in to pierce a hole in the pipe. Slowly turn the handle of the valve in a clockwise direction. When you meet resistance, keep turning the valve firmly. Continue until the needle pierces through the pipe.
- You will feel less resistance once the needle pierces through the pipe.
-
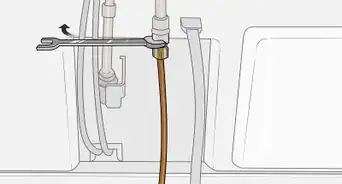
5Attach 0.25 inches (0.64 cm) of copper piping using a compression joint. Place 1 end of your copper tubing into the valve opening. Screw on a small compression joint to secure the connection. Measure the distance between your ice maker and the cold water pipe before purchasing the copper tubing to get the appropriate length. [3]
- Add an extra 6–8 feet (1.8–2.4 m) of tubing to allow for cleaning and maintenance.[4]
-
6Turn the water back on. Once you have attached the saddle valve and copper piping, you can turn your water back on. First, make sure all of your connections are secure. Turn the main water valve counterclockwise to turn the water back on.
-
7Open the saddle valve to rinse through the copper piping into a large bucket. Gently turn the handle on your saddle valve counter-clockwise to open the valve. Direct the end of your copper tubing unto a large bucket. Let enough water flow through to fill the bucket, then close the valve. [5]


Hooking Up a Refrigerator Ice Maker
-
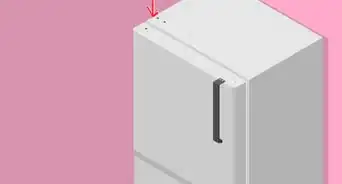
1Locate the ice maker on your refrigerator. If you are hooking up a refrigerator ice maker, find where it is located on the appliance. If you have a model of refrigerator that is 10 years old or older, the ice maker, including the part that hooks up to the copper tubing, is likely to be located in the freezer. If you have a newer model, it may be located in the refrigerator door.[6]
-
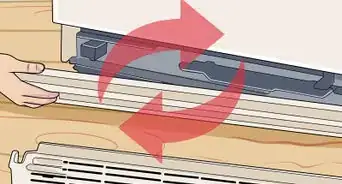
2Run the tubing to your refrigerator. Pull your fridge out to access the back of it. Depending on where you accessed your cold water pipe, carefully run the water line towards the back of your fridge. Avoid leaving the tubing somewhere it might get damaged, stepped on, or crushed. Try to run it flush against the bottom of your walls or cabinets where it is most likely to be safe.[7]
- Coil extra tubing neatly behind your fridge.
-
3Use a compression fitting to attach the piping to the ice maker. Compression fittings are fittings comprised of an outer nut and inner ring that join 2 pipes together. Ice makers will often come with the appropriate compression fitting for the cold water outlet. Follow the instructions on your manual to attach the piping properly, as refrigerator and ice maker models vary .[8]
- If your ice maker does not come with the appropriate piece, consult the refrigerator manual to see what size fitting you should use.
-
4Use nylon cable clamps to attach the tubing to your fridge. Avoid leaving the copper tubing hanging behind your fridge. Clip it firmly to the side of the fridge using 0.25-inch (0.64-cm) wide nylon cable clamps every 2 feet (0.61 m). Use a screwdriver to secure the clamps with standard No. 10 screws.[9]


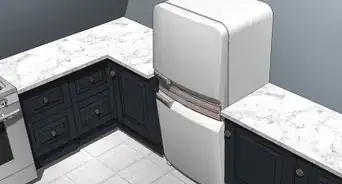
Installing an Under-Counter Ice Maker
-
1Measure the space you have available to install the ice maker. Using a tape measure, find out the height, length, and width of the space you have chosen to install your ice maker. This will help you narrow down what model of ice maker to purchase. To allow for proper ventilation, plan to leave a clearance of at least 5 inches (13 cm) between the back of the cupboard and the machine.
- You should also leave a clearance of 2–3 inches (5.1–7.6 cm) between the top of the counter and the machine, and the same between the sides of the enclosure and the machine.
- An ice maker would be well-located under your kitchen cabinet to the side of your sink or refrigerator.
-
2Choose an ice maker that best fits your needs. Under-counter ice makers are available in a large range of sizes with different production and storage capacities. Determine your budget before shopping, as they can range in price from $250-$5,000. Smaller models generally yield less ice and are less expensive.[10]
-
3Shop for a model of ice maker with a drain pump. A drain pump is a pump that pulls waste water away from different sources, including ice makers, and brings it to a kitchen drain. Most models of ice maker come with a drain pump installed, which makes the installation of an extra, gravity drain unnecessary. Invest a bit more money in your ice maker to make sure it has a drain pump installed, which will ensure that it functions better, requires less installation work, and is less likely to leak.
- You can purchase an ice maker at a hardware store or department store.
-
4Attach the ice maker to your cold water line with a compression fitting. Run your cold water line from the pipe to the back of your under counter ice maker. Gently insert the copper piping into the fixture on your ice maker. Carefully tighten the compression fitting to secure the connection.
- To make this connection simple, drill dime-sized holes into the sides of your cupboard with an electric drill to easily thread the copper tubing through it. Wear safety goggles and gloves to protect your eyes and hands from any wood particles that may fly into the air while you do this.
-
5Put the ice maker into its place under the counter. Under-counter ice makers are typically very heavy, so have a friend or family member help you move it if necessary. Once the cold water line is attached, lift the ice maker and gently fit it into its designated spot. As you move the ice maker, be sure to slowly pull the piping out through the holes in the sides of your cupboard to keep it from getting stuck under the machine.


Things You’ll Need
Installing a Dedicated Cold Water Line
- Wet, clean cloth
- Saddle valve
- 0.25 inches (0.64 cm) copper piping
- Compression fitting
- Electric drill
Hooking Up a Refrigerator Ice Maker
- 0.25 inches (0.64 cm) wide nylon cable clamps
- Screwdriver
- Standard No. 10 screws
- Compression fitting
Installing an Under-Counter Ice Maker
- Measuring tape
- Compression fitting
- Electric drill


References
- ↑ https://www.familyhandyman.com/kitchen/how-to-install-refrigerator-plumbing/view-all/
- ↑ https://www.familyhandyman.com/kitchen/how-to-install-refrigerator-plumbing/view-all/
- ↑ https://homesteady.com/how-6328646-install-maker-kit-kenmore-fridge.html
- ↑ https://www.familyhandyman.com/kitchen/how-to-install-refrigerator-plumbing/view-all/
- ↑ https://www.familyhandyman.com/kitchen/how-to-install-refrigerator-plumbing/view-all/
- ↑ http://refrigerators.reviewed.com/features/how-does-an-ice-maker-work
- ↑ https://www.familyhandyman.com/kitchen/how-to-install-refrigerator-plumbing/view-all/
- ↑ https://www.familyhandyman.com/kitchen/how-to-install-refrigerator-plumbing/view-all/
- ↑ https://www.familyhandyman.com/kitchen/how-to-install-refrigerator-plumbing/view-all/
About This Article