This article was co-authored by wikiHow Staff. Our trained team of editors and researchers validate articles for accuracy and comprehensiveness. wikiHow's Content Management Team carefully monitors the work from our editorial staff to ensure that each article is backed by trusted research and meets our high quality standards.
This article has been viewed 61,480 times.
Learn more...
While fake Christmas trees have undoubtedly grown in popularity over the years, a large percentage of the 2 billion people who celebrate Christmas still prefers to stack their presents beneath a real tree. For many, Christmas just isn't Christmas without the scent of pine, fir, or spruce throughout the home. Without proper care and handling, though, a real tree and the scent won’t last for more than a few short weeks. However, by cutting down a fresh tree yourself, giving it adequate amounts of water, using a Christmas tree watering system and keeping it in a prime location within your home, you can make your tree stay fresh and smell good for at least 5 full weeks, if not more!
Steps
Choosing the Right Tree
-
1Go to your local farm. Go to your local Christmas tree farm and cut the tree down yourself. This is the best way to ensure that your tree stays fresh all season long. Many trees that are sold in lots are cut down one to two weeks prior to making it to the lot, thereby guaranteeing that they will begin to brown and dry out one to two weeks earlier than you would like. Not to mention, precut trees are generally not watered until they are set up and decorated.[1]
-
2Choose the longest lasting Christmas tree variety. Needles on firs, pines, and Blue Spruces last the longest, with or without water. If possible, opt for one of these Christmas tree varieties—especially if you must buy a precut tree.[2]Advertisement
-
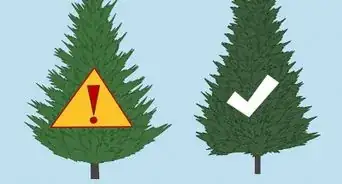
3Choose the freshest tree you can find. Whether you cut down the tree yourself, or whether you buy a precut tree, always buy the freshest one available. Start by checking each tree for brown needles; the ones with the least amount of brown will be your top contenders.
-
4Remove any dead needles. Once you’ve eliminated the trees with any brown needles, run your hands through the branches of the freshest looking trees. The freshest trees will retain their needles even through the disruption.
- To shake out remaining dead needles, pick up your final selection and drop it on its trunk (obviously, you can only do this if you visit a precut farm). Very few, if any, green needles should drop to the ground.
-
5Check for pests. Examine your tree carefully for beetles, mites, and aphids before taking it home. Many precut trees are transported from the tree farm to the city in truck loads, and acquire unwanted bugs and pests along the way. Many of the pests found on Christmas trees suck the nutrients right out of the tree as fast as you can put them in.
- Look for odd needle discoloration, needle feeding (where parts of the needles appear to be eaten), injuries to shoots or branches, shoots that are webbed together, shoots that are more than one color (red, yellow, and brown), pitches or holes in the bark, places where bark is missing, and small “blisters” on shoots or branches.[3]
-
6Cut your tree. If you brought your own saw, go ahead and use it. However, Christmas tree farms generally have saws designed for the best cut on a Christmas tree; use theirs if available. And remember: when cutting a tree down yourself, always be sure to wear the proper safety gear. This includes a helmet, earmuffs, and safety glasses.
- Be sure to estimate the “felling zone,” the zone in which the tree is likely to fall. In order to do this, use the ax handle trick. Hold an ax at arm’s length away from you, close one eye, and back away from the tree. When the top of the ax is even with the top of the tree, stop. Where your feet are at is where the top of the tree should land.
- Begin cutting the trunk low to the ground—as low as you can go. Cut straight across. If you do not like how the bottom branches look, keep in mind that you can always trim those off. However, you cannot add length to the tree trunk, and if it does not fit inside the stand, you will not be able to display your tree for the holidays.
- If possible, have someone hold the tree as high up as they can reach. This will prevent the tree from falling, and therefore, prevent any damage to the limbs and needles.
- Once the tree is cut, have someone help you carry it. You do not want to drag it through the mud. Again, this will damage the branches and needles. Not to mention, it will collect dirt, mud, and pests that you do not want in your home.


Handling with Care
-
1Get your tree home safely. If you plan on placing your tree inside of your vehicle, opt to have it bailed. This will make it easier to fit inside of your vehicle, and prevent any branches from bending or breaking in the process of trying to get it in and out.
- If you choose to put your tree on top of your vehicle, lay down a blanket (to protect the paint) and lay the tree butt forward. This is very important, as it will keep the branches from catching any wind and blowing off the needles.
- If you have a luggage rack, tie the tree twice to both sides.
- If you do not have a luggage rack, wrap the twine or rope through the windows or doors at the front of the vehicle and again at the back.
-
2Trim the trunk. Cut another ½ inch to an inch off the bottom of your tree when you get it home. Once a tree is cut, sap will start to seal over the base and therefore hinder the tree’s ability to receive water.[4]
- Once you make the cut, immediately place your tree in a bucket of water until you have the tree stand set up.
-
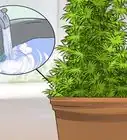
3Water your tree. Like most plants, Christmas trees typically require a continuous water supply to stay fresh. While most Christmas tree stands hold about a gallon of water once you put a tree in the stand there is much less space for water; at the very least, keep the water level above the base of the trunk.
- Check your tree daily to make sure that it does not run out of water.
- A Christmas tree watering system increases the water capacity of your stand, provides a visual indication of your stand's water level and makes it easy to add water. NO crawling under the tree. No spilling water on your floor.
- If your tree still ends up getting dry despite your best efforts to keep it watered, drill some holes into the base to allow for a direct entry point for the water.
-
4Run a humidifier. If you have one, run a humidifier in the same room that your Christmas tree is in. Though not necessary, a humidifier can keep your tree from drying out, and therefore, help it stay fresher longer.
- You can also choose to spray your tree with an anti-transpirant so that it will retain moisture better and thus stay fresher longer.


Choosing the Perfect Setting
-
1Measure the available space. Measure the space where your tree is going to be located to determine just how big of a tree you can actually get. Many families, when they get their tree home, find that the tree they picked is far too big for the location they had in mind for it. In order to accommodate their tree, they cut branches, bend branches, and trim the tops. But if not done properly, pruning and trimming can actually kill your tree.[5]
- Take the tape measure and measure the height, width, and depth of the space. To determine the maximum height that will work for the space, remove one foot of height to allow for the tree topper, and another six inches to allow for the tree stand.
- Because Christmas trees tend to be symmetrical, use the smaller of the width and depth measurements to determine how round of a tree you can get.
-
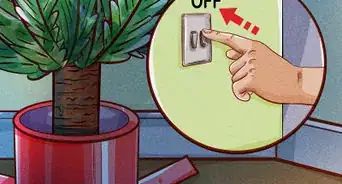
2Keep your tree away from a heat source. Keep your tree away from any source of heat to keep its needles fresh longer, as well as to reduce the risk of starting a house fire. The quickest way to dry out a Christmas tree is to place it directly near or above a heat source.
- If you place your tree next to a fireplace, be sure to douse the fire before leaving the room. Never leave your tree next to an unattended lit fireplace.
- If you place the tree near an independent heat source, shut off the heat source whenever you are not using the room.
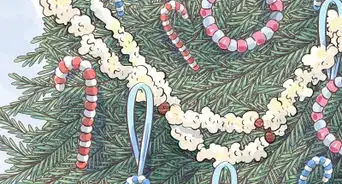
- Lightbulbs and fairy lights are heat sources too! When decorating, use LED (light emitting diode) lights, which burn cooler and are also much more energy efficient.
-
3Place it near a semi-sunny window. Place the tree near a window with optimal sunlight—such as one facing the east, so it gets sunlight in the morning and shade in the afternoon. Like all plants, too much sunlight can quickly dry out a Christmas tree, but not enough sunlight can cause it to wither and die.


Community Q&A
-
QuestionDoes adding an aspirin to the water allow the tree to stay fresh longer?
 Community AnswerIt is possible.
 -
QuestionI hear if you drill a hole up the trunk of your tree and insert tampons and put it in water, it will absorb water and distribute up the tree. Is this true?
 TMDonutTMCommunity AnswerThis is false. Dead trees cannot absorb water, only live or freshly-cut trees.
 -
QuestionCan I use fabric softer in the water for a Christmas tree?
 Community AnswerNo, it could potentially be harmful for your tree. Try to stick to just water.


References
- ↑ http://www.arborday.org
- ↑ https://www.pickyourownchristmastree.org/treevarieties.php
- ↑ http://na.fs.fed.us/spfo/pubs/misc/xmastree/XmasTreePestManual.pdf
- ↑ http://www.tcia.org/TCIA/Blog_Items/2015/Get_Your_Holiday_Tree_Home_Safely.aspx?WebsiteKey=b9a41e1f-978d-4585-9172-c411c78c5c14
- ↑ http://aggie-horticulture.tamu.edu/earthkind/landscape/proper-pruning-techniques/
About This Article