X
wikiHow is a “wiki,” similar to Wikipedia, which means that many of our articles are co-written by multiple authors. To create this article, 23 people, some anonymous, worked to edit and improve it over time.
This article has been viewed 250,121 times.
Learn more...
Want to print out a multiple-page booklet or catalog in Microsoft Word? We'll show you how to create a booklet from scratch, as well as how to use a simple template to speed along the process.
Steps
Method 1
Method 1 of 2:
Using Word Templates
-
1Do search for booklet template. Many professional sites are providing free booklet templates. You can also browse MS's official site.
-
2Download the template. You can download the template by clicking on download button at the bottom of preview. If you've downloaded from save-word-templates or other site then the file will be in .zip's format, but if template is from MS Word then it will be in doc format.Advertisement
-
3Open in MS Word. It's time to open downloaded template in MS Word and update content according to your business's needs. You are suggested to use latest version of MS Word for batter experience.
-
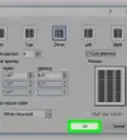
4Save & Print.
- After customization your booklet is ready to go. Now click on file menu and then on save, select directory where you've to save, type file name, select "word template" for save as type, and then click on save.
- Now click on file menu then on print or use (Ctrl+P) for shortcut, Update settings according to your printer and paper then click on print.


Advertisement
Method 2
Method 2 of 2:
Using MS Word
-
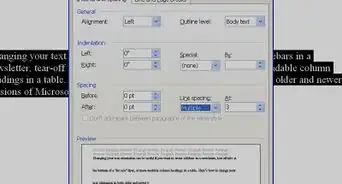
1Go to File —> Page Setup to set your margins. Good booklet design has margins of at least 1/8-inch (0.125”) – you don't want any text or photos bleeding off of the page. Expand the margins to 1/4-inch for a cleaner look.
-
2Set your paper orientation to Landscape', whilst in Page Setup.
-
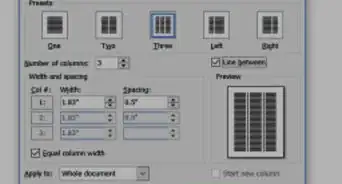
3Add columns' to create a clean line of your product photos. If you want four pictures going across each page, you'll need four columns. You can type in the number of columns manually instead of choosing a Preset. You can alter the spacing and width of the columns as needed, but the default spacing should be okay for most layouts.
-
4Add breaks between the columns so that each column of your booklet will hold separate paragraphs of information without overflowing into the next column. Place your cursor in the first column (the one way to the left) and go to Page Layout (or Insert for Word 2003) – Breaks and choose Column. Your cursor should now be at the top of the next column. Keep inserting breaks as needed until each column is its own entity.
-
5Add text and photos to each column. Just click in each column and go to Insert –> Picture. You may want to use text boxes instead of typing directly into the column if you want your text to “float.”
-
6Save your booklet.
-
7Print out a test copy or send the file to a printer to print a “proof,” which is a test copy.
-
8Ensure there are no spelling or grammar errors, by running the Spell Checker, if you are happy with the proof's colors and the layout. Have someone read over the text as well because the Spell Checker often misses a lot of mistakes.


Advertisement
Community Q&A
-
QuestionCan I insert a new page after completion?
 Kim GTop AnswererYou may need to change the formatting to insert the new page, but it can be done. The instructions may vary somewhat among versions, but basically place your cursor at the point where you want to insert the page, add a hard page break, and type the text. Then reformat the booklet accordingly.
 -
QuestionCan I convert a Word document into a booklet with copy and paste, or do I need to completely retype?
 HumanBeingTop AnswererIt depends how complicated the formatting in your existing Word document is. Try copying and pasting the content into a new document you've created following these instructions and see what happens. Make sure you have saved your original documents, just in case. You could try pasting the content without formatting if a straight copy and paste doesn't work.
Advertisement


About This Article
Advertisement