This article was co-authored by wikiHow Staff. Our trained team of editors and researchers validate articles for accuracy and comprehensiveness. wikiHow's Content Management Team carefully monitors the work from our editorial staff to ensure that each article is backed by trusted research and meets our high quality standards.
There are 8 references cited in this article, which can be found at the bottom of the page.
The wikiHow Video Team also followed the article's instructions and verified that they work.
This article has been viewed 67,722 times.
Learn more...
Brooches are a great fashion accessory reminiscent of classic style but also distinctly modern. However, brooches can be expensive. Cut down on the cost by making your own brooch! You can easily make a brooch using crystals and beads, felted wool, or rickrack.
Steps
Designing a Crystal or Beaded Brooch
-
1Draw the desired shape of your brooch on a piece of felt. Use felt that matched your items to make it less visible, or use a basic background color, such as black or grey. You can draw a square, circle, oval, rectangle, triangle, star, horseshoe, or any other shape you like for your brooch. Try to make the shape about 1.5 in (3.8 cm) across. You can use a template such as a glass. [1]
- For example, you could make a circle that is 1.5 in (3.8 cm) in diameter, a triangle with 1.5 in (3.8 cm) sides, or a rectangle that is 1.5 by 2.5 in (3.8 by 6.4 cm).
-
2Cut out the felt piece with a pair of fabric scissors. After you have traced the shape onto your felt, cut along the lines. Cut slowly to ensure that you do not create any misshapen or jagged edges.[2]
Tip: If you prefer a metal back for your brooch, purchase one from a craft supply store and glue your items directly onto it.
Advertisement -
3Lay out the items you want on your brooch. You can glue beads, crystals, rhinestones, buttons, and other items onto your brooch to decorate it. Use enough items so that they will completely cover the felt, and then position the items on your felt piece how you want to attach them before gluing them into place. This will allow you to play with the positioning of the items and get the desired look.[3]
- Try outlining the brooch with 1 type of gem or bead and then add another row of a different type of bead or gem next to it. Keep alternating or adding new items as you move in towards the center.
- If you have 1 large gem or bead that you want to use as a focal point, place that in the center and surround it with gems or beads that complement it.
-
4Use a hot glue gun to attach the items to your brooch. Turn on your hot glue gun and allow it about 10 to 15 minutes to warm up. Once you are happy with the arrangement of your items, begin gluing them into place. Pick up a piece, apply a small dot of glue and press the piece onto it. Continue to do this until you have attached all of your items.[4]
- Be careful not to touch the hot glue with your fingers. The glue will burn your skin if it gets on it.
- If you don’t want to use hot glue, you can apply fabric glue to attach the items and then let the brooch dry overnight.
-
5Turn the brooch over and glue a brooch pin onto the back. When you have finished attaching the items to the front of your brooch and the glue has dried, turn it over. Then, apply a couple of dots of hot glue to the center of the brooch back and press a brooch pin closure onto the glue. Hold the pin in place for a few seconds to ensure a good bond.[5]
- If you use fabric glue, let the pin dry overnight.
- After the glue has dried, your brooch is ready to wear!
Making a Felted Wool Flower Brooch
-
1Purchase felting wool in a variety of colors. You can purchase felting wool online or at a craft supply store. Buy a few colors that complement each other to create your brooch.
- Felted wool is not regular wool. It will come in soft, puffy bunches.
-
2Wet the wool using soap and warm water. Fill a plastic bucket or bowl about halfway with warm water and add a squirt of hand soap. Squeeze and pull the wool gently while it is in the soapy water. When you can't stretch the fibers any more, the wool has felted.
- That should take about 15 minutes.
-
3Rinse the wool gently with water to remove any remaining soap. Hold the wool under warm, running water to rinse it out. Squeeze out the fabric to get rid of any excess water.
-
4Dry the felt pieces overnight. Place the pieces on a towel on a countertop or up on a shelf where they will not be disturbed by pets or children. The felt pieces will take around 8 hours to dry completely.
- They should feel soft to the touch when they're completely dry.
Tip: Don't rush when waiting for your felt to dry. Only start to make your own brooch with the felt when all the water is completely gone.
-
5Layer the felt pieces as desired. You can arrange the pieces however you like to get the desired effect. Try ordering the layers by size with the smaller ones on top of larger ones so that each of the layers will be visible.
-
6Sew the pieces together. Thread a needle with about 12 in (30 cm) of a durable matching thread and use it to sew through the center of the pieces you want to layer together. Stitch through all of the layers several time to ensure that they are securely attached, then tie a knot through the thread on the back side of the brooch.
- Another way to attach the pieces together is to fold each piece in half and then fold it in half in the other direction so that it is 1/4 of its original size. Then, sew the corner of the piece onto an open piece. Do this for 6 or 7 more pieces to create a 3-D felt flower.[6]
-
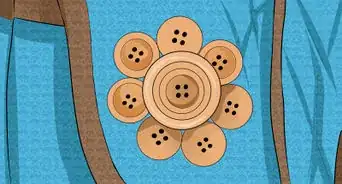
7Sew on buttons, beads, or gems to the center of the brooch. You can also use extra felted wool formed into balls for a decorative addition. A bead or a button makes a good center of a flower.
- Don't forget to glue or sew on a safety pin or brooch pin to the back! You need to be able to attach it your clothes.

Sewing a Rickrack Flower Brooch
-
1Cut your desired length of rickrack. Count from the end of the rickrack until you get to 12 loops on the top edge of the rickrack. Then, cut the rickrack through the next loop.[7]
- Wide rickrack works best for making a brooch. Choose rickrack that is about the width of your thumb.
- Use a pair of sharp fabric scissors to cut the rickrack.
-
2Fold 0.25 in (0.64 cm) of the rickrack under and tack it in place. Thread a needle with about 12 in (30 cm) of thread and tie a knot in the end. Then, fold over the rickrack and insert the needle in through both layers. Pull until the thread is taut to secure the end of the rickrack.[8]
- Make sure that the raw edge of the rickrack is facing away from you when you tack it down.
Tip: Use a needle that is durable enough to puncture thicker material. A thin needle could snap if forced through multiple layers of rickrack.
-
3Sew each loop together across the bottom of your rickrack. Use your fingers to hold the first 2 bottom loops together and then insert the needle through both. Pull the thread taut. Then, pull the needle through the next bottom loop to layer it over the last 2 you sewed through.[9]
- The loops should fold together like an accordion with your needle going in and out of each lower point of the material.
-
4Tack down the end of the rickrack to hide the raw edge. When you're finished sewing through all of the bottom loops, fold the end of the rickrack under as you did in the beginning and sew through it to tack it down. Pull the thread taut to pull the rickrack together in a tight accordion-like bundle.[10]
- Don’t tie a knot in the end of the thread just yet because you have more sewing to do.
-
5Sew the end of your rickrack to the first 1 or 2 loops. This seals up the bunch of fabric in a circle, which should look similar to a flower. Pull the thread taut to tighten the rickrack into a circle.[11]
- Hold the thread taut with your fingers, but don’t tie it off yet.
-
6Stitch the inside corners of the rickrack. Sew back and forth across the rickrack circle to secure the pieces together more firmly. Make sure to sew on the back side of your rickrack flower so that these stitches will not be visible.[12]
- Sewing across the center will help to make the flower firmer and sturdier. It will also improve the appearance of your finished brooch.
-
7Choose a button in a complementary color to your rickrack. Sew it into the center of your rickrack flower. Tie off the thread on the back of the brooch and cut it about 0.25 in (0.64 cm) from the knot.[13]
- Opt for a button or bead that will stand out from the rickrack. For example, you could add a pink or yellow button to the center of a purple rickrack flower.
-
8Cut out a 1 in (2.5 cm) diameter felt circle. This will be the base of your brooch. You can sew or glue the rickrack flower onto the felt circle.[14]
- Choose a color of felt that matches the rickrack, such as red for red rickrack or blue for blue rickrack.
- Use a pair of sharp fabric scissors to cut out the felt circle.
-
9Sew or glue the felt circle onto a brooch pin. You can thread a needle and sew through the openings in the brooch pin, or use hot glue to attach the brooch pin to the felt base. Press the flower onto the felt circle and hold it there for about 15 seconds if you are using hot glue.[15]
- Place the pin near the top of the circle. Sewing it in the middle will cause the brooch to sag when you are wearing it.
- Be careful not to get hot glue on your skin as it will burn you.


Things You'll Need
Designing a Crystal or Beaded Brooch
- Felt
- Pen or pencil
- Ruler
- Scissors
- Beads, crystals, rhinestones
- Brooch pin
- Hot glue gun and glue
Making a Felted Wool Flower Brooch
- Felted Wool
- Soap and water
- Needle and thread
- Button or other embellishments
- Safety pin
Sewing a Rickrack Flower Brooch
- One length of rickrack with at least 12 loops
- Needle and thread
- Small piece of felt
- Button
- Safety pin


References
- ↑ https://www.youtube.com/watch?v=5Jn7OuXb0FA&feature=youtu.be&t=28
- ↑ https://www.youtube.com/watch? v=5Jn7OuXb0FA&feature=youtu.be&t=35
- ↑ https://www.youtube.com/watch?v=5Jn7OuXb0FA&feature=youtu.be&t=45
- ↑ https://www.youtube.com/watch?v=5Jn7OuXb0FA&feature=youtu.be&t=55
- ↑ https://www.youtube.com/watch?v=5Jn7OuXb0FA&feature=youtu.be&t=73
- ↑ https://www.youtube.com/watch?v=dHkWumJyOjM&feature=youtu.be&t=58
- ↑ http://www.craftstylish.com/item/46548/how-to-make-a-rickrack-brooch-for-mothers-day
- ↑ http://www.craftstylish.com/item/46548/how-to-make-a-rickrack-brooch-for-mothers-day
- ↑ http://www.craftstylish.com/item/46548/how-to-make-a-rickrack-brooch-for-mothers-day
- ↑ http://www.craftstylish.com/item/46548/how-to-make-a-rickrack-brooch-for-mothers-day
- ↑ http://www.craftstylish.com/item/46548/how-to-make-a-rickrack-brooch-for-mothers-day/page/2
- ↑ http://www.craftstylish.com/item/46548/how-to-make-a-rickrack-brooch-for-mothers-day
- ↑ http://www.craftstylish.com/item/46548/how-to-make-a-rickrack-brooch-for-mothers-day
- ↑ http://www.craftstylish.com/item/46548/how-to-make-a-rickrack-brooch-for-mothers-day
- ↑ http://www.craftstylish.com/item/46548/how-to-make-a-rickrack-brooch-for-mothers-day
About This Article

To make a brooch, start by drawing the shape you want your brooch to be on a piece of felt. You can draw any kind of shape, like a circle, oval, rectangle, or star. Just make sure it's about 1.5 inches across. Once you've drawn your shape, cut it out and arrange some decorative embellishments on it in whatever pattern you like best. For example, you can decorate your brooch with beads, crystals, or rhinestones. When you've found a pattern that you like, hot glue the embellishments to the felt. Finish your brooch by hot gluing a brooch pin onto the back of the felt and letting everything dry. To learn how to make a felted wool flower brooch, scroll down!