This article was co-authored by Natasha Dikareva, MFA. Natasha Dikareva is a San Francisco, California based sculptor, and installation artist. With over 25 years of ceramics, sculpting, and installation experience, Natasha also teaches a ceramic sculpture workshop titled "Adventures in Clay" covering concept development, hand-building techniques, texture, and glazing techniques. Her work has been featured in solo and group exhibitions at the Beatrice Wood Center for the Arts, Abrams Claghorn Gallery, Bloomington Center for the Arts, Maria Kravetz Gallery, and the American Museum of Ceramic Art. She has taught at the University of Minnesota and the American Indian OIC School. She has been awarded the Excellence Award at the 1st World Teapot Competition, Best in Show at the 4th Clay & Glass Biennial Competition, and a Grand Prize at the American Museum of Ceramic Art. Natasha holds an MFA from the University of Minnesota and a BFA from Kiev Fine Arts College.
This article has been viewed 108,704 times.
Making a clay pot on a wheel is a little different than doing it freehand. It requires centering and anchoring the pot on the wheel first, and then using your hands to shape the pot as desired. Using a pottery wheel to make a pot takes practice and patience, so don’t worry if your first pot doesn’t turn out exactly how you hoped it would. Just keep practicing!
Things You Should Know
- Tap on the clay mound in the center of the wheel to anchor it; if you don’t, the clay may fly off.
- Keep your hands wet at all times to prevent the clay from sticking to your hands.
- Apply gentle pressure to the sides of the clay while forming an indentation in the center to create the gap you’ll use to form the center of the bowl.
- Take your time forming the walls of the pot and use both hands to craft the shape of your pot.
Steps
Centering and Lubricating the Clay
-
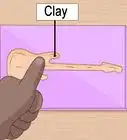
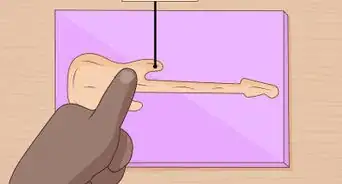
1Place 2 to 3 pounds (0.91 to 1.36 kg) of clay on the pottery wheel. Position the clay in the center of the wheel. If you are a beginner, then start with 2 pounds (0.91 kg) of clay. If you are more experienced, then you can use more clay, such as 3 pounds (1.4 kg).[1]
- Remember that the more clay you use, the larger your pot will be.
-
2Start the wheel on a low speed. A low speed is all you need to anchor the clay and lubricate it. Switch the wheel on and keep it at the lowest speed possible.[2]
- If you are a beginner, keep the speed low to medium while you work the pot. This will help to prevent the clay from getting off-centered.
Advertisement -
3Tap on the mound of clay to center it and anchor it to the wheel. While the wheel is spinning, tap the top and sides of the clay with the palm of your hand several times to ensure that it is centered. This will also help to secure the clay to the wheel base.[3]
- You do not need to push down hard on the clay. Just tap it.
-
4Wet your hands and place 1 hand on each side of the clay. Your hands need to be wet while you work a clay pot on the wheel or they will stick to the clay. Dip your hands in a bowl of water and keep this nearby for lubricating your hands as you work the pot.[4] [5]
Make sure that you also lubricate the walls of the pot as needed while you are working it. If the clay starts to feel sticky, then dip your hands in water.

Creating the Center of the Pot
-
1Apply gentle pressure to the sides of the clay with both hands. Place your hands on the sides of the mound of clay near the bottom of the mound with your thumbs on top of the mound. Apply even pressure to the clay as the wheel turns.
- Keep the wheel set to a low speed as you do this, or increase the speed slightly if you feel comfortable with a higher speed.
-
2Move your hands up the sides of the clay to shape it into a cone. As you apply pressure to the side of the clay, slowly move your hands up around the sides of the clay. The clay should start to form a cone with a flat top as you do this.[6]
- You may increase the speed of the pottery wheel while shaping the cone, or keep it at a low speed.
- Repeat this as many times as needed to mold the clay into the desired width and height.
-
3Move 1 hand to the top of the clay when it forms a cone and press down. Once your clay is in the form of a cone, place 1 hand on top of the clay and start pressing down with light to medium pressure. Keep the other hand on the side of the clay to maintain the shape.[7]
- Maintain an even wheel speed as you do this.
-
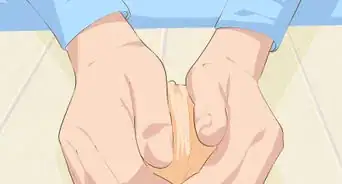
4Find the center of the clay and make an indentation with your thumbs. Look at the clay from the top and locate the center. Then, press down with 1 thumb to form an indentation while the rest of your fingers stay outside of the clay to help maintain the desired shape. Use both thumbs to gradually widen the opening as the wheel turns while your fingers guide the clay on the outside of the bowl.[8]
Make sure that you do not press all the way down to the base of the wheel. Leave 0.5 to 1 in (1.3 to 2.5 cm) of clay at the bottom for the base of the pot.
-
5Compress the rim with your fingertips to shape it. The rim of the pot will be wide at this point, but you can use your fingertips to define the shape. Squeeze the clay around the top of the pot while the wheel is still turning. Keep doing this until the rim is the desired thickness.[9]
- You may also use a chamois to compress the rim. Hold the chamois over the rim and press on it with your fingertips. This will help to remove excess moisture from the clay more efficiently, but it is optional.
Shaping the Walls of the Pot
-
1Press the back of your fingers against the inside of the pot. Insert 1 of your hands into the pot and position them near the bottom of the pot. Your fingers should be bent slightly to help you create the curve on the inside of the pot. Press the back (fingernail side) of your index and middle fingers against the inside of the pot and slowly move your hand up towards the rim.[10]
- Don’t bend your fingers too much or your knuckles will create grooves in the pot. Try to create a curve with your hand to create the same type of curve on the inside of the pot.
-
2Place the palm of your other hand on the outside of the pot. Position your other hand on the opposite side of where your hand is inside the pot. This is so that your hands can work together to shape the walls of the pot. Look down into the pot from above it to check the positioning.[11]
- Try to curve your hand on the outside of the pot in the same way as the hand inside the pot.
-
3Apply even pressure and slowly move your hands up to shape the pot. Press your hands together gently and slide them up towards the rim of the pot while the wheel is turning. Maintain even pressure and keep the pottery wheel turning at a low to medium speed.[12]
- Repeat this as many times as needed to get the desired shape and wall width.
- Make sure to wet your hands after each throw (upward movement) to keep the clay well lubricated.
-
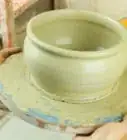
4Stop the wheel and carefully remove the pot from the pottery wheel. After you are finished with your pot, shut off the wheel. Then, use a wire to loosen the pot from the wheel by sliding the taut wire under the base of your pot right up against the wheel. Once the clay has come loose from the wheel, take the removable part of the wheel (bat) of its base, and use it to carry your pot over to a flat, dry surface. Tilt the bat slightly and use your hand to guide the pot onto the flat surface.[13]
- You may want to put down some newspaper to protect your surface before placing the clay pot on it.
-
5Fire and glaze the pot to finish it. Once you have finished shaping your pot, you can fire it and glaze it. This is required for making the pot waterproof and more durable. A glaze also creates an attractive glossy finish on the pot.[14] You will need to use a kiln to do the initial bisque firing, and then apply the glaze and fire the pot again.[15]
- You may also let your pot air dry, but keep in mind that the pot will not be waterproof if you let it air dry. Air drying can take several days to weeks depending on the size of your pot.
- If you do not have a kiln, you could try visiting a local pottery studio and asking if they will fire and glaze the pot for you. They might be willing to do so for a fee.
- Make sure you cover all of the pot with glaze except for the bottom. If you get any glaze on the bottom, your pot will stick to the shelf in the kiln.[16]
- Follow the instructions on the glaze so you know how many layers to apply.[17]

Expert Q&A
-
QuestionCan you make clay pots without a kiln?
 Natasha Dikareva, MFANatasha Dikareva is a San Francisco, California based sculptor, and installation artist. With over 25 years of ceramics, sculpting, and installation experience, Natasha also teaches a ceramic sculpture workshop titled "Adventures in Clay" covering concept development, hand-building techniques, texture, and glazing techniques. Her work has been featured in solo and group exhibitions at the Beatrice Wood Center for the Arts, Abrams Claghorn Gallery, Bloomington Center for the Arts, Maria Kravetz Gallery, and the American Museum of Ceramic Art. She has taught at the University of Minnesota and the American Indian OIC School. She has been awarded the Excellence Award at the 1st World Teapot Competition, Best in Show at the 4th Clay & Glass Biennial Competition, and a Grand Prize at the American Museum of Ceramic Art. Natasha holds an MFA from the University of Minnesota and a BFA from Kiev Fine Arts College.
Ceramics & Sculpting InstructorYou will need to use a kiln to do the initial bisque firing, and then apply the glaze and fire the pot again. Glazing and firing the clay pot is necessary to waterproof it and make it more durable. -
QuestionBut why I should wear odd clothes?
 Community AnswerSimply so you do not ruin your good clothes.
 -
QuestionWhat are the materials needed ?
 Community AnswerThere is a list of materials at the end of the article above.
Things You’ll Need
- Clay
- Pottery wheel
- Bowl of water
- Kiln
- Glaze


References
- ↑ http://www.lakesidepottery.com/Pages/Pottery-tips/Throwing-a-pot-Lakeside-Pottery-Tutorial.htm
- ↑ http://www.lakesidepottery.com/Pages/Pottery-tips/Throwing-a-pot-Lakeside-Pottery-Tutorial.htm
- ↑ http://www.lakesidepottery.com/Pages/Pottery-tips/Throwing-a-pot-Lakeside-Pottery-Tutorial.htm
- ↑ http://www.lakesidepottery.com/Pages/Pottery-tips/Throwing-a-pot-Lakeside-Pottery-Tutorial.htm
- ↑ https://www.thesprucecrafts.com/throwing-pull-up-walls-of-pot-2746275
- ↑ http://www.lakesidepottery.com/Pages/Pottery-tips/Throwing-a-pot-Lakeside-Pottery-Tutorial.htm
- ↑ http://www.lakesidepottery.com/Pages/Pottery-tips/Throwing-a-pot-Lakeside-Pottery-Tutorial.htm
- ↑ http://www.lakesidepottery.com/Pages/Pottery-tips/Throwing-a-pot-Lakeside-Pottery-Tutorial.htm
- ↑ https://www.thesprucecrafts.com/throwing-pull-up-walls-of-pot-2746275
- ↑ https://www.thesprucecrafts.com/throwing-pull-up-walls-of-pot-2746275
- ↑ https://www.thesprucecrafts.com/throwing-pull-up-walls-of-pot-2746275
- ↑ https://www.thesprucecrafts.com/throwing-pull-up-walls-of-pot-2746275
- ↑ http://www.lakesidepottery.com/Pages/Pottery-tips/removing-pot-off-the-bat.htm
- ↑ https://www.thesprucecrafts.com/an-overview-of-the-firing-process-2746250
- ↑ Natasha Dikareva, MFA. Ceramics & Sculpting Instructor. Expert Interview. 5 May 2020.
- ↑ Natasha Dikareva, MFA. Ceramics & Sculpting Instructor. Expert Interview. 5 May 2020.
- ↑ Natasha Dikareva, MFA. Ceramics & Sculpting Instructor. Expert Interview. 5 May 2020.
- ↑ https://www.thesprucecrafts.com/throwing-pull-up-walls-of-pot-2746275
About This Article