This article was co-authored by wikiHow Staff. Our trained team of editors and researchers validate articles for accuracy and comprehensiveness. wikiHow's Content Management Team carefully monitors the work from our editorial staff to ensure that each article is backed by trusted research and meets our high quality standards.
There are 7 references cited in this article, which can be found at the bottom of the page.
This article has been viewed 325,367 times.
Learn more...
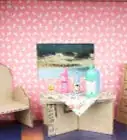
There's something special about miniature versions of life-sized buildings. Dollhouses have the power to light up the imaginations of both children and adults alike. All you need to make this realistic dollhouse is a box and basic craft supplies. Decorate the dollhouse with pretty colours and then fill it with tiny furniture. Have fun creating your very own dollhouse!
Steps
Creating the Main Structure
-
1Stand a box up lengthways. Any regular box will work for this activity. Opt for a big box for a large dollhouse or use a small box if you want a smaller project. Stand the box up on one of the narrow ends. If it has a lid, keep it to use later.[1]
- Shoeboxes work really well for this activity.
- Opt for a wooden crate if you want to make a wooden dollhouse.
-
2Create an A-frame roof for your dollhouse. Measure the depth of the box and then measure that length widthways on your lid and make a mark. Draw a line lengthways and cut down the line with scissors. Bend the trimmed lid in half widthways to create an A-frame roof. Then, attach 2 5 cm (2.0 in) pieces of sticky tape to the short edges of the roof and stick it to the top of your dollhouse.[2]
- If you don't have a lid, use a scrap piece of cardboard instead.
- If you are making a wooden dollhouse and want a roof, make an A-frame style roof out of pieces of wood.
- If you have made a wooden roof, secure it in place with super glue.
Advertisement -
3Decorate the outside of the dollhouse with tissue paper or paint it. This is a great chance for you to personalise your dollhouse and make it unique! Cut out pieces of tissue paper and stick them onto the dollhouse to cover the box. Alternatively, paint the box or cover it with stickers, sequins, or glitter.[3]
- To make the dollhouse look really realistic, draw bricks on it or cover it with paper that has a brick pattern.


Making Extra Rooms, a Door, and Windows
-
1Add vertical pieces of cardboard or wood to create internal walls. Trim a piece of cardboard or wood to the height of the first story. Position it in place and then attach it in place with hot glue. Repeat this step on the second story to create extra rooms or leave it as an open loft.[4]
- If you don't have hot glue, use super glue.
- Leave the glue to dry for about 1 hour.
-
2Trim cardboard or wood to create a second story. Place your dollhouse on top of a piece of cardboard or wood, draw around the base to create a rectangle outline, and then cut out the rectangle. Place hot glue or super glue on the edges of the rectangle and slide it horizontally into the dollhouse and position it halfway up the box to create a second story.[5]
- If you don't want a second story, simply skip this step.
-
3Draw the doors and windows onto the back of the dollhouse. Turn the dollhouse around so that the flat back of the box is facing you. Then, use a pen to draw a door and as many windows as you like. Consider placing at least 1 window in each room to make the house look realistic.[6]
- Leave at least a 2 cm (0.79 in) gap between each window to keep the structural integrity of the dollhouse intact.
-
4Use scissors or a jigsaw to cut out the windows. Poke the tip of the scissors or the blade into the middle of the window to make a hole. Then, use this hole to help you cut around the outline of your windows.[7]
- Try to cut as close to the outline of the window as possible so that you can't see the pen marks.
- If you don't have a jigsaw, consider hiring one from a hardware store.[8]
-
5Cut out the door to create an entrance to the dollhouse. If you have made a cardboard dollhouse, cut the top and 1 side of the door so that you can bend it open. Use scissors to cut along the top edge of the door. Then, cut along 1 of the long edges of the door. Fold the door back along the other edge so that it opens and closes like a regular door.[9]
- If you have a wooden dollhouse, cut out the entire door with a jigsaw.
- If you find it easier, use a craft knife to make the cuts on the cardboard instead.


Community Q&A
-
QuestionCan I make this with cardboard?
 Community AnswerYes. It may not be as sturdy, but it would work.
 -
QuestionCan I make a doll house using a big box?
 LavaWafflesCommunity AnswerYes. If the box comes with flaps on the top, cut them off and use glue to stick them in place for floors. Use extra bits of cardboard to make furniture.
 -
QuestionCan I stick two shoe boxes together to make a two story doll house?
 Community AnswerYes, you can. Place your shoeboxes side to side so they open out to you. Tape or glue them together then decorate the inside and outside.
Things You'll Need
- Box
- Scissors
- Ruler
- Sticky tape
- Hot glue gun
- Pen


References
- ↑ https://youtu.be/hQI9J0v-Szc?t=19
- ↑ https://youtu.be/hQI9J0v-Szc?t=26
- ↑ https://youtu.be/4VtMZNV2wx0?t=31
- ↑ https://youtu.be/hQI9J0v-Szc?t=189
- ↑ https://youtu.be/hQI9J0v-Szc?t=90
- ↑ https://youtu.be/4bfopIbbaCU?t=192
- ↑ https://youtu.be/4bfopIbbaCU?t=192
- ↑ https://youtu.be/f_WK69M0iPQ?t=17
- ↑ https://youtu.be/4bfopIbbaCU?t=192
About This Article

To make a simple dollhouse, start by standing a box up lengthwise to make the main part of the house. If you want a sturdier house, opt for a wooden crate instead of a cardboard box. If your box came with a lid, cut it lengthwise to fit the depth of the box and then bend it in half widthwise to form an A-frame roof. You can also use scrap cardboard or wood. When the roof is cut to the right size, attach it to the dollhouse with sticky tape or superglue. Next, paint the outside of the dollhouse or decorate it with tissue paper. Keep reading to learn how to add extra rooms, doors, and windows!