wikiHow is a “wiki,” similar to Wikipedia, which means that many of our articles are co-written by multiple authors. To create this article, 23 people, some anonymous, worked to edit and improve it over time.
There are 8 references cited in this article, which can be found at the bottom of the page.
The wikiHow Video Team also followed the article's instructions and verified that they work.
This article has been viewed 132,757 times.
Learn more...
Hacky sacks haven't made it to the Olympics yet, but you could change that. Get started by making your own training equipment. Here are several easy ways to make a hacky sack out of household materials or basic craft supplies.
Steps
Sewing a Sock
-
1Use this for an easy, but sturdy hacky sack. Anyone can make this hackysack, even if you've never sewed before. The result is pretty sturdy if you use strong thread. One disadvantage is that sand – a great stuffing for beginners or people practicing tricks – will leak out the hole. Most players will still have plenty of fun with rice or lentil stuffing instead.
-
Video Player is loading.
This is a modal window.
The media could not be loaded, either because the server or network failed or because the format is not supported.2Cut an old sock. Find a pair of old socks without holes or worn areas. Cut off the tip of each one, about 3–4 inches (7.5–10 cm) from the toes.[1]Advertisement -
Video Player is loading.
This is a modal window.
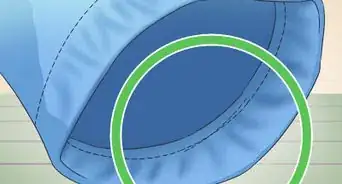
The media could not be loaded, either because the server or network failed or because the format is not supported.3Sew one piece most of the way closed. Thread a needle with a long piece of strong thread. Pull it through both sides of the sock, near the hole. Continue sewing by moving the needle back through the sock again in the other direction. Repeat this back-and-forth movement until the sock is sewn mostly shut. Leave a gap for stuffing the sock.- Polyester thread is cheap and strong, making it a good choice for this project.[2]
- The closer together your thread lines, the less your hacky sack will leak stuffing.
-
Video Player is loading.
This is a modal window.
The media could not be loaded, either because the server or network failed or because the format is not supported.4Pour in rice or other material. Stick a funnel in the hole, or a rolled-up paper cone. Fill the sock with stuffing material. Uncooked rice or lentils are cheap and large enough that they won't fall out much. Plastic pellets or steel pellets from a hobby store will give more control, and feel more like commercial hacky sacks.[3]- Sand and birdseed tends to leak out of this style hacky sack.
-
Video Player is loading.
This is a modal window.
The media could not be loaded, either because the server or network failed or because the format is not supported.5Sew the sock closed. Finish sewing the hole shut once the sock is filled. Tie the thread into a knot and snip off the excess. -
Video Player is loading.
This is a modal window.
The media could not be loaded, either because the server or network failed or because the format is not supported.6Sew the second sock over the first. For extra protection, pull the second piece of sock over the first. Sew it shut just as you did the first one. Align this sock so the two holes are on opposite ends, reducing the chance of material leaking out.

Using Balloons
-
1Use this to make temporary hacky sacks. Balloon sacks are super quick and easy to make. They won't last as long as other hacky sacks, but a replacement will only cost you a few minutes and a dip in the change jar.
-
Video Player is loading.
This is a modal window.
The media could not be loaded, either because the server or network failed or because the format is not supported.2Stick a funnel into the neck of a balloon. Get a round, uninflated balloon. Stretch the opening wide and push in the end of a funnel.- If you don't have a funnel, make one out of paper.
-
Video Player is loading.
This is a modal window.
The media could not be loaded, either because the server or network failed or because the format is not supported.3Fill with sand or other material. Sand-filled sacks are easy to "stall" on the foot, useful for beginners or people learning tricks.[4] Birdseed, dried beans or lentils, uncooked rice, or small beads are other fine alternatives. Fill the balloon to the neck. -
Video Player is loading.
This is a modal window.
The media could not be loaded, either because the server or network failed or because the format is not supported.4Cut off the neck. Remove any dangling rubber, to make the sack spherical.- If using fine sand, you may want to tie a knot instead. This helps stop sand leaking out, but the knot will make the ball bumpy.
-
Video Player is loading.
This is a modal window.
The media could not be loaded, either because the server or network failed or because the format is not supported.5Cover with several more balloons. Pull another balloon over the exposed hole and around the whole ball. Cut off the neck. Repeat with at least two more balloons, covering each previous hole. For a stronger sack, use up to ten balloons.- For decoration, you can cut small holes in the balloons so the different color shows through.[5]

Crocheting a Hacky Sack
-
1Choose a worsted weight yarn. Worsted weight yarn, the most common type, makes a good hacky sack. The exact size of the yarn doesn't matter much, as long as you use a matching crochet hook.
-
Video Player is loading.
This is a modal window.
The media could not be loaded, either because the server or network failed or because the format is not supported.2Crochet a short chain. Create a chain of six stitches, not counting the initial slipknot or the loop of yarn still on the hook.- If you don't know how to crochet, review the information here.
-
Video Player is loading.
This is a modal window.
The media could not be loaded, either because the server or network failed or because the format is not supported.3Review the single crochet stitch. You only need to know this most basic crochet stitch to make a hacky sack. Read the full details here.- In the UK, this is called the double stitch.
-
Video Player is loading.
This is a modal window.
The media could not be loaded, either because the server or network failed or because the format is not supported.4Single crochet twice in each stitch. Insert the hook back in the first stitch. Complete a single crochet twice in this stitch. Repeat for each stitch in the row, for 12 total stitches.- If you're having trouble fitting two single crochets in one stitch, loosen your stitches a little.
- Don't reverse direction – you want a circle, not a square.
-
Video Player is loading.
This is a modal window.
The media could not be loaded, either because the server or network failed or because the format is not supported.5Alternate one and two single crochets per stitch. Start the next row Perform two single crochets inside the next stitch. Perform one single crochet in the next stitch. Alternate this 2sc, sc pattern down the row, for 18 stitches. -
Video Player is loading.
This is a modal window.
The media could not be loaded, either because the server or network failed or because the format is not supported.6Continue increasing each row. As you do this, you'll see the ball taking shape, becoming wider. Follow these patterns for each row, using two single crochets per stitch where it says "2c" and one single crochet where it says "sc:"- Row 4: 2sc, sc, sc, repeat to make 24 stitches
- Row 5: 2sc, sc, sc, sc, repeat to make 30 stitches
- Row 6: 2sc, sc, sc, sc, sc, repeat to make 36 stitches
-
Video Player is loading.
This is a modal window.
The media could not be loaded, either because the server or network failed or because the format is not supported.7Fill out the middle with single crochets. Just repeat one single crochet per stitch to create the middle of the ball. Do this for seven rows (Rows 7–13). There should be 36 stitches per row. -
Video Player is loading.
This is a modal window.
The media could not be loaded, either because the server or network failed or because the format is not supported.8Learn how to decrease. You'll need to decrease the number of stitches to close the ball again. To do this, simply grab the next stitch and pulling a single crochet through both stitches at once. In other words:- Grab the next stitch and pull a loop through as usual (two loops on the hook).
- Grab the next stitch and pull another loop through all of them (three loops on the hook).
- Complete the single crochet by grabbing another loop of yarn, and pulling it through all three loops.
-
Video Player is loading.
This is a modal window.
The media could not be loaded, either because the server or network failed or because the format is not supported.9Start decreasing. Start narrowing the ball size by decreasing each row. Follow these instructions, decreasing each time it says "dec:"- Row 14: dec, sc, sc, sc, sc, repeat to make 30 stitches
- Row 15: dec, sc, sc, sc, repeat to make 24 stitches
-
Video Player is loading.
This is a modal window.
The media could not be loaded, either because the server or network failed or because the format is not supported.10Fill the sack. Pour in plastic pellets, uncooked rice, or dried lentils. If you want to use sand or birdseed, you'll need to sew it into a sock, then drop it into the crocheted hacky sack.- You may need to finish filling the sack as you go. Do this between rows, to avoid losing your place.
-
Video Player is loading.
This is a modal window.
The media could not be loaded, either because the server or network failed or because the format is not supported.11Complete the hacky sack shape. Continue shortening each row until the hacky sack is closed enough to keep the material inside. This should do it:- Row 16: dec, sc, sc, repeat to make 18 stitches
- Row 17: dec, sc, repeat to make 12 stitches
- Row 18: dec until hole is small enough to close off. (If stitching loosely, you may need to repeat this for another row.)
-
Video Player is loading.
This is a modal window.
The media could not be loaded, either because the server or network failed or because the format is not supported.12Finish the project. Weave the yarn through one of the stitches, pulling it with the hook or a yarn needle. Repeat to weave it through several stitches, then lock it in place by reversing direction and weaving through several more.[6] Snip off the rest of the yarn.

Knitting a Hacky Sack
-
Video Player is loading.
This is a modal window.
The media could not be loaded, either because the server or network failed or because the format is not supported.1Gather your supplies. For this hacky sack, it may use some old yarn and some dry mixed beans, and four sizes 6 double-pointed needles (DPN). The yarn calls for size 8 needles, but in order to keep the beans enclosed inside the hack sack, smaller needles should be used. -
Video Player is loading.
This is a modal window.
The media could not be loaded, either because the server or network failed or because the format is not supported.2Cast 6 stitches onto the first DPN. Divide the stitches among three DNP so there are two stitches on each needle. -
Video Player is loading.
This is a modal window.
The media could not be loaded, either because the server or network failed or because the format is not supported.3Without Twisting the yarn, begin the second row by using the needle in the right hand to knit the first stitch. Do not slide the stitch off after this first stitch is knitted. Instead, add a second stitch to the back of this. You should add 1. There should now be four stitches on the right-hand needle and one left on the other needle. Introduce the fourth needle by knitting the last stitch. -
Video Player is loading.
This is a modal window.
The media could not be loaded, either because the server or network failed or because the format is not supported.4Slide the first two stitches from the right-hand needle back onto the new fourth needle. There should now be three stitches on one needle and two on the other two needles. On the next needle, knit the first stitch, add one to the back, and then knit the last one. Do this same thing on the last needle. Each needle should have three stitches remaining. -
Video Player is loading.
This is a modal window.
The media could not be loaded, either because the server or network failed or because the format is not supported.5Repeat the pattern followed. Knit the first stitch, add one, and knit the remaining stitches. There should be four stitches now. Continue knitting in this fashion until each needle has ten stitches. This should be row 9.- A marker can be used to know what needle goes first.
- If you can't find a marker, find a hoop earring, safety pin, or a paperclip.
-
Video Player is loading.
This is a modal window.
The media could not be loaded, either because the server or network failed or because the format is not supported.6Rows 11-12 are straight knitting. Do not increase and make sure not to drop a stitch. This is where the paperclip can be helpful if possible. -
Video Player is loading.
This is a modal window.
The media could not be loaded, either because the server or network failed or because the format is not supported.7The next few rows, slip the needle through the back of the first two stitches. This should be on row 13. Knit these together and slip onto a needle. Knit the remaining 8 stitches. There should now be 9 stitches on this needle. Continue knitting in this fashion until there are 2 stitches on each needle. -
Video Player is loading.
This is a modal window.
The media could not be loaded, either because the server or network failed or because the format is not supported.8Fill the hackysack with beans. A funnel can be helpful if possible. Then continue knitting the stitches together two at a time until one stitch remains. -
Video Player is loading.
This is a modal window.
The media could not be loaded, either because the server or network failed or because the format is not supported.9Use a tapestry needle to close this last stitch. Before cutting, make sure to leave enough yarn so you can close any places where beans might be able to escape. When done with this, stick the tapestry needle into the center of the ball and pull it to the other side. Pull tightly and then cut the string so the end is somewhere inside the hackysack. Do this same thing to tie off the end string on the other side.- Use the stitching as a guide so the reinforcements can be hidden.
Community Q&A
-
QuestionHow do I make designs on a crocheted hacky sack?
 Community AnswerEmbroidery, surface stitching and tapestry crochet are easy ways to make designs!
 -
QuestionHow can I make this process easier?Community AnswerHave your friends or kids help, and turn it into a game.
-
QuestionWhat kind of materials should I use to make a backup sack?
 Community AnswerTo fill the hacky sack, use beads, beans or rice. For the outside, use fabric.
Warnings
- Birdseed or rice will eventually sprout when it gets wet.[7] Use inorganic stuffing if you want your sack to last longer without funky smells.⧼thumbs_response⧽
Things You'll Need
Filling (for all sacks)
- Coarse sand, birdseed, rice, beads, plastic pellets, or steel pellets
Hacky Sock
- Two socks
- Polyester thread
- Needle
Balloon Sack
- Balloons (at least four)
- Funnel or paper cone
- Scissors
Crocheted Sack
- Worsted weight yarn
- Crochet hook
- Yarn needle (optional)
You Might Also Like

This is a modal window.
This is a modal window.
This is a modal window.


This is a modal window.
This is a modal window.
This is a modal window.
This is a modal window.

This is a modal window.
This is a modal window.
References
- ↑ https://www.youtube.com/watch?v=fu9lspCvxwM
- ↑ http://www.craftsy.com/blog/2013/10/types-of-sewing-thread/
- ↑ http://worldfootbag.com/buyers-guide/
- ↑ http://worldfootbag.com/buyers-guide/
- ↑ http://pagingfunmums.com/2014/05/17/make-your-own-hacky-sacks/
- ↑ http://www.crochetguru.com/weave-in-yarn-ends.html
- ↑ http://worldfootbag.com/about-footbag/
- http://www.makeandtakes.com/easy-crochet-hacky-sack
- http://www.freshstitches.com/how-to-make-a-hacky-sack-crochet-easy/
About This Article
To make a hacky sack, start by cutting about 4 inches off the toes of an old pair of socks. Then, sew one of the socks shut, leaving a small gap for the stuffing. Next, fill the sock with uncooked rice or lentils. Once the sock is full, sew it closed before placing it inside the other sock for extra protection. Finish by sewing the second sock over the first one. For tips on how to make a hacky sack out of balloons, keep reading!