This article was co-authored by wikiHow staff writer, Maddie Holleman. Maddie Holleman is a Technology Writing Intern for wikiHow. Alongside writing many articles on technology and social media, Maddie has previously worked as a social media strategist and publicist for two organizations and has been using social media for years. She is currently pursuing a degree in Anthropology and Digital Studies at Davidson College.
This article has been viewed 54,547 times.
Learn more...
With Google Forms, you can easily make a sign-up sheet to schedule meetings, shifts, and any other appointments. Using the Choice Limit add-on for Google Forms will limit the number of responses allowed for each time slot on your sign-up sheet. This wikiHow article will teach you how to install the Choice Limit add-on and make a time slot sign-up sheet on Google Forms.
Steps
Download the Choice Limit Add-On
-
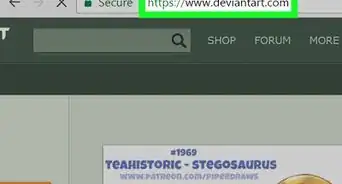
1Go to Google Forms. On your computer, visit the Google Forms website to start setting up a new form.
- You can find Forms in your Google Drive or by searching for it in your web browser search bar.
-
2Create a new form. On the homepage of Google Forms, click the "Blank" option with the logo of the plus sign to create a new form. If you already have a sign-up form started, open that form from your "Recent forms" on the homepage.[1]Advertisement
-
3Click the icon of the three dots. Once in a form, you will find this icon at the top right corner of the screen.
-
4Click "Add-ons". After clicking the three dots, you will see a drop-down menu. At the bottom of this menu will be the add-ons option. Click this option to open the add-ons marketplace.
-
5Find the Choice Limit add-on. In the add-ons marketplace, search for Choice Limit using the search bar at the top of this window. The add-on will appear with the purple icon of the Google Form logo.
- Choice Limit will allow you to remove options that have already been selected from your form sign-up sheet.
-
6Install Choice Limit. Once you have found and selected formLimiter in the add-ons marketplace, click the blue "Install" button. The add-on will request your permission to be installed in your Google Drive and use necessary functions.
- You will be prompted to choose the Google account you want to connect Choice Limit to.
- Choice Limit is free to install.


Set up Your Time Slot Sign-Up Sheet
-
1Title your form. At the top of your form, click on "untitled form" and type in a name for your form.
- Give your form a relevant title so that people know what they are signing up for.
- If you want to give additional information about what the sign-up form will be used for, you can type it in the "form description" section directly below the form's title.
-
2Name the first section of your form. Below the title of your form, you will see the first section of the form. Click "Question" to rename this portion of your form. For a time slot sign-up, you can name the sections of your form with either the day of the week or the date you are offering time slot sign-ups on.
- For example, you could title the sections of your form "Monday," "Tuesday," etc. if you were offering time slots throughout a given week. Alternatively, if you were asking people to sign up for time slots on specific dates, you could name the sections of your form "10/15," "10/22," etc.
-
3Choose a response format. Next to the name of a section, you will see the response format for that portion. The default response format is multiple choice. Click on "Multiple choice" to pull up the menu of response format options. Choice Limit will work with either multiple choice or checkboxes as the response format for your form.[2] Choose between these two options and click anywhere on the form to exit the selection menu and save your choice.
-
4Add your time slot options. Below the name of your section, type in the first time slot option. Click "Add option" directly below the first time slot to add more choices.
- If you have multiple sections in your form representing different days of time slots, be sure to add the correct time slots for each of these sections.


Use Choice Limit to Set Response Limits
-
1Click the puzzle piece logo. At the top of your form, you will see a puzzle piece logo. Clicking on this logo will pull up a list of your installed add-ons.
-
2Open Choice Limit. From the list of add-ons, choose Choice Limit, and then press "Start". You should see the add-on pop up in a menu at the bottom of your form.
-
3Set a response limit for your time slots. In the Choice Limit window, you will see the option to set a number for how many people can choose each time slot until it is removed from the form. Change this number using the plus and minus signs.
- The free version of Choice Limit caps this response limit at 3.
- The response limit will be applied to all time slots listed under the same section of the form.
-
4Click "Set Limit". This button will save this response number limit to that section of your form.
- If you have more than one section to your time slot sign-up form, repeat this process for each section.
-
5Send your form out. Once you have completed the process of setting a response limit for each time slot option, your form is ready to be sent out. Press the purple "Send" button at the top of your form, and share it via email or by copying a link.


References
About This Article