X
wikiHow is a “wiki,” similar to Wikipedia, which means that many of our articles are co-written by multiple authors. To create this article, 11 people, some anonymous, worked to edit and improve it over time.
The wikiHow Video Team also followed the article's instructions and verified that they work.
This article has been viewed 58,071 times.
Learn more...
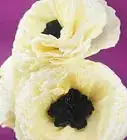
Tissue paper wins the thrifty decoration contest every time. Turn one of the cheapest items at the craft store into a bright, beautiful art project.
Steps
-
1Stack tissue paper sheets. Make a stack from 8–14 large sheets of tissue paper. Alternating two different colors leads to a pretty design.
-
2Fold the sheets accordion style. Fold the edge of the stack over by roughly 1½ to 2 in. (3.75–5 cm) and crease.[3] Turn the tissue paper upside down and fold the same edge back the other direction. Repeat until the entire sheet is folded into equal accordion folds.
- If you're using small sheets of tissue paper, make roughly ½ in. (2.5 cm) folds instead. You should be able to make at least 16 folds (eight forward, eight back).
Advertisement -
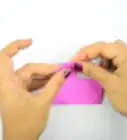
3Tie in half with wire. Fold the tissue stack lengthwise, to make a crease in the center. Unfold it back to a long strip. Tie a length of craft wire around the crease. Squish the fold between your fingers and pull the wire as tight as you can.[4] Twist the wire around itself and snip off the excess.
- You should end up with a long "bow tie" shape. Don't tie the wire around both halves, or you'll end up with a fan shape instead.
- Leave ½ in (2.5 cm) of extra wire if you want to attach the balls to other objects.[5]
-
4Cut the edges to a point or semicircle. Cut both ends of the tissue paper with a pair of scissors. Pointed ends make a more dramatic, ruffly ball. Rounded ends create a more natural floral look.
-
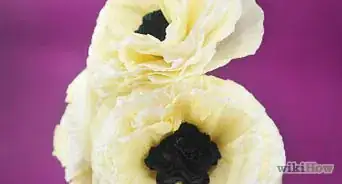
5Pull sheets of paper to the center. Lay your project on its side, with the peaks of the accordion fold sticking upward. Gradually pull the tissue paper to form a puffy flower shape:
- Bring the fold around to form a circle.
- Tug the top sheet of paper gently upward to start the ball. Do this on both sides of the fold.
- Repeat for the top ⅓ of the stack (roughly).
- Flip the stack over. Repeat for the top ⅓ on the other side.
- Turn the ball on its side. Tug apart the remaining sheets of paper to complete the ball.
-
6Decorate. Now it's time to decorate with your tissue paper ball. Toss it on windowsills and mantels, or add a little pizazz:
- Tie a length of fishing line or string around the ball's wire. Hang it from a ceiling fixture, or attach to the ceiling using tape or an adhesive hook.
- Place them on top of vases to make "Dr Seuss flowers."
- Make miniature balls and tie them around napkins for a pretty place setting.
- Stick small balls on wooden skewers to top a birthday cake.
-
7Finished.


Advertisement
Community Q&A
-
QuestionCan I make this with paper, too?
 Community AnswerYes, as long as it is sturdy paper and won't rip it will be fine to use paper.
Advertisement
Things You'll Need
- Tissue paper, 8–14 large sheets
- Floral wire or craft wire
- Scissors
- Fishing line (monofilament) or string

References
- ↑ http://www.marthastewart.com/265163/pom-poms-and-luminarias-how-to
- ↑ http://ruffledblog.com/do-it-yourself-tissue-paper-pomanders/
- ↑ http://www.allthingsthrifty.com/2010/04/tutorial-making-tissue-paper-balls.html
- ↑ http://www.allthingsthrifty.com/2010/04/tutorial-making-tissue-paper-balls.html
- ↑ http://ruffledblog.com/do-it-yourself-tissue-paper-pomanders/
- ↑ http://www.darlingdoodlesdesign.com/2013/04/tissue-pom-pom-tutorial.html
- ↑ https://www.youtube.com/watch?v=nDiGHGzGXK0
About This Article
Advertisement