This article was co-authored by wikiHow Staff. Our trained team of editors and researchers validate articles for accuracy and comprehensiveness. wikiHow's Content Management Team carefully monitors the work from our editorial staff to ensure that each article is backed by trusted research and meets our high quality standards.
There are 30 references cited in this article, which can be found at the bottom of the page.
This article has been viewed 10,507 times.
Learn more...
Waldorf dolls make great gifts for younger children or any special person in your life. The dolls were originally made in Europe from natural cloth and stuffing. The faces are almost entirely featureless so that children can develop their imagination during playtime. Making one of these dolls from scratch is somewhat complex and time-consuming, but it’s more than worth it if you want to surprise someone special with a handmade present. So if you're feeling crafty, round up your sewing supplies and get to work!
Steps
Making the Head
-
1Tie a string in the middle of some fabric tubing. Lay the tubing flat and run a string underneath it at the midway point. Tie it into a double knot to section the tubing off into 2 parts of equal length.[1]
- Fabric tubing is 1 1/8" wide tubing made from cotton gauze that’s intended for making Waldorf dolls. For an 8–10 in (20–25 cm) doll, use a strip that’s 12 in (30 cm) long.
- To help you find the middle, fold the tubing in half and line up the ends. The folded end of the tubing is where you want to tie the string.
- If you want your doll to have true-to-life skin color, use a beige, tan, or honey-colored tube of cotton knit fabric.[2]
-
2Form some corn fiber stuffing into a firm ball. Rip off a handful of corn fiber then knead and roll it in your hands to make a big puffball. Make one side perfectly round (for the head) and the other more conical or egg-shaped (where the head will turn into the neck).[3]
- Corn fiber stuffing is an extremely soft (and all natural) fiber specifically used for stuffing toys and dolls.
- As you stuff it in, some of the ball will elongate into more of an egg shape anyway—this is what you want to happen because that slope will differentiate between the doll's head and neck.
Advertisement -
3Slide the ball into one end of the tubing. Open the tubing and stuff the ball into it, keeping as much of the round shape at the top as possible. Push it all the way up to the where the knot is at the midway point in the tubing.[4]
- The material will stretch but may distort the round shape, so round it out again by rearranging the stuffing with your fingers.
-
4Knot the open end of the tubing to hold the fluff in place. Take the same end of the tubing that you just stuffed and tie a knot with the open end. Make sure the knot sits right below the stuffing so it holds it in place.[5]
- If you have extra tubing below the knot, feel free to cut it off.
-
5Create the neckline by tying a knot 3/4 of the way down the egg-shaped head. Look for the natural slope of the fluff under the cloth tubing—you'll have a more bulbous, rounded head on top and a more egg-shaped blob on the bottom. Tie the string where the tubing starts to slope between the bulbous head and the neck. Pull it tight and tie it in a knot so it holds the corn fiber stuffing in place.[6]
- If you don't see a natural slope, squeeze the fluff around with your fingers to make one.


Creating Facial Features
-
1Make the eye-line by tying a string around the middle of the head. Find the midway point across the bulbous head and tie a string around it. Pull it tight until the string makes an indentation. Cut off any excess string.[7]
- This slight indentation marks where the eyes go slightly back so the cheeks and brow are more prominent and lifelike.
-
2Tie a string from the chin to the forehead to make the outline of the face. Choose which side of the fabric you want to be the actual face of the doll. Run the string vertically around the ball-shaped head (horizontally if the doll is laying flat on your workstation). Tie it tight so the face is differentiated from the rest of the doll's head.[8]
- It won't be centered around the ball, but slightly to one side so that the face takes up about 1/4 of the ball.
-
3Sew the eye and neck strings in place with white thread. Insert the tip of the needle on the right side of the string and pull it out under the opposite side. Keep doing this until you've gone across the entire string that signifies the eye line. Repeat this for the string below that signifies the neckline.[9]
- This is very important so your doll's face and neck don't distort over time.
- Since you’re using cotton knit fabric, use a size 14 (US) or size 90 (EU) needle.
-
4Insert a pushpin where you want the nose to be and sew around and through it. Poke the pin straight into the doll’s face to mark the nose and insert the needle right next to it. Sew through the center point (where the pin is) at least 8 times until you've made a circle (like an asterisk-shape). Take out the pushpin and make 8 more stitches, running the needle from the side of where the pushpin was, through the center point, and out the other side each time.[10]
- Pull the thread tight to make a raised bump—that’s the nose!
- A good spot for the nose is in the center of the doll’s face, 1⁄4 inch (0.64 cm) below the eye line.
-
5Move the eye line string on the back of the head down and sew it in place. The back of the doll's head doesn't need an eye line indentation—pull it down so it dips along the back of the doll's neck. For a better grip on the string, use a crochet hook instead of trying to shimmy it down with your fingers.[11]
- If you plan to put a full head of hair on the doll or pull its hair into a ponytail (completely covering the back of its head), you can skip this step.
-
6Pull the slack end of the tubing over the head and knot it in place. Pick up the slack end of the tubing coming off the top of the doll's head. Turn it inside out and pull it down over the entire form you've just created. Tie a string around the bottom to hold the tubing in place.[12]
- This will create smooth lines on your doll's face and head, making it look more professional.


Assembling the Body
-
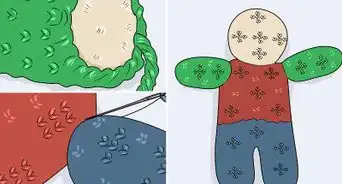
1Use pre-made body part templates or draw and sew your own from fabric. If you have some time to wait for shipping, you can order fabric templates online. If not, you can draw your own, cut them out, and sew them together. Use a fabric pen to draw 2 rounded “L” shapes for the legs, 2 rectangles for the torso, and 2 long hot-dog shapes for the arms. Cut out each shape and layer them together so the edges align. Sew the edges of each part together with a sewing machine.[13]
- Leave holes at the top of the legs and the top and bottom of the torso so you can stuff them later on.
- You can hand sew these pieces, but it will take a lot more time and may not look as refined.
- If you like, cut out the shapes with construction paper first and then use that to trace it onto the fabric. That way, you know exactly where to cut.
- Waldorf dolls are usually made from cotton knit fabric (also known as tricot or cotton interlock jersey) because it's stretchy enough to fit over the stuffing and hold its shape.
-
2Fold darts into one end of the torso and sew up the sides. Fold the corners of one end of the torso rectangle to make even darts. Sew them up, along with the 2 longest parallel sides. Sew the seam close to the edge, leaving a maximum of 1⁄2 inch (1.3 cm) of room on either side. Cut off the excess fabric once you’re done so you don’t have a bulge at the sides.[14]
- The darts will make sure the fabric doesn’t bunch around the neck and shoulders of the doll.
-
3Insert corn fiber stuffing into each of the legs. Rip off bits of the corn fiber stuffing and shove them into each of the legs. Use your fingers or the blunt end of a pencil to push the stuffing all the way to the feet so they’re nice and shapely.[15]
- If you notice extra fabric around the seams of the feet (once they fill out), feel free to carefully snip that off.
-
4Insert the legs into the torso with the darts facing the back of the legs. Position the torso piece so the darts are facing downward on your work area. Pick it up and insert the legs into the center, feet first. They should be covered by the torso piece like a tight pencil skirt.[16]
- If you need to, rearrange the legs so they’re facing straight up and together. That way, your doll won’t be duck-footed or pigeon-toed.
-
5Sew the fabric at the top of each leg to the torso piece. Carefully sew the fabric at the top of the legs to the fabric of the torso piece that envelopes them. If you’re using a sewing machine, go slow and make sure the needle is poking through all 4 layers of the fabric. After you tie off the thread, snip off the excess.[17]
- When you’re done, flip the torso piece upward so it’s above the legs (like a torso should be).
-
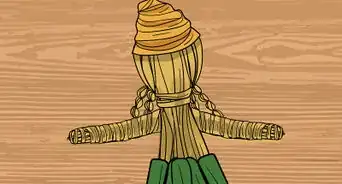
6Stuff the arms, leaving a space in the middle empty. Cut a slice into a single layer of fabric at the center of the arm sleeve. Rip off puffs of the corn fiber and stuff the arms, pushing each puff all the way to the doll's hands with your fingers before adding more. Leave about 2 inches (5.1 cm) in the center free of stuffing because that's where you'll be sewing the arms onto the back of the doll.[18]
- If you cut thumb grooves into your doll's hands, make sure they're facing upward when you lay the sleeve down to cut the layer of fabric. That way, the open slice will be hidden and secured when you sew the arm piece onto the doll.
-
7Sew the arms to the back of the doll just below the neck. Use a few pushpins to attach the arms to the back of the doll below the neck. Hold it up to make sure they're protruding from the doll just as you intended. If you cut thumb grooves at the end of each arm, make sure those are facing upward.[19]
- If one arm is limper, unpin the arm piece and put more stuffing into the limp arm.
- If you want the arms to stick forward a little, sew until you reach the side of the doll's face (just below where you think an ear would be).
-
8Stuff the torso and sew it onto the base of the neck. Fold over the top edge of the sleeve (outward toward you) that makes up the torso and slide it up to the doll's neck. Stuff it about halfway with corn fiber and then pin the loose fabric in place. Sew it all the way around.[20]
- If you have extra fabric (even with the darts near the neck and shoulder area), carefully cut away some of the fabric with scissors until you can bunch it around the neck and shoulders more smoothly.
-
9Add more stuffing to the torso through the armholes. Find the little holes under each arm where you can stuff more corn fiber in. Rip off small puffs of corn fiber and stuff the doll until it has a nice round belly.[21]
- It may help to use the blunt edge of a pencil to stuff the stuffing deeper into the torso.
Tip: If you want your doll to be super lifelike, give it a belly button bump! Sew around in a circle in the shape of an asterisk to make a raised bump (just like you did for the nose).[22]
-
10Sew up the armholes on the top of and under each shoulder. Use a needle and thread to sew the armholes shut around the arms. These holes will be located at the shoulders and in the dolls armpits.[23]
- It's okay to have some wrinkled fabric around the doll's arms because those areas will be covered by clothing anyway.
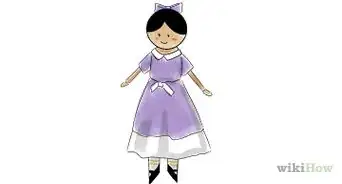
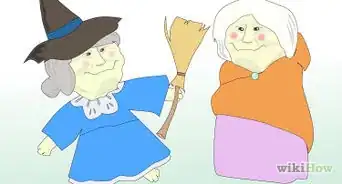
- Now that you’re finished with the doll’s body, you’re ready to make some clothes for the doll!


Adding Hair
-
1Cut 15 to 20 pieces of yarn roughly the same length. Get a ball of yarn and a ruler to measure each piece. If you want your doll to have longer hair, make each piece at least 6 inches (15 cm) long. For shorter hair, you can make them 3 inches (7.6 cm) long.[24]
- The yarn is going to be the doll’s hair, so pick a color that you like (e.g., golden yellow, brown, red, black). Or, if you want a more modern-looking doll, give it some hot pink, electric blue, or cool green hair!
-
2Pull apart the yarn’s threads to make thinner pieces. Use your fingers to pull apart each fiber of yarn into 3 different, thinner pieces. It may take some time, but the more pieces you separate, the thicker your doll’s hair will be and the better it will look.[25]
- This will make your doll’s hair look finer and more lifelike.
-
3Cut a 3–4 in (7.6–10.2 cm) piece of yarn and lay it flat on your workstation. Snip off a short piece of yarn to act as the hair part on your doll’s head. You can measure your doll’s head from the hairline to the back of their head to get a better estimate on how long this piece needs to be.[26]
- It’s better to have it be too long than too short because you can always snip off the ends.
-
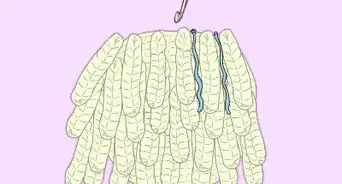
4Knot the thinned pieces of yarn onto the hairline piece of yarn. Gather the thin fibers of yarn in your hands, lining up the ends so they’re even. Fold them in half to make a loop. Run the loop under the center of the main hairline string and then pull the loose ends through the loop. Pull the knot tight so it stays on. Attach them to the center of the hairline string first and work your way outward (i.e., attach 1 to the left side then 1 to the right).[27]
- Repeat this for all of the yarn pieces that you’ve cut or until most of the hairline string is covered.
- Brush the hair with a wide-toothed comb so it straightens out a bit and looks less like yarn fibers.
-
5Sew the center part string onto your doll’s head. Arrange the hair over your dolls head (like a wig piece) so that the hairline is 1–2 inches (2.5–5.1 cm) above your doll’s eye line. Make sure the hairline piece is centered above your doll’s nose. Use a needle and thread to hand sew the hairpiece onto the top of the head.[28]
- Use thread that’s roughly the same color as the doll’s hair so the stitching isn’t noticeable.
-
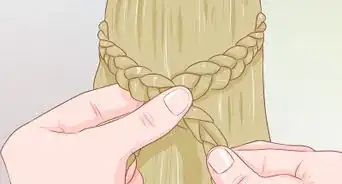
6Pull the doll’s hair into a low ponytail and sew along the hairline. Use a small rubber band to tie your doll’s hair back into a low ponytail—this will pull the yarn taut so you can secure the hair in place. Use the same colored thread and needle to sew the hair in place onto the doll.[29]
- If you want your doll to have moveable hair, feel free to skip this step.
- You can also skip the extra sewing and leave your doll’s hair pulled back into a ponytail—that way, whoever you give it to can style its hair however they like!


Warnings
- Always keep your fingers at least 1 inch (2.5 cm) away from the presser foot of your sewing machine.[30]⧼thumbs_response⧽
Things You’ll Need
- Fabric tubing for Waldorf doll
- Fabric (cotton knit, for body parts)
- String
- Scissors
- Corn fiber stuffing
- Pushpin
- Sewing needle (size 14 US or 90 EU)
- White sewing thread
- Sewing machine
- Yarn
- Ruler
- Small rubber band
- Skin-colored woven fabric (optional, for covering the head)
- Wide-toothed comb (optional, for brushing the doll’s “hair”)

References
- ↑ https://youtu.be/dFbOIRIT6iE?t=22
- ↑ https://youtu.be/06VxuK5p9H0?t=122
- ↑ https://youtu.be/dFbOIRIT6iE?t=37
- ↑ https://youtu.be/dFbOIRIT6iE?t=50
- ↑ https://youtu.be/dFbOIRIT6iE?t=59
- ↑ https://youtu.be/dFbOIRIT6iE?t=68
- ↑ https://youtu.be/dFbOIRIT6iE?t=85
- ↑ https://youtu.be/dFbOIRIT6iE?t=114
- ↑ https://youtu.be/dFbOIRIT6iE?t=143
- ↑ https://youtu.be/dFbOIRIT6iE?t=185
- ↑ https://youtu.be/dFbOIRIT6iE?t=248
- ↑ https://youtu.be/dFbOIRIT6iE?t=297
- ↑ https://youtu.be/VHkLL0BTqrc?t=122
- ↑ https://youtu.be/VHkLL0BTqrc?t=324
- ↑ https://youtu.be/VHkLL0BTqrc?t=694
- ↑ https://youtu.be/VHkLL0BTqrc?t=1471
- ↑ https://youtu.be/VHkLL0BTqrc?t=1544
- ↑ https://youtu.be/06VxuK5p9H0?t=238
- ↑ https://youtu.be/06VxuK5p9H0?t=257
- ↑ https://youtu.be/06VxuK5p9H0?t=279
- ↑ https://youtu.be/06VxuK5p9H0?t=329
- ↑ https://youtu.be/06VxuK5p9H0?t=410
- ↑ https://youtu.be/06VxuK5p9H0?t=341
- ↑ https://youtu.be/SFs8L2l7Was?t=38
- ↑ https://youtu.be/SFs8L2l7Was?t=32
- ↑ https://youtu.be/SFs8L2l7Was?t=16
- ↑ https://youtu.be/SFs8L2l7Was?t=65
- ↑ https://youtu.be/dyDs93hCVa8?t=79
- ↑ https://youtu.be/dyDs93hCVa8?t=142
- ↑ http://safety.ucanr.edu/files/1564.pdf
About This Article