wikiHow is a “wiki,” similar to Wikipedia, which means that many of our articles are co-written by multiple authors. To create this article, 16 people, some anonymous, worked to edit and improve it over time.
This article has been viewed 82,237 times.
Learn more...
Whiteboards are great to use for classrooms, homes and offices. You can write down the daily schedule, business plans, school lessons, or drawings of any type. Whiteboards can be bought pre-made, however they are typically expensive, especially when you need a large one. Luckily, there are numerous ways to make a whiteboard yourself, each of which is easy and fun to do. Gather together a few materials, set aside a bit of time, and you will be on your way to making your very own whiteboard!
Steps
Assembling a Large Whiteboard for Your Classroom
-
1Gather your materials. You will need to purchase one or two pieces of white panel board as big as your the space on your wall you wish to hang it on. This can be found at home improvement stores and/or arts and crafts stores. You will also need to get:
- Rotary saw or hand saw
- Pencil
- Measuring Tape
- Four 2 inch screws(wood, concrete, and/or brick wall)
- Four washers(wood, concrete, and/or brick wall)
- Drill (wood, concrete, and/or brick wall)
- Magnets (metal wall)
- Super glue or hot glue (metal wall)
-
2Measure out your wall space. Whether the space be in a classroom or your home, measure it out with a tape measure. Once you have a rectangular measurement (for example, 30 inches X 45 inches) decide whether you will have to divide this size into two, so that you have two separate boards. This all depends on a number of factors such as how you will be transporting the board to its final location (pick-up truck, van, car, etc.), the size of the door you have to get the board through, etc.[1]Advertisement
-
3Purchase some white panelboard. This is board used solely for dry/erase purposes which can be found at arts and crafts stores as well as home improvement stores. They are usually bought in standard sizes, so you will not be able to get the board cut in-store. The board you purchase will need to be bigger than the measurements you made of your wall space. This means that you will need to have either a table or rotary saw to cut it down to the proper size.[2]
-
4Cut your panelboard down to size. Lay the board face down so that the smooth side you write on is facing the table. Next, measure out the dimensions of your wall space on the back of your board. You can highlight your measurements with a light pencil mark. If you are using one large piece of board which will later be divided into two pieces, do ahead and draw the line down the middle where the board will be split.[3]
- Transfer the board to a safe location such as outside or in your construction garage. Put on goggles before you begin sawing your board. Place the board face down again so that you can see your pencil markings.
- Take out either a table saw or rotary saw. Cut along the pencil lines. If you have divided your board into two pieces, cut along the middle line as well.
- Once you have cut the piece(s) use a piece of sandpaper to go around the edges. Rub them with the sandpaper until they are smooth.
-
5Secure your board to a wooden wall (option 1). First you will have to transfer the board(s) to where you will hang them. Depending on the wall type, you will have to pick the best way to hang the board. If your wall is wooden, you should first pre-drill a hole in each of the four corners. Then have someone else hold the board against the wall in the exact spot you want it.[4]
- For each hole, place a washer down over the hole, and then a screw through the hole. Take your drill and drill the top left (or right) screw into the wall. You might want to drill your first screw only partially through so that you can still swing and adjust the position of your board.
- Make sure if you are doing this in a school that you have checked with the building codes and the school maintenance workers.
-
6Secure the board to a metal wall (option 2). Flip your board over so that the back is facing upwards. You will have to attach magnets onto the back. There are two options for this. One is to buy adhesive magnets, where all you have to do is to remove the adhesive strip and press it against the board. Make sure that you have a solid strip of magnet around all four edges of the board. Extra magnets will only further secure your board to the wall.
- The second options is to buy more traditional magnet strips which need to be glued onto the back of your board. It is best to use either hot glue or super glue which will help the magnets stick the best.
- Once again, make sure that there is at least a solid strip of magnet around each of the edges of your board. More magnets attached to the back are always a plus, and will help your board stick to the wall better.
-
7Secure your board to a concrete or brick wall (option 3). This is similar to wooden walls. You will have to pre-drill a hole into each of the four corners of your board. The difference between this and wood is that you will have to pre-drill holes into the wall as well.[5]
- For this, you will need to first position the board against the wall exactly as you would have it hang. Trace around the board with a light pencil mark. Then eyeball where your pre-drilled holes are on your board (usually 1 inch down/up and 1 inch over from each corner) and make a mark on the wall. Drill a small hole into each of these marks.
- Then have someone else hold the board up in the correct spot. Place a washer and a screw threw each hole. Drill the top left (or right) screw in first. Leave a bit of space between the screw and the wall to allow you to adjust/swing the board into the correct position.
- Because you need to drill holes into the wall for this option, make sure you clear it with the building guidelines and school officials first.


Making Small Whiteboards for Your Classroom
-
1Gather your materials. You will need a large piece of cardboard. This can be found on a cardboard box, or you can buy sheets of cardboard at home improvement stores. You will also need:
- Pencil
- Ruler
- Scissors
- White, or light colored printer paper
- Clear plastic sheets
- Duct tape
- Liquid glue or glue sticks
- Masking tape (optional)
- Sharpie/marker (optional)
-
2Cut a small piece of cardboard. First purchase a large piece of cardboard from an arts and crafts store. You can also cut out one of the panels from a cardboard box using a knife or a pair of scissors. After you have a large piece of cardboard, you can then cut it down to the appropriate size for each individual whiteboard.[6]
- Mark on the cardboard, using a pencil and ruler, a rectangular shape. You can use the standard size of a piece of notebook paper which is 8.5 X 11 inches. However, depending on how many boards you wish to create, and your own personal preference, you will want to maximize your use of the cardboard. This might mean you make slightly smaller boards so that you don't have to buy so many large sheets of cardboard, and have so much wasted cardboard left over.
- After the rectangular shape is marked out with a pencil, go ahead and cut it out using either a knife or a pair of scissors. Don't worry about the edges being rough, as they will be covered up later.
-
3Cut out a piece of paper. First purchase standard printer paper (8.5 X 11 inches). White is the best color to choose as the writings on the whiteboard will show more clearly. However, you can also choose lighter shades of primary colors, such as a light green, blue, red, etc. Next, lay one piece of paper over the rectangular shaped cardboard.[7]
- If the piece of paper and cardboard are the same size, all you have to do is to glue them together.
- If the piece of paper is slightly larger, lay the cardboard overtop of the piece of paper. Make sure that each exposed side of paper is equidistant in size. Trace around the piece of cardboard with a light pencil mark onto the piece of paper. Cut out the rectangle using a pair of scissors or a rotary blade.
-
4Glue the cardboard and paper together. Glue the piece of paper onto the piece of cardboard so that each side is flush with one another. You can use either liquid glue or a glue stick. If you use liquid glue, make sure that it is spread evenly over the cardboard before you press the paper and cardboard together.[8]
- Smooth over any bubbles or wrinkles in the paper with your hands.
- After the glue has been applied, press the two tightly together with your hands. Hold for about a minute until the glue begins to dry.
- If the paper is still slightly loose on the edges, you can either apply some extra glue, or wait until you secure the final product with duct tape later on.
-
5Add a clear plastic sheet. You can purchase what are commonly termed "transparencies" online. These are clear plastic sheets that used to be used on projectors in many classrooms. However, if you can't find these, you do have some other options. One is to go to your local arts and crafts store. They should have either precut plastic sheets, or large sheets on the bar that they will cut for you.[9]
- You can also use the clear plastic in front and back of binders. You can cut the piece of plastic off the front and back with a pair of scissors or a rotary blade.
- If the piece of plastic is the same size as the cardboard/paper, you can move onto the next step. If the plastic is slightly larger, place the cardboard/paper overtop of the plastic. Use a magic marker and trace around the cardboard/paper.
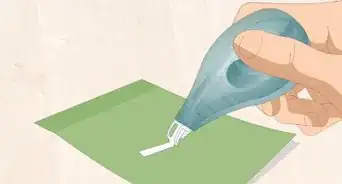
- Cut out the rectangular shape with a pair of scissors or rotary blade. Take either an eraser, or a tissue with some windex, and wipe off the magic marker.
-
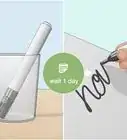
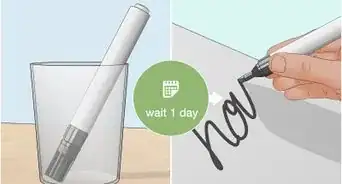
6Attach the plastic to the top of the paper. Take the piece of plastic and place it overtop of the paper side of the cardboard/paper combination. Turn the entire board so that it is facing landscape style. Next, take duct tape and place the exposed sticky end of the duct tape at the bottom left hand corner. Note: you only want half the duct tape on the top of your board, the other half will be folded back.[10] [11] [12]
- Gradually unwind your duct tape, pressing down the duct tape against the board as you go along. Remember, only half of the duct tape should be shown on top of the board. Once you get to the corner, rip the piece of duct tape or cut it with scissors.
- Then, take the duct tape that is loose and fold it backwards against the back of the whiteboard. You can flip the board over entirely if this is easier for you. Smooth out the duct tape and press against it with your hands to ensure it sticks.
- Repeat the same step but with the other three sides of your white board. It is fine if the duct tape slightly overlaps on the corners.
-
7Repeat the previous steps over again. Do so until you have enough boards for your entire classroom. Make sure that each student has at least one classroom safe magic marker, and a small eraser. Do not use the tissue/Windex combination as this could be unsafe for small children.
- You do have some options when it comes to decorating them. You can add a small piece of masking tape to the bottom of the board. This way you can write your student's name on the board with either a pencil, pen or marker.
- You can also go over the edge (duct tape) with a Sharpie and add designs such as vines, trees, flowers, sports balls, etc.


Creating a Galvanized Steel Whiteboard for Your Home or Office
-
1Gather your materials. You will need a piece of galvanized steel (see step two). These come prepackaged and can be found at arts and crafts stores as well as home improvement stores. Since they are not cut on-site, please make sure to measure the space on your refrigerator or office wall before you purchase a piece of steel. You will also need:
- A piece of wood or cork board, bigger than your steel (you will cut it down to size)
- Pencil
- Hand saw or electrical radial saw
- Sand paper
- Wall hook (if hanging on wall)
- Nails (if hanging on wall)
- Hammer (if hanging on wall)
- Magnet strips (if hanging on refrigerator)
- Hot glue or super glue (if hanging on refrigerator)
-
2Purchase a piece of galvanized steel. The great thing about galvanized steel is that it is both magnetic and dry erasable. Most home improvement and arts and crafts stores have galvanized steel for sale for this exact reason. Galvanized steel is sold in standard sizes, not cut on site, so you will have to measure your wall/fridge space ahead of time before you go into the store.
- There are usually different shades of galvanized steel. Since you will be making a whiteboard out of it, it is best to pick a lighter shade of gray.
- You won't be able to cut the steel unless you have serious construction equipment. Therefore, the standard size of steel you buy will have to fit within the wall/fridge space.
-
3Cut a piece of wood down to size. You will need to purchase a relatively thin piece (1/4 inch) of wood or cork board that is the size of your galvanized steel. Wood/cork board which is cut on site to the perfect size is always your best option. However, if the store won't cut it for you, you will have to do it at home. Buy a piece of wood or cork that is larger than your piece of galvanized steel so that you can cut it down later on.
- If you are affixing the board to your refrigerator use cork board, not wood (will prevent scratching).
- Place the piece of steel overtop of the board. Take a pencil and trace around the steel, onto the board. Lift away the steel and keep it somewhere safe.
- Next, cut the rectangular shape out using a saw. You will want to do this somewhere safe (outside and away from children). You can either use a hand saw or an electric radial saw.
- Once the board has been cut, take a piece of sand paper to the edge so that it is smooth all around.
-
4Attach a wall hook to your board (option 1). If you wish to hang your final product on a wall you will have to attach a wall hanger to your board. Flip your wooden/cork board landscape style. Place your hanger at the center top of your board, about 1 inch (3 cm) from the top. You can use a ruler to measure both sides of the hanger to make sure that it is in the middle. Nail it in using two nails and some gentle taps of a hammer.[13]
- The nails will go through the board. Take some pliers and snip off the two pointy ends. Then sand them down using a piece of sandpaper or an electric sander.
-
5Attach magnets to your board (option 2). If you are hanging it on your refrigerator you will need to attach magnets. You can buy magnet that has an adhesive strip. All you have to do is to cut your magnet strip into the appropriate pieces (one for each corner, and one for the center) and then press the adhesive side onto the board.[14]
- If you are buying regular magnets, simply cut the magnet into the appropriate pieces (one for each corner, and one for the center) and attach them using a small helping of super glue.
- You can also buy metal clips which have magnets on them. Purchase two or three and clip onto the top of your final product. However, the board will be relatively heavy, so you will need to get clips with strong magnets in them.
-
6Glue the board and steel together. Apply a large helping of super glue or Gorilla glue to the side of your board without the hook or magnets. Have your galvanized steel nearby. Position it so that it directly overlaps the board. Press the steel against it. Run over the whole piece with your hands.[15]
- Leave the two sit overnight so that you can ensure they are stuck together. If you want to, you can place a book overtop of them in order to ensure that they stick together.
- The next day, press your hand against the steel and try to gently move it around. If it is secure, it will not move. If it is still loose, lift the steel up, apply some more glue, and wait another night for it to dry.
-
7Hang your board up. If you attach it to the wall you will have to hammer in a nail so that you have something for your hanger to catch. Nails about 1 inch (3 cm) long should do the trick. If it is going on your refrigerator place the magnet side against the fridge. Because your board is magnetic you can also attach a small magnet to a magic marker.[16]
- Either attach an small adhesive magnet to a marker, or hot glue on a small magnet to your marker.
- When you car done writing with the marker, simply press the magnet against the galvanized steel and it should stick.
- You can also add other magnets you buy from elsewhere, such as on a holiday vacation.


Warnings
- Check with the local building codes and/or maintenance workers if you are hanging your board in a school or office.⧼thumbs_response⧽
- When and/if you use a saw, make sure to use the proper eye protection. Goggles need to be worn at all times. Also make sure to handle the saw properly. Do not place your saw near your fingers. Make sure that there are no children around when you use the saw.⧼thumbs_response⧽


-Step-22.webp)
References
- ↑ http://fairydustteaching.com/2012/03/diy-white-boards-so-cheap/
- ↑ http://fairydustteaching.com/2012/03/diy-white-boards-so-cheap/
- ↑ http://fairydustteaching.com/2012/03/diy-white-boards-so-cheap/
- ↑ http://www.primermagazine.com/2012/learn/make-a-giant-whiteboard-for-only-15
- ↑ http://www.primermagazine.com/2012/learn/make-a-giant-whiteboard-for-only-15
- ↑ http://teachnet.com/manage/classroom-management/whiteboards-on-a-zero-budget/
- ↑ https://www.youtube.com/watch?v=34D8pmWjoU4
- ↑ https://www.youtube.com/watch?v=34D8pmWjoU4
- ↑ http://teachnet.com/manage/classroom-management/whiteboards-on-a-zero-budget/
- ↑ https://www.youtube.com/watch?v=Mrw6Gew2feI
- ↑ http://teachnet.com/manage/classroom-management/whiteboards-on-a-zero-budget/
- ↑ https://www.youtube.com/watch?v=34D8pmWjoU4
- ↑ http://www.thekitchn.com/how-to-make-a-magnetic-galvanized-steel-dry-erase-board-projects-from-the-kitchn-217415
- ↑ http://www.thekitchn.com/how-to-make-a-magnetic-galvanized-steel-dry-erase-board-projects-from-the-kitchn-217415
- ↑ http://www.thekitchn.com/how-to-make-a-magnetic-galvanized-steel-dry-erase-board-projects-from-the-kitchn-217415
- ↑ http://www.thekitchn.com/how-to-make-a-magnetic-galvanized-steel-dry-erase-board-projects-from-the-kitchn-217415
About This Article
To make a small whiteboard, start by cutting out a rectangular piece of cardboard. Then, cut out a piece of white paper that's the same size, and glue it to the top of the cardboard. Next, cut out a piece of clear, plastic transparency paper, and position it over the paper-covered side of the cardboard. Finally, secure the transparency paper to the cardboard with duct tape. To learn how to make a large whiteboard that you can mount on a wall, keep reading!