This article was co-authored by wikiHow Staff. Our trained team of editors and researchers validate articles for accuracy and comprehensiveness. wikiHow's Content Management Team carefully monitors the work from our editorial staff to ensure that each article is backed by trusted research and meets our high quality standards.
This article has been viewed 57,344 times.
Learn more...
Accordion scrapbooks are miniature scrapbooks that are easy to create because they don't require that you bind the covers and stitch the pages. Best of all, they don't require special materials; all you need is some paper, thin cardboard, scissors, and glue. Once you get the hang of it, you can make more scrapbooks for various events and occasions!
Steps
Folding the Paper
-
1Cut your paper into 4 by 12 in (10 by 30 cm) strips. You will be folding the strips into thirds, with each square creating a single page. This means that 1 strip will give you 3 pages. How many strips you end up making is up to you.[1]
- Plain, white printer paper will work great for this, but you can also use construction paper or scrapbooking paper.
- Use a paper slicer for the neatest finish, otherwise use scissors.
-
2Fan-fold the paper every 4 inches (10 cm). Get out your first strip, and fold it widthwise 4 inches (10 cm) from 1 of the narrow ends. Flip the paper over, measure another 4 inches (10 cm), and fold it again. Do this for all of the strips that you cut.[2]
- You are essentially creating a 4 by 4 in (10 by 10 cm) fan.
- Run your fingernail across each crease to make it nice and sharp.
Advertisement -
3Overlap and glue ends of your first 2 strips. Hold 2 strips together, end-to-end. The left end of the first strip should be pointing up and the right end of the second strip should be pointing down. Slide the ends into each other, like hooks, then secure them with glue.[3]
- A glue stick will work the best for this, but you can also apply a thin layer of liquid glue with a paintbrush.
- Don't just stick 2 strips together end-to-end, otherwise, you will lose the zigzag fold.
-
4Repeat the process for the rest of the strips. Alternate the directions that they point in so that you have a continuous zigzag, with no vertical lines. You may have to temporarily secure the previous strips with paper clips or clothespins so that they don't fall apart.
-
5Set the accordion aside so that the glue can dry. If you want to, you can place a heavy book or 2 on top of it to help weigh it down.[4] How long this takes depends on the glue that you are using; it shouldn't take more than 15 or 20 minutes, however.
- While the glue is drying, you can work on making the covers. This will save you some time.


Making the Covers
-
1Cut two 4 1⁄2 in (11 cm) squares out of thin cardboard. This is large enough to make a set of covers for 4 in (10 cm) pages. If your pages were a different size, make the cardboard squares 1⁄2 inch (1.3 cm) larger instead.[5]
- For example, if you made 6 in (15 cm) pages, then make the cardboard squares 6 1⁄2 inches (17 cm).
- Use a metal straight-edge and a craft blade for the most precise finish.
-
2Cut two 5 1⁄2 in (14 cm) squares out of scrapbooking paper. This will make the pattern for your cover, so choose something that fits the theme of your scrapbook. For example, if this is for a baby shower, you could pick baby-themed scrapbooking paper.[6]
- The paper can be patterned or solid-colored.
- If you can't find scrapbooking paper that you like, you could use wrapping paper instead.
-
3Glue the cardboard to the back of each piece of paper. Set the scrapbooking paper down so that the blank side is facing up. Coat the back of each cardboard piece with glue, then press it down onto the scrapbooking paper, making sure that it is centered.[7]
- A glue stick will work the best for this. You can also apply a thin coat of white school glue with a brush.
-
4Clip the corners off of the paper to reduce bulk. Use scissors or a craft blade to slice the scrapbooking paper corners off until they are flush with the cardboard. This is not absolutely necessary, but it will help reduce bulk when you go to fold and glue the paper.
- Make sure that you do this for all 4 corners on each piece of cardboard.
-
5Secure the edges of the scrapbook paper to the front of the cardboard. Coat the edges of the scrapbook paper with more glue. Next, fold them over, then press them down onto the cardboard.[8]
- Alternatively, you can secure the edges with strips of double-sided tape.
Assembling the Scrapbook
-
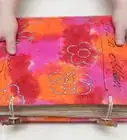
1Glue the cardboard to the front and back of your accordion. Coat the first page of your accordion with glue, then press the first cover cardboard-side-down onto it. Flip the accordion over, and do the same thing with the other cover.[9]
- Make sure that you are pressing the cardboard side into the glue. The scrapbook side should be visible.
- Let the glue dry before moving on.
-
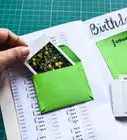
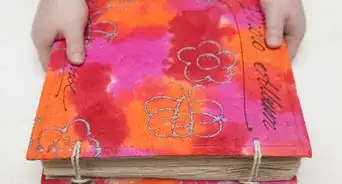
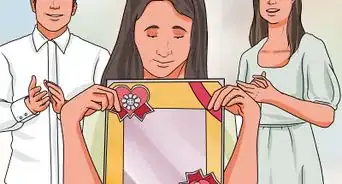
2Decorate the covers, if desired. Browse through the scrapbooking section of a craft store, and find items that are related to the theme of your scrapbook. This can be things like buttons, cabochons, stickers, and so forth. You can also use stamps, glitter, and embossing powder.
- Glue a square of solid-colored paper in the middle of your cover, then create a title using stickers or stamps.
- Add a border to your scrapbook with washi tape, glitter, ribbon, or lace.
- Layer 3D items on top of flat items. Hot glue or tacky glue will work especially well for this.
-
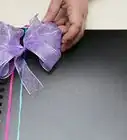
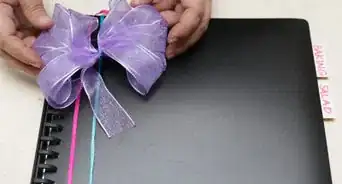
3Add a ribbon closure to your scrapbook, if desired. Cut a piece of ribbon that's 3 to 4 times the width of your scrapbook. Find the middle of your ribbon, then secure it to the back-center of your scrapbook with a drop of hot glue. Wrap the ribbon around the scrapbook and tie it into a bow in the front.[10]
- Give your ribbon a nicer touch by cutting the ends at angles, then sealing them with a flame.
-
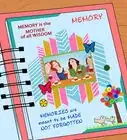
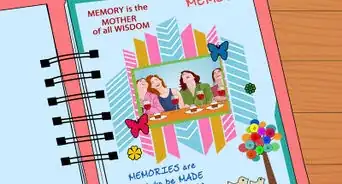
4Open your scrapbook and decorate the pages. Each 4 by 4 in (10 by 10 cm) square equals 1 page. Decorate the pages with photos, stickers, notes, and other scrapbooking embellishments. Flip the scrapbook over, and repeat the process on the back.
- Try to keep to a specific theme for your scrapbook. For example, if this is for a baby shower, then you could include photos from the event.
Community Q&A
-
QuestionCan I put in more than three pages?
 Community AnswerYes! You can put in as many pages as you want! Keep in mind that these pages will expand into a continuous strip of paper. The more pages you make, the longer this strip will be.
Things You'll Need
- Plain paper
- Patterned paper
- Thin cardboard
- Craft blade
- Metal ruler
- Paper slicer or scissors
- Glue stick or liquid glue
- Hot glue or tacky glue
- Embellishments
- Ribbon


References
- ↑ http://www.clubcrafted.com/2017/01/04/diy-mini-accordion-scrapbook/
- ↑ http://www.clubcrafted.com/2017/01/04/diy-mini-accordion-scrapbook/
- ↑ http://www.clubcrafted.com/2017/01/04/diy-mini-accordion-scrapbook/
- ↑ http://www.readbrightly.com/diy-accordion-book/
- ↑ http://www.clubcrafted.com/2017/01/04/diy-mini-accordion-scrapbook/
- ↑ http://www.clubcrafted.com/2017/01/04/diy-mini-accordion-scrapbook/
- ↑ http://www.readbrightly.com/diy-accordion-book/
- ↑ http://www.readbrightly.com/diy-accordion-book/
- ↑ http://www.readbrightly.com/diy-accordion-book/
About This Article