wikiHow is a “wiki,” similar to Wikipedia, which means that many of our articles are co-written by multiple authors. To create this article, 42 people, some anonymous, worked to edit and improve it over time.
This article has been viewed 1,232,542 times.
Learn more...
An invoice is a notice you send to customers or clients to notify them that payment is due for services you have performed. An invoice should outline what services you performed, how much the client owes and where they should send your payment. Learn how to create an invoice template you can use each time you perform a service.
Steps
Creating a Header
-
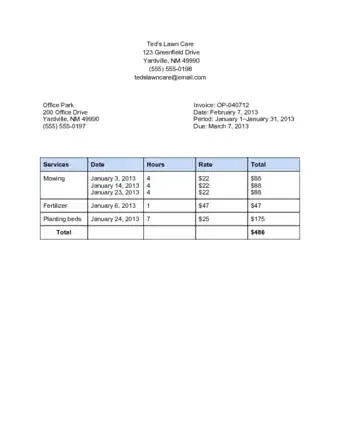
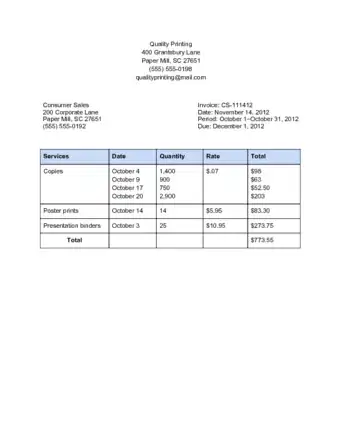
1Include your business name. This basic information about your company should appear in professional lettering at the top of the page. If you're using word processing software, create a new document and select "header" from the drop down menu to create a header; otherwise, simply type your company's name and center it at the top of the page.[1]
- If you don't have a business name, type your first and last name. You may also include your middle initial if desired.
- Use Arial, Times New Roman or another professional font for the heading. The font size should be bigger than the size you'll use for the body of the invoice.
-
2Provide your contact information. Type the address where you want to receive payment, your business phone number, and your business email address just under your business name. Your contact information should be centered and written in a smaller font than your business name.[2]
- If you use your personal phone number and email address as your business phone number and email address, include those.
- To make your contact information appear more readable, consider typing it on several lines. For example,
- 2005 Rodeo Drive
- Los Angeles, CA 90010
- 555-666-1234
- junedesign@email.com
- 2005 Rodeo Drive
Advertisement -
3Consider including your business logo. If you have a logo, include it in the header to the left or right of your business name. If your business name is part of your business logo, you can use the logo in place of your name.
- It is not necessary to include a company logo, though it can help lend your invoice a professional air.
- If you don't have a logo and wish to make one, see How to Make a Personal Logo.


Recipient & Invoice Information
-
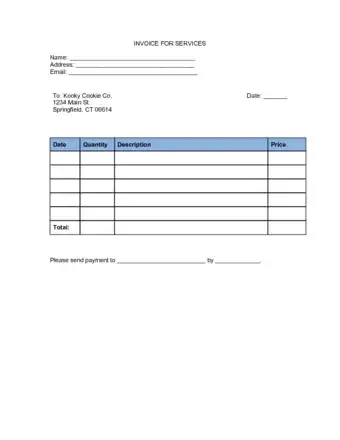
1Write the recipient's contact information. The name, address and phone number of the business you are invoicing should appear on the left side of the invoice, below the header.[3]
- If you are invoicing a person, rather than a business, include that person's name and the address and phone number you have on file for that person.
- If you don't have an address and phone number for the business or person you are invoicing, include an email address instead.
-
2Write the invoice number and other invoice information. On the right side of the page, across from the recipient's contact information, include the details of your invoice. Write the following information on separate lines on the right side of the page:[4]
- The invoice number. Type INVOICE: followed by the number. Since you are the one sending the invoice, you may choose the numbering system that works best for you. You can number your invoices numerically (1, 2, 3, 4) or by date (for example, 2010-10-16, for the year, month and day of the invoice). If you choose the latter, you can add "-01" to the end to differentiate between invoices sent on the same day. In any case, make sure you number your invoices in sequential order so you don't confuse yourself.
- The invoice date. Even if you choose to number your invoice by date, you should clearly write the date on a separate line.
- The invoice due date. If you have an agreement with the business you are invoicing about when you can expect to get paid, write that date as the due date. If you don't have an agreement, figure out the standard pay-by period in your industry; in most cases, it's 30 to 45 days.
-
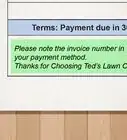
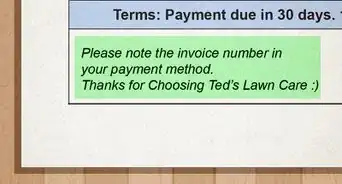
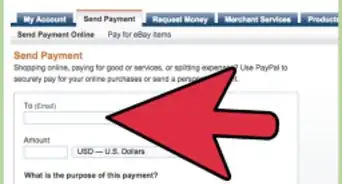
3Specify your payment terms. Under the invoice information, note whether you will take cash, checks, credit cards, PayPal or some other form of payment.[5]
- If you charge a late fee, quickly outline this as well, if you haven't outlined it somewhere else already, like in a contract.
- Include your tax identification number, if applicable. Laws vary by municipality, so be sure you know your local tax code if you are to collect sales tax or some other usage tax, like the hotel tax.


Itemizing Rendered Services
-
1Make a chart to itemize the services. If you're using word processing software, create a table in which you will list the different services you performed for your client, or the items that were purchased from you for which you are requesting payment. Your chart should contain the following components:[6]
- 5 columns with the following headings:
- Services. This is where you list the task you performed, such as copyediting, or the item that was purchased from you, such as handmade jewelry.
- Date. Write the date the service was performed or the item was purchased.
- Quantity. Write how many pages you copyedited, how many pieces of jewelry were purchased, etc.
- Rate: Write the rate you are charging for the services or items. If you charge by the hour, write the rate as $00.00/hr.
- Hours. If you charge by the hour, write how many hours were spent performing the service.
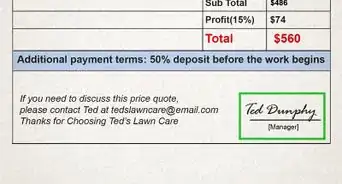
- Subtotal. Write the total amount you are charging for the service performed.
- One row for every separate service performed for the client, followed by a final row reserved for the total amount you are charging the client for all services.
- 5 columns with the following headings:
-
2Calculate the total. Subtotal the amount due and add any sales tax, delivery fees or other fees and to calculate the grand total. Use bolding or highlighting to make the total stand out from the rest of the numbers.[7]
-
3Provide additional information. If you are invoicing a customer who has purchased items for you, describe your return policy. You may also want to thank the customer for their business and offer other products or services at the bottom of the invoice. This is the last thing customers see, so in the interest of good relations, try to be kind and appreciative.


Community Q&A
-
QuestionWhat are payment terms on an invoice?
 wikiHow Staff EditorThis answer was written by one of our trained team of researchers who validated it for accuracy and comprehensiveness.
Staff AnswerwikiHow Staff EditorStaff AnswerPayment terms on an invoice refer to the requirements placed on payment by the person issuing the invoice. For example, a common payment term is the deadline by which payment should be received. Other payment terms can include how you will accept payment (credit, cash, bank transfer, Bitcoin, etc.), cash on delivery or in advance, staged payments, expected currency, late-payment fees, etc. -
QuestionHow do I make an invoice to someone on my computer?wikiHow Staff EditorThis answer was written by one of our trained team of researchers who validated it for accuracy and comprehensiveness.
Staff AnswerwikiHow Staff EditorStaff AnswerUse the word processing program that is already installed on your computer (e.g. MS Word on many PCs or Mac's Pages) and follow the instructions explained in the steps above for creating the relevant tables and text required to make a suitable invoice. An invoice should look professional, so be sure to include the necessary details, such as business name, date, addresses, hours worked, products supplied, costs, total, payment terms, etc. -
QuestionCan I create an invoice in Word?wikiHow Staff EditorThis answer was written by one of our trained team of researchers who validated it for accuracy and comprehensiveness.
Staff AnswerwikiHow Staff EditorStaff AnswerYes, Microsoft Word is ideal for making invoices with. MS Word provides you with the opportunity to create invoices using its own various invoice templates or you can make an invoice from scratch using a blank Word document. Illustrated details for making an invoice both ways can be found here: How to Make Invoices in Word.


References
- ↑ https://fitsmallbusiness.com/invoice-examples-best-practices/
- ↑ https://fitsmallbusiness.com/invoice-examples-best-practices/
- ↑ https://fitsmallbusiness.com/invoice-examples-best-practices/
- ↑ https://fitsmallbusiness.com/invoice-examples-best-practices/
- ↑ https://fitsmallbusiness.com/invoice-examples-best-practices/
- ↑ https://www.sage.com/en-gb/blog/invoice-cheat-sheet/
- ↑ https://www.sage.com/en-gb/blog/invoice-cheat-sheet/
- http://office.microsoft.com/en-ca/templates/sales-invoice-simple-lines-design-TC010151430.aspx
About This Article
To create an invoice, put your name, address, and contact information at the top of the page, followed by the recipient’s name and address. Be sure you have an invoice number, too! Then make a chart with 6 columns for services, date, quantity, rate, hours, and subtotal. Make 1 row for every service performed, then add a final row for the total amount being charged. Remember to include any sales tax or delivery fees in the total, and add a "thank you" at the bottom of the invoice. For more information on creating an invoice, including how to number your invoices, read on!