This article was co-authored by wikiHow Staff. Our trained team of editors and researchers validate articles for accuracy and comprehensiveness. wikiHow's Content Management Team carefully monitors the work from our editorial staff to ensure that each article is backed by trusted research and meets our high quality standards.
This article has been viewed 76,181 times.
Learn more...
Swingline staplers come in many different varieties, but they all open in a similar way. On a top loading stapler, you'll have to pull the plastic sheath off the staple tray. Other staplers, including back loading and electric varieties, have a button or knob for you to press. Heavy-duty staplers may instead have a follow block you need to raise. No matter which type of stapler you have, opening it is something you can quickly learn to keep it functioning.
Steps
Opening a Top Loading Stapler
-
1Hold the stapler's base in place. Hold the stapler against a flat surface, such as a table. Keep one hand on the stapler's lower jaw so it doesn't move.[1]
-
2Pull the plastic top up to expose the stapler tray. On a top load stapler, you'll see the metal staple tray set inside the plastic. While holding the stapler's base, use your other hand to pull the plastic away from the tray.Advertisement
-
3Place new staples legs-down in the tray. Always place staples as close to the tray's front end as possible. The front end is the side closest to the inside of the stapler. Push any unused staples to the front as well to create additional space.
- If your stapler is jammed, dump out the old staples. Use pliers to pull out any staples that are stuck.
-
4Lower the stapler head to close it. When you're finished placing staples legs-down in the tray, grasp the base again. Push the top of the stapler back down onto the tray. It'll click in place and your stapler will be ready for use again.


Unlatching a Back Loading Stapler
-
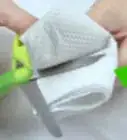
1Press the button on the stapler's back end. Set the stapler down on the table and look at the back end. There's a small button on either the top or bottom edge. Press it to pop out the staple tray.
- Your stapler may also have a small piece of plastic over the tray that you'll need to remove.
- Hold the base of the stapler steady with 1 hand. It wouldn't be good if the tray comes open and loose staples fly everywhere.
-
2Pull the tray with your free hand. The tray should already have popped out. It'll be on the back end of the stapler between the handles. Tug on the tray to pull it back. It will take a little force to pull it all the way back.
-
3Push the tray back in to close it. Place new staples legs-down first, then load the tray by pushing it straight into the stapler. It should lock in place and not pop back out, even when you tip the stapler towards you.


Opening an All-Metal Stapler
-
1Push the follow block in to loosen it. Set the stapler down on a flat surface. Leave the jaws open. The follow block looks like a small metal latch that sticks out a little from the stapler's smooth edge. It will most likely be on the stapler's back side, near the bottom edge.[2]
- If you don't see this piece, the follow block may be on the stapler's front. Look for a black triangle sticking out from between the stapler's jaws.
-
2Lift and slide the block away from the stapler. Pull the follow block upwards to release the hooks holding it in place. While holding the follow block in this position, pull it towards you to expose the staple tray.[3]
-
3Push the block into the stapler to lock it back in place. Load the staples legs-down at the tray's front end, which is the end closest to the stapler. Slide the tray back into the stapler. It will most likely lock in place immediately. If the tray is still loose, push down on the follow block to engage the hooks.[4]


Unlatching an Electric Stapler
-
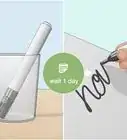
1Turn the knob on the base of the stapler to free the tray. The knob will be near the bottom of the stapler and can usually be found on the right side near the back. Turn the knob to the left. It'll release the tray on the stapler's front side.[5]
-
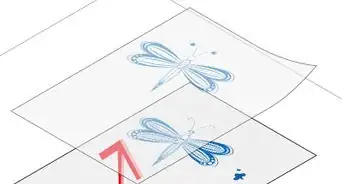
2Pull the staple tray away from the stapler. The stapler tray will be on the front side, near the stapler's mouth. Gently pull it back with your fingers so you can load in new staples. Load the staples by placing them legs-down in the tray's front end.[6]
-
3Push the tray back in to lock it in place. All you have to do is push it straight back into the stapler. The tray will lock in place and the knob will turn back to its original position.[7]


-Step-22.webp)
References
- ↑ https://www.youtube.com/watch?v=UAKl5DbW_x8
- ↑ https://www.youtube.com/watch?v=wBmx6MyYOEg
- ↑ https://www.youtube.com/watch?v=wBmx6MyYOEg
- ↑ https://bizfluent.com/how-5822366-load-swingline-heavy-duty-stapler.html
- ↑ https://bizfluent.com/how-5031827-load-swingline-electric-stapler.html
- ↑ https://bizfluent.com/how-5031827-load-swingline-electric-stapler.html
- ↑ https://bizfluent.com/how-5031827-load-swingline-electric-stapler.html
About This Article