This article was co-authored by wikiHow Staff. Our trained team of editors and researchers validate articles for accuracy and comprehensiveness. wikiHow's Content Management Team carefully monitors the work from our editorial staff to ensure that each article is backed by trusted research and meets our high quality standards.
This article has been viewed 326,777 times.
Learn more...
If you have electric (power) windows in your car, there may come a time that you push the button and the window doesn't respond the way it used to. If the window suddenly stops moving at all, the problem could be as simple as a blown fuse or a loose connection. It is also possible that you have a faulty switch, especially if the window works on a hit and miss basis. Window motors go down sometimes as well. This is usually characterized by a gradual decrease in how well the window responds to the switch, but a slow window could also be getting stuck on the gaskets. Once you identify the problem, you may be able to repair it with some basic tools.
Steps
Changing a Fuse
-
1Locate and open the fuse box. It should be located inside the car as a part of, or near, the dash.
-
2Check your owner's manual to locate that operates the windows. It is not uncommon that the only thing wrong with electrical components in a vehicle is a blown fuse. If this is the case with your windows you will need to replace the window fuse.[1]Advertisement
-
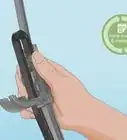
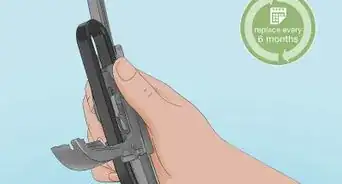
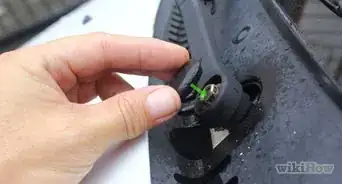
3Pull the fuse straight out of its cradle. Be careful not to twist or otherwise force it. You do not want to damage the cradle or break a piece of the fuse off in the cradle. There are fuse tongs available at part supply stores that can help with this.
-
4Locate a replacement fuse. It must be the rated for the same amperage as the original fuse that operated the window mechanism. The amp rating should be printed on the fuse, and it should also be listed in your owner’s manual. Do not use a fuse with a higher amp rating, as this may lead damaging the electrical components of your vehicle.
-
5Push the new fuse straight down into the cradle. The fuse must be “set”. This means that it does not move or wobble.
-
6Turn your car key to the "on" position. This provides power to your windows and allows you to test them. You need not start your car.
-
7Test your windows. Confirm that they go up and down without restriction.


Repairing Window Gaskets
-
1Evaluate the condition of your window seals and gaskets. You want your gaskets and seals in good repair. They are responsible for keeping rain out by forming a water tight boundary when your window is rolled up. They also serve to insulate the inside of the vehicle from road noise.
-
2Check the entire gasket channel for foreign objects. Any obstruction of the channel may prevent the window from rising or falling properly. You should remove any objects such as pebbles or leaves before proceeding.
-
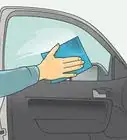
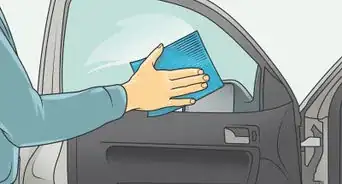
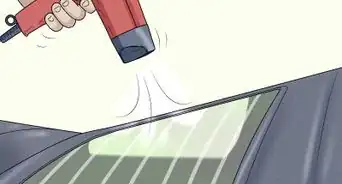
3Clean the gasket with acetone. This will help to remove any grease or dirt build up that might impede your window or prevent your gaskets from sealing properly.
- Be very careful not to get any acetone on your car's paint or carpets. It's better to put a small amount on a cloth and wipe with the cloth than to pour the acetone directly on the gasket.
-
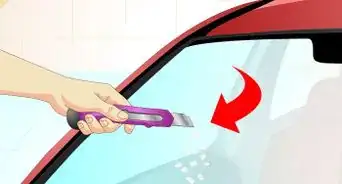
4Repair any small tears. You can do this using a rubber adhesive or glue. Be sure to trim any loose corners with a razor blade so that you get a good seal.
-
5Replace the gasket. This may be necessary if the original gasket has large tears or several small tears. Replacing the gasket is a fairly easy job.
- Use a trim removal tool to slide in between the window and the gasket.
- Hook the tool underneath the gasket and pull up.
- Once the old gasket is removed, install the new gasket by fitting it into the same place as the original and pushing down firmly.
-
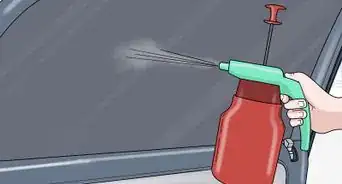
6Lubricate the channel with silicone spray. This will help your window glide smoothly along the channel.
-
7Retest the window. Your window should move up and down without restriction or delay if the problem has been fixed.


Fixing Wiring Problems
-
1Find an electrical schematic of your vehicle. This can be found either from information in your owner's manual or on the Internet.
-
2Trace the wiring from the fuse panel to the switch. You should refer to your electrical schematic for help. You want to make sure that there are no breaks in the connection from the fuse box to the switch. If you did not find a schematic, it might be easier to trace the wiring from the switch back to the fuse box to look for any breaks in the connection.
-
3Use a multi-meter to confirm that the switch is getting 12V of power. Attach the leads of the multi-meter to where the electrical wires come into the switch and set the meter to D/C volts. It should read 12 volts.
-
4Trace the wiring from the switch to the motor. This is the path that a signal will travel to move your window when you press the switch. Any breaks or loose connections in this path will prevent your motor from functioning properly.
-
5Use the multi-meter to confirm that the motor is getting 12V of power. Attach the leads of the multi-meter to where the electrical wires come into the motor. Again, set it to D/C volts and it should read 12 volts.
-
6Look for any interrupted voltage caused by a loose connector or corrosion. If there are any loose or corroded connections in the circuit they will disrupt the signal and cause your window to malfunction.
-
7Fix the connector or corroded areas. Push any connectors or wiring harnesses together tightly, and clean any corrosion away with a wire brush or similar tool. .
-
8Test the window again. If your problem was in the circuitry and is now fixed, then your window should freely roll up and down without any restrictions or delays.


Replacing a Faulty Switch
-
1Locate the window switch panel. This is the button used to operate your window. It is almost always on the door, however, they are rarely found on the center console.
-
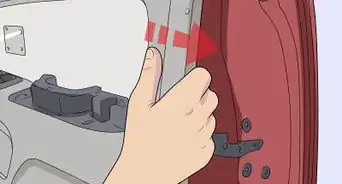
2Remove the window switch panel. Be careful not to scratch up the door panel while removing the window switch, as it often requires prying. Using a shop rag or piece of cardboard under your prying tool can help.
-
3Unplug the wiring connectors from the switch. You will need to test these connectors to make sure that they are providing the appropriate 12 volts to your switch.
-
4Use your multi-meter to probe each connector. Set the multi-meter for D/C volts and put the prongs of your multi-meter into the connector. It should read 12 volts.
-
5Check the wiring on any switch that has a low voltage reading. Tighten any loose connections, and clear away any corrosion.
-
6Test another switch. Take a switch from another door and plug it into the connectors on the malfunctioning door. If you are able to operate your window using this switch, then the original is bad and will need to be replaced.
-
7Buy a new switch. Contact your dealership or favorite parts store and get a new window switch.
-
8Install the new window switch. This can be done by plugging the connectors into the switch and popping the switch back into the door panel.


Replacing Your Window Motor or Regulator
-
1Remove the door panel. This task will vary from car to car, but typically you will have to remove some screws around the middle of the panel (such as inside the door pull) and then use a prying tool around the outside to pop out the clips on the perimeter.[2] Sometimes you may have to remove things such as weather-stripping or door moldings as well.
-
2Use a multi-meter to make sure that the motor is getting the correct voltage. Attach the probes of your multi-meter to the motor’s plug and toggle the switch up and down.[3] Make note of the voltage in both directions. Your owner’s manual should list the specific voltage required.
-
3Ensure that the window moves freely during this test. There should be no slow spots or blockages.
-
4Unplug the motor. If you the motor is getting the proper voltage but not functioning properly, you likely need to replace it. Start by unplugging the wiring connectors from the motor.
- If your motor is functioning properly but the window is not responding, you may need to replace your regulator.
-
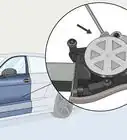
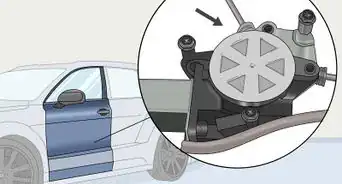
5Remove the bolts that attach the regulator to the glass. The regulator is the lift assembly that moves your window up and down. You will have to move the window up or down to align these bolts with a hole in the door interior. Using an extension on a ratchet, you will put a socket (usually 8 or 10 mm) through the hole and loosen the two bolts.
-
6Push the window all the way up. Use your hands to push the window up, and then either fasten it with tape or pull it out of the door altogether.
-
7Unplug the wiring harness from the window motor. You will have to press down on the clip that holds the wiring harness into place and pull the harness out. These can be hard to press and sometimes it is best if you can get a screwdriver on it to press it in.
-
8Unbolt the harness and/or motor from the door's interior. Any bolts holding the harness and motor will have to be removed.
- These can often be difficult to bolts to remove. You may need to use a ratchet with a long extension to provide the necessary angle to access and turn the bolts.
-
9Pull the motor and harness out as one assembly. Once you have the assembly removed, you can separate the two pieces and replace the one that is malfunctioning.
-
10Re-install the motor/regulator assembly. Once you have replaced the malfunctioning part, whether it was the motor or the regulator, it is time to slide the assembly back into the door's interior and bolt it back into it's original position.
-
11Plug up the new motor. Plug the wiring harness into the window motor. This will provide power to the motor so use caution.
-
12Lower your window back into its correct place on the wiring harness. Remove the tape or re-install your window. Make sure that the tabs in the bottom of the window are properly aligned to bolt it back onto the regulator.
-
13Bolt the window to the regulator. Using the bolts you removed earlier and the same extension, you need to bolt your window back to the regulator.
-
14Test your window. It should now move up and down freely when you press the switch.


Community Q&A
-
QuestionI have a car that parts are unavailable for. The window repairman removed the panel and, by hooking up a car battery, was able to get it moving up and down freely. He said it needed a "relay," ultimately finding it was obsolete or unavailable, even from the factory. What can I do?
 Community AnswerYou can try a salvage yard or Ebay, or use a regular 30-amp relay.
 -
QuestionWhat is wrong if a window does not move when the switch is toggled, but makes a "thunk, thunk, thunk" sound?
 Community AnswerThe motor is stuck or burned out, or the window is stuck in the tracks from dirt, grime etc. You have to pull off the door panel to see what is wrong. You can then clean the motor and the window tracks, and use WD-40. WD-40 will not hurt electrical connections.
 -
QuestionI put a new power window regulator on my 1998 Toyota Camry. Why isn't the switch doing anything?
 Community AnswerStart by checking all the fuses. The switch may be the problem, so consider replacing it. Check that you have power to the switch and away from the switch.
Warnings
- If you must replace the window motor, proceed with extreme caution. The window motor has a lot of torque and can remove a finger if it is activated and your fingers are in the gears. To safely remove a window motor, the linkage arms should be secured in a vice before the springs and motor are removed.⧼thumbs_response⧽
Things You'll Need
- voltmeter
- Contact cement
- Silicone spray
- Lacquer thinner
- Razor blade or utility knife
- Screw drivers and socket wrenches
- Assorted fuses of different voltages
- Fuse puller
- Paper towels and shop rags
- New rubber gasket (if needed)
- New toggle switch (if needed)
- New window motor (if needed)


References
About This Article

If the power isn’t working for your electric car windows, you might be able to fix it yourself with a multimeter and a little electrical know-how. If all your windows have stopped working, you might just need to replace the fuse. You can locate your car’s fuse box underneath or near its dash. If only one window doesn’t work, check around the seal for any small objects that might be stuck inside. If you can’t find anything, take off the window switch and test the wiring with a multimeter. If the wiring’s fine, test the window with another switch from your car. You might need a new switch. Otherwise, you might have to replace some of the wiring. If the wiring’s fine but it still doesn’t work, you might have to replace your window’s motor or regulator. For more tips, including how to trace your car’s wiring from the switch to the motor, read on!