This article was co-authored by Mia Danilowicz and by wikiHow staff writer, Jessica Gibson. Mia Danilowicz is a Master Tailor who works onset and on the red carpet in Los Angeles, California. With over a decade of experience, Mia specializes in bridal and gown couturier fittings, garment reconstruction, and custom design. Mia has worked at the Oscars, Grammys, SAG Awards, and Golden Globes. Her clients include a long list of entertainment and fashion industry headliners, major fashion magazines, luxury consumer brands, and popular media. Mia was trained at the Fashion Institute of Design and Merchandising and received her AA in Fashion Design and BS in Business Management.
This article has been viewed 20,624 times.
Sticky back Velcro can be a lifesaver if you're trying to quickly finish a project, but it can pull away from fabric over time. If your Velcro is peeling or you just want to work with Velcro that doesn't require pinning, get out your needle and start sewing! Stitch the Velcro by hand for the easiest experience or use your machine and keep lubricant close by so you can clean the needle.
Steps
Hand-Stitching the Velcro
-
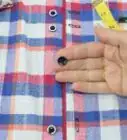
1Cut the Velcro to the size you need for your project and press it onto fabric.[1] Pull off as much sticky back Velcro as you need and cut it to size. Then, pull apart the pieces and peel off the backing before you press a sticky side onto the fabric. Push firmly so the Velcro stays in place.[2]
- You can hand-sew sticky Velcro on most lightweight fabrics such as cotton or polyester. Avoid using denim since it's too thick to stitch by hand.
- If you only need to sew a little bit of sticky back Velcro, buy small sticky back coins or squares instead of tape.
Tip: Trim each corner of the Velcro piece at a 120-degree angle if you don't want the corners to catch on fabric. Sharp edges are more likely to peel up and snag the fabric.
-
2Thread a heavy-duty needle with polyester thread and knot 1 end.[3] Cut off an 18 to 20 inches (460 to 510 mm) long strand of polyester thread that matches your fabric. Insert the thread through the eye of a heavy-duty sewing needle and tie a knot at the other end of the thread.[4]
- Buy needles that say they're heavy-duty or made for denim on the package.
- If you use a thin needle, it's more likely to break as you push it through the tough Velcro pieces.
Advertisement -
3Bring the needle through the corner of the Velcro to the front of the fabric. Insert the needle through 1 corner of the Velcro so the knot catches on the Velcro.[5]
- To make the knot more secure, bring the needle back up through the Velcro and push it down through the same spot you just stitched into.
-
4Straight stitch across each edge of the Velcro. Push your needle down through the Velcro to create a straight stitch, also called a running stitch. Then, bring it back up through the Velcro to make another stitch. To finish sewing, make a few backstitches and cut the thread.[6]
- Repeat this process for the opposite piece of the Velcro.
- Sew as close to the edges as you can when you're doing the straight stitch, so they don't curl up. Keep your stitches as small as possible so the Velcro stays firmly in place.[7]
- If you want the Velcro to be extra secure, straight stitch diagonally across the piece.
-
5Wipe away adhesive with acetone and lubricate the needle if it begins to stick. Although it's a lot easier to sew sticky back Velcro by hand, the needle might still become sticky from the adhesive.[8] If it does, stop sewing and wipe the needle with a cloth soaked in acetone or nail polish remover. Then, squirt a few drops of sewing machine lubricant onto another cloth and wipe it on the needle.[9]
- You may need to repeat this every few stitches or at least for every side you sew.


Using a Sewing Machine
-
1Cut the Velcro to the size you need and press it onto fabric. Unroll as much of the sticky back Velcro as you need for your project and cut it. Then, separate the sides and peel off the backing to expose the adhesive. Position the sticky back Velcro on your fabric and press firmly so it sticks in place.[10]
- Although sticky back Velcro also comes in small coins or squares, these are too small to sew using your machine.
- To prevent the Velcro's corners from catching on fabric, trim each corner of the Velcro piece at a 120-degree angle.
- Since a sewing machine can easily stitch through heavy fabrics as well as lightweight ones, you can sew sticky back Velcro onto most fabrics. Just ensure that you have a strong needle so it doesn't break.
-
2Lubricate a heavy-duty sewing needle. Since the sticky adhesive can gum up your sewing needle, install a new, heavy-duty needle. Then, squirt a few drops of sewing machine lubricant onto a soft cloth and wipe it on the needle.[11]
- The package of needles should say "heavy-duty" or that they're designed for denim.
- Set the oiled cloth aside since you'll use it when you begin sewing.
Tip: It's important to use a heavy-duty needle since thinner needles may break as you sew. Try using a denim or leather needle if your sturdiest needle isn't working.
-
3Attach a hook and loop footer to your machine if you have one. To make it easier for your machine to sew over the Velcro, snap a hook and loop footer in place. If your machine doesn't have a hook and loop presser foot, use a zipper foot so it doesn't catch on the Velcro.[12]
-
4Set your machine to make small stitches so the machine doesn't skip. Place the fabric under your needle so the Velcro faces up. Then, adjust the machine's stitch length to make straight stitches between 1.5 and 2.0 millimetres (0.059 and 0.079 in) long. If you make the stitch length longer than this, the needle may skip over the Velcro.[13]
- Use polyester thread, which is stronger than cotton thread and less likely to break.
- Don't try to do the zig zag stitch with Velcro since your machine may have a difficult time working back and forth.
-
5Stitch around the edges of the Velcro to securely attach it to the fabric. Sticky back Velcro tends to curl up around the edges, so sew straight stitches along each edge of the Velcro piece. Then, sew diagonally across the Velcro piece so it's secure in the center.[14]
-
6Wipe down the needle and lubricate it every few stitches. Your needle will get coated with adhesive gunk even though you lubricated it. Stop every 2 or 3 stitches and carefully wipe away the buildup using a cloth soaked in acetone or nail polish remover. Then, wipe the needle with the lubricated cloth you used earlier. To finish sewing, make a few backstitches and cut the thread.[15]
- Keep both cloths handy since you'll need to stop every few stitches to clean and oil the needle.
- Repeat this process for the opposite side of the Velcro.
-
7Sew slowly so you don't break the needle. Your machine may struggle to stitch through the Velcro even with frequent lubrication. Work as slowly as possible so your needle doesn't gum up or break.[16]
- If you're still having trouble sewing Velcro with the machine, consider sewing the Velcro by hand.


Expert Q&A
-
QuestionCan you sew through stick-on velcro?
 Mia DanilowiczMia Danilowicz is a Master Tailor who works onset and on the red carpet in Los Angeles, California. With over a decade of experience, Mia specializes in bridal and gown couturier fittings, garment reconstruction, and custom design. Mia has worked at the Oscars, Grammys, SAG Awards, and Golden Globes. Her clients include a long list of entertainment and fashion industry headliners, major fashion magazines, luxury consumer brands, and popular media. Mia was trained at the Fashion Institute of Design and Merchandising and received her AA in Fashion Design and BS in Business Management.
Master TailorIt's important to make sure you use self-fastening velcro when sewing, as velcro with adhesive can get into your needle and mess up the sewing process. -
QuestionWhat thread do I use for stick on velcro?Mia DanilowiczMia Danilowicz is a Master Tailor who works onset and on the red carpet in Los Angeles, California. With over a decade of experience, Mia specializes in bridal and gown couturier fittings, garment reconstruction, and custom design. Mia has worked at the Oscars, Grammys, SAG Awards, and Golden Globes. Her clients include a long list of entertainment and fashion industry headliners, major fashion magazines, luxury consumer brands, and popular media. Mia was trained at the Fashion Institute of Design and Merchandising and received her AA in Fashion Design and BS in Business Management.
Master TailorUse polyester thread to sew through your velcro so it'll have a firm hold. -
QuestionWhere do I sew velcro?Mia DanilowiczMia Danilowicz is a Master Tailor who works onset and on the red carpet in Los Angeles, California. With over a decade of experience, Mia specializes in bridal and gown couturier fittings, garment reconstruction, and custom design. Mia has worked at the Oscars, Grammys, SAG Awards, and Golden Globes. Her clients include a long list of entertainment and fashion industry headliners, major fashion magazines, luxury consumer brands, and popular media. Mia was trained at the Fashion Institute of Design and Merchandising and received her AA in Fashion Design and BS in Business Management.
Master TailorKeep your stiches close to the edge of the velcro. Otherwise, the velcro might start to curl up on the sides.
Things You'll Need
Hand-Stitching the Velcro
- Heavy-duty needle
- Polyester thread
- Sticky back Velcro
- Fabric
- Acetone
Trying to Sew Velcro with a Machine
- Sewing machine
- Polyester thread
- Acetone or nail polish remover
- Sewing machine lubricant
- Heavy-duty needle
- Sticky back Velcro
- Fabric
- Cloths


References
- ↑ Mia Danilowicz. Master Tailor. Expert Interview. 8 January 2021.
- ↑ https://youtu.be/SD8aEGBJTMg?t=16
- ↑ Mia Danilowicz. Master Tailor. Expert Interview. 8 January 2021.
- ↑ https://sewingiscool.com/how-to-sew-through-sticky-velcro/
- ↑ https://sewingiscool.com/how-to-sew-through-sticky-velcro/
- ↑ https://sewguide.com/easy-hand-stitches/
- ↑ Mia Danilowicz. Master Tailor. Expert Interview. 8 January 2021.
- ↑ Mia Danilowicz. Master Tailor. Expert Interview. 8 January 2021.
- ↑ https://youtu.be/1k5oLyuz1qM?t=126
- ↑ https://www.velcro.com/products/adhesive-backed/velcro-brand-sticky-back-tape/
- ↑ https://sewingiscool.com/how-to-sew-through-sticky-velcro/
- ↑ https://sewingiscool.com/how-to-sew-through-sticky-velcro/
- ↑ https://sewingiscool.com/how-to-sew-through-sticky-velcro/
- ↑ https://sewingiscool.com/how-to-sew-through-sticky-velcro/
- ↑ https://youtu.be/1k5oLyuz1qM?t=126
- ↑ https://sewingiscool.com/how-to-sew-through-sticky-velcro/
- ↑ https://sewingiscool.com/how-to-sew-through-sticky-velcro/
About This Article