This article was co-authored by wikiHow Staff. Our trained team of editors and researchers validate articles for accuracy and comprehensiveness. wikiHow's Content Management Team carefully monitors the work from our editorial staff to ensure that each article is backed by trusted research and meets our high quality standards.
There are 11 references cited in this article, which can be found at the bottom of the page.
The wikiHow Video Team also followed the article's instructions and verified that they work.
This article has been viewed 27,748 times.
Learn more...
A mitered corner is a way to finish corners on pillow cases, curtains, napkins, and many other types of sewing projects. Creating mitered corners will make the edges of your project look neat and clean. Sewing mitered corners might seem challenging, but it is quite easy and only requires making 1 seam on each corner. However, you will need to make a couple of folds and marks to identify where to sew the seams.
Steps
-
1Fold over the edges of the fabric by 0.25 to 0.5 in (0.64 to 1.27 cm). Use a ruler or fabric measuring tape to find the spot on the fabric that is 0.25 to 0.5 in (0.64 to 1.27 cm) from the edge, and then make the first fold here. With your fabric facing right (print) side down, fold over the edges of the fabric. Fold the fabric in towards the center of the piece of fabric so that the raw edges will be hidden.[1]
- Make these folds along any adjoining edges where you want a mitered corner to be.
-
2Fold again to the width you want your border to be. Measure from the folded edge with a ruler or fabric measuring tape. Fold the edges in the same way as before, but make the fold as wide as you want the border on your item to be. For example, if you want a 1 inch (2.5 cm), then make a 1 inch (2.5 cm) fold along each of the edges.[2]
- This second fold will completely hide the raw edges on your fabric.
- Repeat this second fold on all of the edges you have already folded.
Advertisement -
3Press the folded fabric with an iron. After you have folded an edge, use an iron to press it. Run the iron up and down the folded edge of the fabric a few times to press it. This will make a crease in the fabric, which will make it easier to identify where to sew the corners.[3]
- Repeat this on all of the folded edges.
-
4Open up the last fold you made so that the crease is visible. After you have finished ironing the last folded edge, open up the second fold you made in the fabric so that you can see the crease. This will be your guide for determining where to sew the mitered corner.[4]
- Make sure to leave the first fold you made. Do not unfold it.
- Repeat this for each of the edges.

-
1Multiply the width of the border by 2. This will be the distance you need to measure from the corner of the fabric, which will allow you to create the mitered corner.
- For example, if you want to create a 1 in (2.5 cm) border, then multiply 1 in (2.5 cm) by 2 for a total of 2 in (5.1 cm).
-
2Measure from the corner from both sides and mark both locations. Place your ruler so that it is lined up with 1 of the folded edges and start measuring from the corner. Mark this spot on the folded edges of your fabric with a pen or piece of chalk. Then, repeat the same measurement and marking process on the opposite edge of the same corner.[5]
-
3Repeat the measuring and marking process for each of the corners. You will need to make the same markings on all of the corners you want to be mitered. The 2 measurements should form a triangle on each of the corners of the fabric.[6]
-
4Draw a line between the 2 adjacent marks you have made on a corner. Place the ruler so that the edge is lined up with the 2 adjacent marks. Then, use a pen or piece of chalk and the ruler’s edge to connect the marks in a straight line.[7]
- Do this for each of the corners on your fabric.
-
5Fold the corner of the fabric in half so the marks are lined up. The right (print) sides of the fabric should be together and the wrong (non-print) sides should be showing. Insert a pin near the mark to hold the fold.[8]
- Repeat this for each of the corners you want to sew

-
1Sew a straight stitch across the line. Set your sewing machine to the straight stitch setting. Then, sew straight across the line you have drawn onto the fabric. Sew right off the edge when you get to the end.[9]
- Repeat this for each of the corners you have marked.
- To make the stitch extra secure, you can backstitch at the beginning and end of the stitch, or sew over the line twice. However, this is optional.
-
2Cut the excess fabric 0.25 in (0.64 cm) from the seam. When you have finished sewing across the line, use a sharp pair of scissors to cut the excess fabric off of the corner. Cut 0.25 in (0.64 cm) from the seam and make sure to cut in a straight line.[10]
- Repeat this for each of the corners.
-
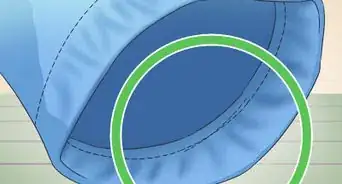
3Turn the corner inside out to hide the raw edges. When you have finished sewing the corner and have cut off the excess fabric, use your fingers to press the fabric out. Press into the corner from the wrong side to turn the fabric at the corner right side out.[11]
- You may find it easier to turn the corner out if you iron the seam open before turning it out.
- Repeat this for each of the corners to complete the mitered corners.
-
4Iron the corners to flatten the seams. After you finish pushing the fabric into the corners, you may want to iron the corners to ensure that they are flat. Run an iron over each of the corners for a few seconds.[12]
- If you have a delicate fabric, you can cover it with a towel or t-shirt, or you can set your iron to the lowest setting.
Things You’ll Need
- Ruler
- Iron
- Chalk or pen
- Pins
- Sewing machine
- Thread
- Scissors


References
- ↑ https://www.youtube.com/watch?v=o3twJCHAQfI&feature=youtu.be&t=26s
- ↑ https://www.youtube.com/watch?v=o3twJCHAQfI&feature=youtu.be&t=36s
- ↑ https://www.youtube.com/watch?v=o3twJCHAQfI&feature=youtu.be&t=43s
- ↑ https://www.youtube.com/watch?v=o3twJCHAQfI&feature=youtu.be&t=48s
- ↑ https://www.youtube.com/watch?v=o3twJCHAQfI&feature=youtu.be&t=53s
- ↑ https://celebrate-creativity.com/my_weblog/2014/02/mitering-fabric.html
- ↑ https://www.youtube.com/watch?v=o3twJCHAQfI&feature=youtu.be&t=1m4s
- ↑ https://www.youtube.com/watch?v=o3twJCHAQfI&feature=youtu.be&t=1m11s
- ↑ https://www.youtube.com/watch?v=o3twJCHAQfI&feature=youtu.be&t=1m24s
About This Article

To sew a mitered corner, start by folding the edges of the fabric over 1/4-1/2 inch. Then, fold them again to the width that you want your border to be, and press the fold with an iron before unfolding it. Next, multiply the width of the border by 2, and measure and mark that distance from each corner on all sides. Once you've done that, draw a line between the marks at each corner, fold the corners in half so the marks line up, and sew a straight stitch across the lines. Finally, cut the excess fabric, turn the corners inside out, and iron them to flatten the seams. To learn how to press the folds with an iron, read on!