This article was co-authored by wikiHow staff writer, Nicole Levine, MFA. Nicole Levine is a Technology Writer and Editor for wikiHow. She has more than 20 years of experience creating technical documentation and leading support teams at major web hosting and software companies. Nicole also holds an MFA in Creative Writing from Portland State University and teaches composition, fiction-writing, and zine-making at various institutions.
The wikiHow Tech Team also followed the article's instructions and verified that they work.
This article has been viewed 21,207 times.
Learn more...
This wikiHow will teach you how to use the Dropbox app on a Mac. The first thing you'll need to do is install the Dropbox app if you haven't already (we'll show you how below). Then you can start backing up your files, sharing them with others, and accessing them when you're on-the-go, all of which we've also covered below. Keep reading to learn how to get started!
Steps
Installing the Dropbox App
-
1Go to https://www.dropbox.com/install in a web browser.
-
2Click Download Dropbox. The installer will download to your computer.Advertisement
-
3Double-click the installer file. It will be called something like "DropboxInstaller.dmg."
- If you're using Safari, click the icon that has a circle with a downward-pointing arrow, then double-click the installer.
- If you're using Chrome, the download will appear at the bottom of the Chrome window.
-
4Double click on the Dropbox icon. It’s the open blue box icon on the installer window.
-
5Click Open. Dropbox will now install on your Mac. When the installation is complete, you’ll see a sign-in window.
-
6Sign up for Dropbox. If you already have a Dropbox account, enter your login information and click Sign In. Otherwise, click Sign up, then follow the on-screen instructions to create your account.
- A free account comes with 2 GB of space. If you need more, see Get More Space on Dropbox or visit https://www.dropbox.com/plus to upgrade to Dropbox Plus.
-
7Click Open My Dropbox Folder. This opens your new Dropbox folder. As long as your Mac is connected to the internet, files in this folder will automatically sync to your Dropbox account in the cloud.[1]
- To get to your Dropbox folder in the future, open Finder (it’s the smiling Mac icon in the Dock, typically located at the bottom of the screen) and click Dropbox in the left panel.
- If you want to move the Dropbox folder to another location on your Mac, see Move the Dropbox Folder to a New Location.


Adding Files and Folders to Dropbox
-
1Open your Dropbox folder. To find it, click the Finder icon in the Dock (a smiling blue and gray Mac logo), then click Dropbox in the left panel.
- This folder is like your Dropbox “home,” meaning that anything you add to this folder will be synced to your Dropbox account so you can access them from anywhere.
- If you’ve already been using Dropbox on another computer or at Dropbox.com, those files will appear in this folder.
- Your Dropbox can contain up to 300,000 files. If you go over that amount, you may experience slowness or unexpected behavior.[2]
-
2Drag a file or folder to the Dropbox folder. Once you’ve added a new file to the folder, Dropbox will sync that file to your account. If you use Dropbox on another device or on the web, you’ll be able to see that file at that location shortly.[3]
- Another way to move a file to your Dropbox is to right-click (or press Ctrl as you left-click), the file and select “Move to Dropbox.”
- Dropbox will constantly monitor this folder and sync your changes to the cloud.
-
3Change which files are synced. If you don’t have a lot of space on your computer, use Dropbox Selective Sync to make sure only crucial files and folders are synced. Here’s how to set it up:[4]
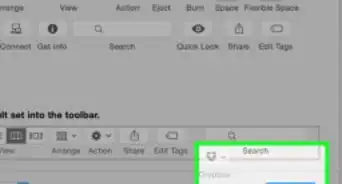
- Click the Dropbox icon in the menu bar at the top-right corner of the screen.
- Click the gear icon.
- Click Preferences.
- Click Accounts.
- Click Change Settings…
- Remove the check marks from any folders you do not want to sync.
- Click Update to save your changes.
-
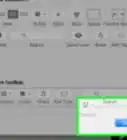
4Check how much space you’re using. The fastest way to do this is by accessing https://www.dropbox.com in a web browser. Once you’re signed in, click your avatar at the top of the page, then click Settings to open your account menu. The amount of available space appears beneath your email address.


Accessing your Dropbox on a Phone or Tablet
-
1Install the Dropbox app. A quick way to do this is to visit https://www.dropbox.com/mobile on your mobile device, type your phone number into the blank, then tap Text Me the Link. Follow the link to complete your Dropbox installation.[5]
-
2Open Dropbox. It’s the icon of a blue open box on the home screen (iPhone/iPad) or in the app drawer (Android).
-
3Sign in. Use the account information you created when installing Dropbox on your Mac. Once you’re signed in, you’ll see the contents of your Dropbox folder.
-
4View a file. Tap a file to view it. If the file is within its own folder, tap the folder to see its contents, then tap the file to open it.
- You’ll only be able to view file types supported by your device. For example, if you have a Photoshop .PSD file in your Dropbox, your phone or tablet may be unable to open it.
-
5Add a file or folder to your Dropbox. You can add files from your phone or tablet to your Dropbox so you can open and modify them on your Mac. Here’s how:[6]
- Tap the + icon in Dropbox.
- Tap Create or upload file.
- Tap Upload File.
- Tap the file you want to upload. The next time your Mac syncs with your Dropbox folder (a process that happens automatically when your Mac connects to the internet), the uploaded file will be available.


Accessing your Dropbox on the Web
-
1Go to https://www.dropbox.com. You can add, delete, edit, or view files in your Dropbox folder from any computer on Dropbox.com.
-
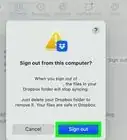
2Sign in to Dropbox. Click Sign In at the top-right corner of the screen to sign in to your account. Once you’re in, you’ll see the contents of the Dropbox folder on your computer.
-
3Click a file to view it. As long as the computer you’re on supports the file type, you should be able to open and edit the files in your Dropbox without issue.
-
4Upload new files. To add new files from another computer, click the blue Upload Files button on the right side of the screen, then follow the on-screen instructions to add your files. The next time your Mac connects to the internet, the files you uploaded will sync to its Dropbox folder.


Sharing Files with Others
-
1Open your Dropbox folder. You’ll see it on the left side of Finder.[7]
-
2Press Ctrl and click the folder you want to share.
-
3Click Share….
-
4Enter the email address(es) of those you want to invite.
-
5Choose a sharing method. Choose the method that best suits your needs:
- Can edit: Allows the person you’re sharing with to add, edit, and delete files.
- Can view: Allows the person to view the contents of the folder but not make any changes.
-
6Stop sharing a file. To make your file or folder private again:
- Press Ctrl as you click the shared file or folder, then select Manage Access.
- Click the dropdown next to the name of the person with whom you’ve shared the file. If you’re sharing with more than one person, you’ll need to do this for each person.
- Click Remove.


References
- ↑ https://www.lifewire.com/install-use-dropbox-on-mac-2259786
- ↑ https://www.dropbox.com/help/39
- ↑ https://www.dropbox.com/help/8839?path=syncing_and_uploads
- ↑ https://www.dropbox.com/help/4456
- ↑ https://www.dropbox.com/help/84?path=mobile
- ↑ https://www.dropbox.com/help/84?path=mobile
- ↑ https://www.dropbox.com/en/help/19
About This Article

1. Install the app from https://www.dropbox.com/install.
2. Open Dropbox.
3. Sign up for an account.
4. Click Open My Dropbox Folder.
5. Add files from your computer to Dropbox.
6. Click the Dropbox icon in the menu bar to manage options.