X
wikiHow is a “wiki,” similar to Wikipedia, which means that many of our articles are co-written by multiple authors. To create this article, 9 people, some anonymous, worked to edit and improve it over time.
The wikiHow Tech Team also followed the article's instructions and verified that they work.
This article has been viewed 28,926 times.
Learn more...
HTML and CSS are the prime parts of a webpage structure. As a new web developer, it's very important to get hold of the HTML CSS basics. Learning HTML means you would learn how to create the structure and wireframe of your webpage. Adding CSS, or Cascading Stylesheets, will enable you to make your HTML structure more vibrant with styles.
Steps
Part 1
Part 1 of 3:
Understanding HTML and CSS
-
1Think of the HTML structure as three sections.
- The Head tag is the first section. It contains all data relevant to the web page's purpose and information. This includes meta data, title, external file sources, etc. Several websites also contain important information pertaining to the website traffic analytics, page rank, etc. All of these are contained within this segment.
- Next comes the Body tag. This is the main centre for the webpage structure. The website's wireframe or building blocks are mentioned here. You actually mention elements and tags here in this space. According to the order in which you mention, the elements get placed in the final webpage.
- So, for example, if we write a form tag and then an image tag; we would find our webpage displaying a form and below that an image (but of course these orders and positions can be altered with high grade CSS).So, if you have a design in hand, just keep on adding elements according to your design flow. The different segments (left, right , center) of a webpage must be treated accordingly. For that we have the table tag or list tags. Learn all the types of tags available in HTML and understand their implementation.
- Finally comes the Foot section. This section normally contains all that is visible in the webpage footer area. However, we do not normally include this separately. Instead, the footer contents are appended to the body itself
-
2Understand how CSS factors in. CSS, or Cascading Style Sheets, were introduced by the W3C in order to reduce HTML file size, get a cleaner code and synchronize styles separately with HTML. These are nothing but separate files that are included in the HTML head section, and they contain the style definition for the various elements of the HTML document.
- CSS defined style codes include font behaviour, color, height, width, display style, etc. They also include behavioural definition for mouseover and mouse-out events. In fact, with the latest inclusion of CSS3, styling has been enhanced to a very different level. Now, you can create animations, transformations and transitions - all from the CSS codes. Mostly we use CSS to declare width, height, color, font, etc. These are the most common styling options, and help us define the appearance and position of the several HTML elements.


Advertisement
Part 2
Part 2 of 3:
Combining or Linking HTML with CSS
- One very common and important question is - how does the style sheet know what style to put for a particular object? This is one very important question that should arise for all newbies. Well, there are quite a few procedures for you to make you CSS code understand as to which element you want to access for your current style.
-
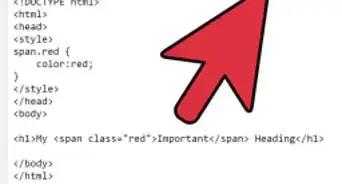
1Do this with the help of classes and ids, if desired. This is the most common procedure and is followed as a master stroke all around the internet world. In your HTML document, while declaring an element, just add the attribute "class" and assign a certain name to it. The same for "id". Now in your CSS file, just write the class name or id name and define your style. Automatically that particular element will derive the style definitions.
- While declaring with class name, in the CSS file, add a dot in front. For ids, add a hash in front of the name. That is the syntax. Now, the most important part.
- So, what is the difference between classes and ids? They can't be same if they co-exist. Yes, there is a huge difference. In your HTML document, you can name as many elements you want with the same class name. But ids must be dedicated to one single element. Therefore, classes are used when we need the same style for multiple items on the HTML page, and ids for styling one single item exclusively.
-
2Access the DOM (Data object Model) elements, or the HTML elements, by their tag names. So, if we want to remove borders from all image tags in the page; we just write 'img' and declare 'border : none'. This will however be applicable to all image tags on the document. You may be thinking, is there a way we can point to a specific element (an image tag for example) but with its element name ? Yes there is a way. Dive into the next point.
-
3Access specific elements by their tag name as well. You need to however traverse all through their parent elements up to them. That was a bit tough was it? Okay. Let's take an example. Suppose we have a form element and then an input element inside it. We also have input elements outside of the form, just stray ones for example. So, now if we follow the point above and declare some styling on input elements; these styles shall be implemented on both input elements inside and outside of the form. I
- f we want the style to be implemented only on the element inside the form, we can do this - form input { /* Declare the style here */ }. So, notice how we accessed the input element we want to style specifically. First the parent and then the main element. In this way, the outer input elements get discarded.


Advertisement
Part 3
Part 3 of 3:
Taking it a Step Further
-
1Give yourself time to learn. To be a veteran in coding can take quite a lot of time. But here are some topics that can help you understand the basic methodologies and design standard HTML pages quickly.
-
2Learn to break your webpage design structure correctly. Understand your available tags and find out how you can use them to break down your page into the simplest structure.
-
3Know that the CSS Box Model is very important. Understanding width, height of an element is the first step. But after that, you must learn how to adjust spacing with the help of padding and margin. There are certain cases where margins are not applicable. You must use padding therefore, and vice versa. Try to find out what exactly they are and how they are used.
-
4Learn floats and their uses. The CSS float is another very important aspect of styling. Floating content left and right plays an important role in website structure.


Advertisement


About This Article
Advertisement