X
This article was co-authored by wikiHow staff writer, Jack Lloyd. Jack Lloyd is a Technology Writer and Editor for wikiHow. He has over two years of experience writing and editing technology-related articles. He is technology enthusiast and an English teacher.
The wikiHow Tech Team also followed the article's instructions and verified that they work.
This article has been viewed 210,686 times.
Learn more...
This wikiHow teaches you how to use Windows' Notepad app to store information for a webpage written in HTML and CSS. HTML is the programming language used to create your webpage, while CSS is the language that determines the style—color, font, and so on—of the HTML elements on the webpage.
Steps
Part 1
Part 1 of 3:
Creating an HTML Page
-
1
-
2Indicate the document type. Type <!DOCTYPE html> into Notepad, then press ↵ Enter to start a new line.Advertisement
-
3Add the HTML tag. Type in <html> and press ↵ Enter.
-
4Enter the BODY tag. Type in <body> and press ↵ Enter. You can now begin entering your webpage's information.
-
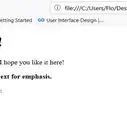
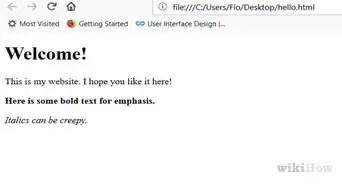
5Add a header. Type in <h1>TEXT</h1>, making sure to replace "TEXT" with your preferred page heading, and press ↵ Enter.
- For example, to create a page header that says "Welcome!", you would type <h1>Welcome!</h1> into Notepad.
-
6Add text below the header. Type in <p1>TEXT</p1>, making sure to replace "TEXT" with your preferred message, and press ↵ Enter.
- For example, to add text that says "I am an iguana", you would enter <p1>I am an iguana</p1> into Notepad.
-
7Add more headers and paragraphs. Each subsequent header and paragraph must have an ascending number applied to it; for example, your second header will have <h2></h2> tags around it, and the second paragraph will have <p2></p2> tags.
- Make sure that you're continuing to press ↵ Enter after each line of code.
-
8Close the BODY and HTML tags. Once you've entered your last line of code, type in </body> on its own line and press ↵ Enter, then type in </html>. Your document is now ready to be styled with CSS.


Advertisement
Part 2
Part 2 of 3:
Adding CSS
-
1Understand how CSS works. You use CSS to change the appearance of an HTML element (e.g., a paragraph). CSS is typically written in the following line-by-line format:[1]
-
element tag {(for example,p {) -
modifier: property;(for example,font-size: 20px;) -
modifier: property;(for example,color: black;) }
-
-
2Place a space between the
<html>and<body>tags. These should be near the top of the page. -
3Enter a HEAD tag. Type in <head> and press ↵ Enter.
-
4Add a STYLE tag. Type in <style> and press ↵ Enter.
-
5Change your webpage's background color. To do so:
- Type in body { and press ↵ Enter.
- Type in background-color: lightblue; and press ↵ Enter.
- You can use any supported color here, as well as "light" or "dark" modifiers.
- Type in } and press ↵ Enter.
-
6Style your first header. Type in h1 { and press ↵ Enter, add a modifier and press ↵ Enter, and type in } and press ↵ Enter. You can add multiple modifiers to one element as long as each modifier is on its own line. Common modifiers include the following:
- Text size - Type in font-size: 30px; to set your text as 30-point font. Substitute any number that you want to use.
- Text color - Type in color: black; to make black text. Substitute any color that you want to use.
- Text alignment - Type in text-align: center; to center the text. You can also type left or right to align the text appropriately.
- Font used - Type in font-family: times new roman; to set your font as Times New Roman. You can also use fonts like verdana or georgia.
-
7Style your first paragraph. Type in p1 { and press ↵ Enter, add a modifier and press ↵ Enter, and type in } and press ↵ Enter.
- The modifiers that you can use here are identical to the ones used for the header.
-
8Style the rest of your document. You can style any element by referencing its tag text and placing an open curly bracket ({), adding modifiers, and then closing the bracket (}).
-
9Close the STYLE and HEAD tags. On a new line below your last styling text, type in </style> and press ↵ Enter, then type in </head> and press ↵ Enter. Your CSS sheet is complete, meaning that you can now review and save it.


Advertisement
Part 3
Part 3 of 3:
Saving the Document
-
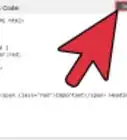
1Review your CSS stylesheet. Your CSS document will vary slightly, but it should look something like this:
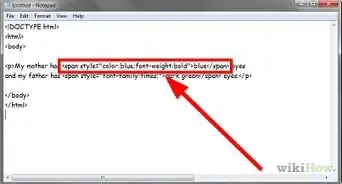
<!DOCTYPE html><html><head><style>body {background-color: lightblue;}h1 {font-size: 45px;}p1 {color: black;}</style></head><body><h1>Hi!</h1><p1>I am an iguana</p1></body></html>
-
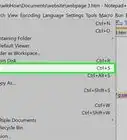
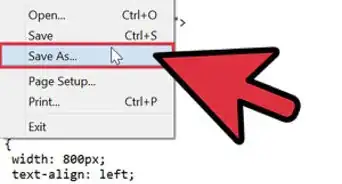
2Click File. It's in the top-left corner of the Notepad window. A drop-down menu will appear.
-
3Click Save As…. You'll see this near the bottom of the drop-down menu. Clicking it prompts a window to open.
-
4Select a save location. Click a folder (e.g., Desktop) on the left side of the window.
-
5Click the "Save as type" drop-down box. A drop-down menu will appear.
-
6Click All Files. It's in the drop-down menu.
-
7Name your file with a ".html" extension. In the "File name" text field, type in your preferred document name (e.g., "My CSS") followed by .html.
- For example, if you named your file "My CSS", you'd type my css.html into the field.
- If you use a program that can run ".css" files, you can use .css instead of .html here.
-
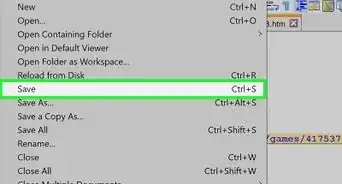
8Click Save. It's in the bottom-right side of the "Save As" window. This will save your CSS sheet in an executable format, meaning that you can open it in your preferred browser or HTML editor rather than in Notepad.


Advertisement
Community Q&A
-
QuestionWhat is the procedure to compile using a CSS file?
 Community AnswerCSS files do not need to be compiled. You may just link it to your .html header.
 -
QuestionHow do I create an account?
 Nicole FutoryanskyCommunity AnswerNotepad files will be saved to your computer itself, so no account is necessary.
 -
QuestionHow do I run the CSS file?
 Community AnswerCSS files are stylesheets that extend HTML pages with styles. They are not able to be run, but must be specified as links in a tag.
Advertisement
Warnings
- Always test your code before uploading it to a website or sharing it with other people.⧼thumbs_response⧽
Advertisement


References
About This Article
Jack Lloyd
wikiHow Technology Writer
This article was co-authored by wikiHow staff writer, Jack Lloyd. Jack Lloyd is a Technology Writer and Editor for wikiHow. He has over two years of experience writing and editing technology-related articles. He is technology enthusiast and an English teacher. This article has been viewed 210,686 times.
How helpful is this?
Co-authors: 19
Updated: October 21, 2021
Views: 210,686
Categories: Markup Languages
Advertisement