Tips and tricks for using the IF function in Excel
This article was co-authored by wikiHow staff writer, Kyle Smith. Kyle Smith is a wikiHow Technology Writer, learning and sharing information about the latest technology. He has presented his research at multiple engineering conferences and is the writer and editor of hundreds of online electronics repair guides. Kyle received a BS in Industrial Engineering from Cal Poly, San Luis Obispo.
The wikiHow Tech Team also followed the article's instructions and verified that they work.
This article has been viewed 77,904 times.
Learn more...
This wikiHow guide will show you how to use the IF function in Microsoft Excel to create logic formulas. If-else statements indicate that one value should appear “if” a condition is met, “else” show a different value if the condition isn’t met. The IF function allows you to evaluate a condition and output a different value for when the condition is true or false. You can add in AND, OR, and NOT functions to create more complex logical conditions. Use nested IF statements to create multiple conditions that must be met and different paths.
Things You Should Know
- Use =IF(logical_test, [value_if_true], [value_if_false]) to create an if-else statement.
- Add AND, OR, or NOT functions to evaluate more complex situations.
- Create nested IF statements to evaluate multiple conditions at different levels.
Steps
Using the IF Function
-
1Open Excel and click Blank Document. This will create a new spreadsheet. If Excel has already opened to a blank spreadsheet, you can skip this step.
- Alternatively, open an existing Excel file if you already have a dataset you want to apply the IF function to.
-
2Enter the data you want to evaluate. For example, you might have two columns of numbers in columns A and B. You can compare these numbers using an IF formula to see if they’re the same number.Advertisement
-
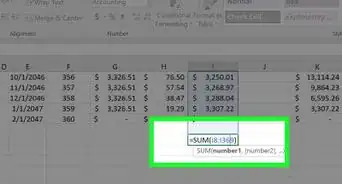
3Enter =IF(A1=B1, in a blank cell. The first argument in the IF function is the condition you want to evaluate. Replace A1=B1 with the condition you want to check. Here are some examples:
- A1>B1
- A1=“Canada”
- A1=3
-
4Enter "yes", after the comma. This is the second argument in the IF function. It’s the value you want to appear if the condition is true. You would now have =IF(A1=B1, "yes",.
-
5Enter "no") after the comma. This is the third argument in the IF function. It’s the value you want to appear if the condition is false. You would now have =IF(A1=B1, "yes", "no").
- In other words, this example indicates that if A1 does equal B1, the text “yes” should appear in the IF formula cell. Otherwise, “no” should appear.
- You can replace the second and third values with different text, numbers, or functions (such as the SUM function).
- Copy the IF formula as needed to apply it to other parts of your dataset.


Adding AND, OR, and NOT
-
1Create a simple IF formula. This will be the base formula to which we can add logical operators. You can add the AND, OR, and NOT operators to the first argument in an IF function to evaluate multiple criteria or whether the criteria is not met.
- For a simple example, =IF(A1=B1, "yes", "no") evaluates one condition, whether A1 equals B1.
-
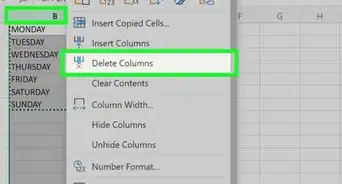
2Add the AND operator. AND, OR, and NOT are formatted as functions. The AND function follows the format AND(condition 1, condition 2). If both conditions are true, the entire AND argument will be true. If one or both conditions are false, the AND argument will evaluate to false.
- Continuing our example, =IF(AND(A1=B1, A1=C1), "yes", "no") checks whether A1 equals B1 and C1.
-
3Add the OR operator. The OR function follows the format OR(condition 1, condition 2). If either condition is true, the entire OR argument will be true. If both conditions are false, the OR argument will evaluate to false.
- Continuing our example, =IF(OR(A1=B1, A1=C1), "yes", "no") checks whether A1 equals B1 or C1.
-
4Add the NOT operator. The NOT function follows the format NOT(condition). If the condition is true, the NOT argument will be false. If the condition is false, the NOT argument will be true.
- Continuing our example, =IF(NOT(A1=B1), "yes", "no") checks whether A1 does not equal B1.


Using Nested IF Functions
-
1Open a Blank Document in Excel. If Excel has already opened to a blank spreadsheet, you can skip this step. For this method, we’ll work with a blank document to create an example formula.
- In this example formula, we’ll say that if the value of A1 is greater than 5, multiply it by 1. If the value is less than or equal to 5, multiply it by 2.
- The end result of this formula will look like this: =IF(A1>5, A1*1, IF (A1<5, A1*2, A1*2))
-
2Type 2 into A1 and press ↵ Enter.
-
3Double-click cell B1. This is where you’ll type the example formula.
-
4Type =IF( into the cell. This starts the formula.
-
5Type the first condition, followed by a comma. This is the first test you’ll be performing.
- In our example, we want a certain action to occur if the value of A1 is greater than 5. Type A1>5,.
- The formula should now read =IF(A1>5,, which means “if the number inside A1 is greater than 5.”
-
6Type the desired output if true. This is the action you want to occur if the result of the first condition is true.
- In this example, we want the value to be multiplied by 1 if it’s greater than 5. So, type A1*1.
- The formula now looks like this: =IF(A1>5, A1*1. This means “if the value of A1 is greater than five, multiple the value by 1.”
-
7Type a , (comma) and press the spacebar. The formula should now look like this: =IF(A1>5, A1*1,
-
8Type IF( after the space. Now you’re ready to add the second part of the formula.
-
9Type the second condition, followed by a comma. This is the second test you’ll perform on the value of A1.
- In our example, we want to specify an action to occur if A1 is less than 5. So, type A1<5.
- The formula should now read: =IF(A1>5, A1*1, IF(A1<5,.
-
10Type the desired output if true, followed by a comma. This is the action you want to occur if A1 is less than 5.
- In this example, we want the value to be multiplied by 2 if it’s less than 5. So, type A1*2,.
- The formula now looks like this: =IF(A1>5, A1*1, IF(A1<5, A1*2,.
-
11Type the desired output is false. Since we’re doing a greater/less than operation, the only value that could be false is 5, since we’re checking for numbers that are greater or less than 5.
- In our example, we want the equal-to value to be multiplied by 2. So, you’ll type A1*2.
- The formula should now look like this: =IF(A1>5, A1*1, IF(A1<5, A1*2, A1*2. This means that if the value of A1 is equal to 5, it will be multiplied by 2.
-
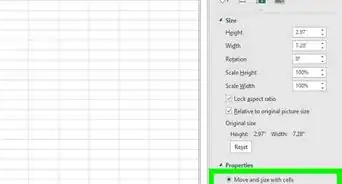
12Type )). This ends both nested IF statements, as each needs their own “)” mark.
- The formula now looks like this: =IF(A1>5, A1*1, IF(A1<5, A1*2, A1*2)).
-
13Press ↵ Enter. This runs the formula and displays the result in cell B1. The example result should be 4, because the since the value of A1 (which is 2) is less than 5, it has been multiplied by 2.


About This Article