This article was co-authored by Adam Kealing. Adam Kealing is a Professional Photographer based in Austin, Texas. He specializes in general wedding, destination wedding, and engagement photoshoots. Adam has over 11 years of photography experience. His work has been featured in Green Wedding Shoes, Style Me Pretty, Once Wed, and Snippet Ink. His work has won numerous awards with Fearless Photographers and Masters of Wedding Photography.
This article has been viewed 95,317 times.
Do you want to take photos like a pro? You can — and you won't need an expensive camera to do it. The secret is in the light. Learn how to use different kinds of light — back lighting, side lighting, diffused lighting and artificial lighting — and no one will be able to tell if you are using an expensive Nikon or your everyday cell phone.
Steps
Mastering the Basics
-
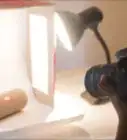
1Find the light source. Look around you and find where the light is coming from. Light can come from almost anywhere — above you, behind you, around you. Where the light is coming from will make a difference in how your subject looks. For example, light coming from above your subject might cause sharp shadows, while light coming from in front of your subject can flatten the image.[1]
- Move around your subject and note how changing the direction of the light changes the image. Move your subject to an area where the direction of the light creates the look you want. Certain lights will flatter your subjects, while others can create drama.
-
2Note the color of the light. Light can be bright, soft, harsh or low. It can take on a variety of colors depending on its source. Some lights are cool while others are warm. The quality of the light will affect how your subject looks, and can cause pictures to be too harsh, too soft, too dark, or just right.[2]Advertisement
-
3Look for details. Your eyes see more details than a camera can pick up. This is why your photos often don't match what you see. But being aware of the exposure, which is the overall brightness or darkness of a scene, will help you capture the details you want to include.[3]
- If you are using a camera that has an exposure setting, a neutral or normal exposure will create the most natural-looking image.[4]
-
4Look for contrasts. The direction of the light creates highlights and shadows. Highlights are the brightest part of an image. Conversely, a shadow is the darkest part of an image. The contrast between shadows and highlights is what makes an image interesting. Knowing how changing your light will change the contrast is the difference between taking a sub-par photo and taking one that your friends will rave about.[5]
- Side-lit photos will have a lot of contrast. Front-lit photos will typically have very little contrast. Images shot on a cloudy day usually are also low in contrast, while images shot in the bright sun are generally high in contrast.[6]


Taking Advantage of Light Direction
-
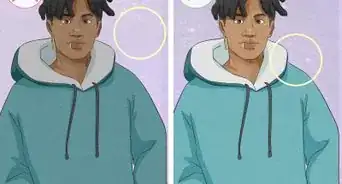
1Use front lighting for the most certain results. Positioning your subjects so the light shines them straight on is the most common way to work with light. Changing the brightness of the light, however, can turn this common set-up into uncommon photos. Soft front lighting, for example, can be very flattering. Bright front lighting, such as a flash, can be too harsh.[7]
- Flash is the most common form of front lighting. Most built-in flashes are set to flash automatically in low light. For more control, you can disable this feature and use the flash only when you want to. Sometimes, you'll want to use it to fill in shadows when the light is bright. Other times, you might want the image to remain in shadows for a special effect, so you would not want your camera to use a flash at all.
- Camera flashes sometimes cause “red eye.” The best way to prevent this is to have your subject looking away from the camera. You can often remove red eye from existing photos with free photo-editing software available online.
-
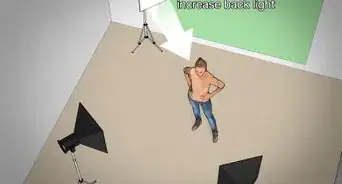
2Use back lighting to create dramatic photos. Back-lit photos are so interesting because they are the opposite of a standard photo. In a back-lit photo, the background is illuminated while the foreground is in the dark. A solar eclipse is a good example of a back-lit photo. These can be tricky, but experimenting with different lights and different camera settings will help you learn to achieve the result you want.[8]
- Silhouettes are the prime example of back-lit photos. You can create a simple one by putting the light directly behind your subject. When you shoot from the front, the subject will remain dark.[9]
-
3Use side lighting for stand-out portraits. To produce an eye-catching effect on your photos, use lighting from the side, which will put part of your subject in light and part in shadow. It is great for showing depth in landscape photography, as well as portraits.[10]
- Side lighting will create depth, but you need to be careful not to go overboard. Too much contrast can be unflattering. Many professional photographers use a reflector or a flash to fill in the shadows and reduce the sharp edges.[11]
- One of the most popular poses for portraits is to position your subject in front of a window, with one shoulder facing the camera. Different effects can be achieved by having your subjects change the direction of their heads. For one photo, ask them to look out the window. For another, have them look at you.
-
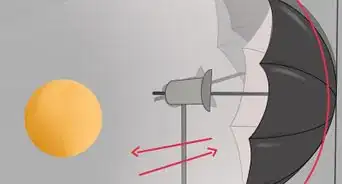
4Use diffused lighting for natural pictures. Diffused lighting is a soft light that can be produced by the sun shining through clouds, by the shade of trees or by light bouncing off a wall or ceiling. This soft light produces a pleasing image that captures the natural colors and details of the subject.[12]


Focusing on Light Quality
-
1Take photos during the Golden Hour. The Golden Hour is the hour around sunrise and sunset, where the sun is near the horizon, and the light is softer. This soft light is perfect for nearly any type of photo.[13]
-
2Take photos on overcast or cloudy days. The weather and time of day have a major effect on the type of light you will be shooting in. It might seem counterintuitive, but overcast is good. Clouds will diffuse the light, making shadows lighter or non-existent. The shadows cast by large buildings and trees can also create the same type of diffused light found on overcast days.[14]
- Many photographers think that overhead sun is the best light because everything is so bright. Unfortunately, this is often the worst time to take pictures. Colors will be washed out. If you are taking photos of people, shadows will be too dark under facial features. In addition, you are likely to see squinting eyes looking back at you through your viewfinder.[15]
-
3Be aware of light color. During the Golden Hour, the sunlight casts off red and yellow rays. This is a great light for warm and appealing photos. If you are taking pictures of people, they will particularly like this light because warm colors flatter the skin. These colors will also make scenes appear more cheerful.[16]
- Blue hours consist of the hour before sunrise and the hour after sunset, when the sun is just below the horizon. This early and late indirect light results in a light with a cool blue cast. It can create photos with a more somber mood.[17]


Expert Q&A
-
QuestionHow do you take pictures in bright sunlight?
 Adam KealingAdam Kealing is a Professional Photographer based in Austin, Texas. He specializes in general wedding, destination wedding, and engagement photoshoots. Adam has over 11 years of photography experience. His work has been featured in Green Wedding Shoes, Style Me Pretty, Once Wed, and Snippet Ink. His work has won numerous awards with Fearless Photographers and Masters of Wedding Photography.
Professional PhotographerIf you're taking photos outside when it's very bright out, have your subject stand in the shade, like under a tree or next to a building. Shaded light will turn out much better than direct sunlight. -
QuestionWhat is the colour performance for the picture under sunlight, flashlight, halogen lamp and fluorescent lamp?
 Cesar GrossmannCommunity AnswerSunlight and flashlight reproduce all colors. Fluorescent lamps depend on the lamp. If you use a lamp for photography, it has a higher CRI (Color Rendering Index) and all colors are reproduced.


References
- ↑ http://www.digital-photo-secrets.com/tip/2627/front-light-vs-side-light-vs-back-light
- ↑ https://www.pinkbike.com/news/basic-light-tutorial-2011.html
- ↑ https://www.pinkbike.com/news/basic-light-tutorial-2011.html
- ↑ https://www.pinkbike.com/news/basic-light-tutorial-2011.html
- ↑ https://www.pinkbike.com/news/basic-light-tutorial-2011.html
- ↑ http://www.digital-photo-secrets.com/tip/2627/front-light-vs-side-light-vs-back-light
- ↑ http://www.digital-photo-secrets.com/tip/2627/front-light-vs-side-light-vs-back-light
- ↑ http://www.digital-photo-secrets.com/tip/2627/front-light-vs-side-light-vs-back-light
- ↑ http://photolisticlife.com/2014/09/23/mastering-light-in-photography-part-one
- ↑ http://photolisticlife.com/2014/09/23/mastering-light-in-photography-part-one
- ↑ http://www.digital-photo-secrets.com/tip/2627/front-light-vs-side-light-vs-back-light
- ↑ http://photolisticlife.com/2014/09/23/mastering-light-in-photography-part-one
- ↑ http://photolisticlife.com/2014/09/23/mastering-light-in-photography-part-one
- ↑ http://photolisticlife.com/2014/09/23/mastering-light-in-photography-part-one
- ↑ http://photolisticlife.com/2014/09/23/mastering-light-in-photography-part-one
- ↑ http://photolisticlife.com/2014/09/23/mastering-light-in-photography-part-one/
- ↑ http://photolisticlife.com/2014/09/23/mastering-light-in-photography-part-one
About This Article

To use light in photography, start by figuring out where the light should come from to give you your best shot. For example, lighting from the front will give you a reliably bright shot, but lighting from the side can create flattering depth in a portrait. Then, decide what type of light will enhance your picture. You can make almost any photo look good by shooting during the Golden Hour, around sunrise or sunset. Alternatively, try shooting on cloudy or overcast days when the light is more diffused to eliminate unwanted shadows in your pictures. For tips on how to use light to create dramatic contrasts in your photos, keep reading!