This article was co-authored by wikiHow staff writer, Janice Tieperman. Janice is a professional and creative writer who has worked at wikiHow since 2019. With both a B.A. and M.A. in English from East Stroudsburg University, she has a passion for writing a wide variety of content for anyone and everyone. In her free time, you can find her working on a new crochet pattern, listening to true crime podcasts, or tackling a new creative writing project.
There are 15 references cited in this article, which can be found at the bottom of the page.
This article has been viewed 16,819 times.
Learn more...
Tassimo coffee makers are a staple for many caffeine-loving households. If you’ve recently purchased or acquired one of these devices, it won’t take you very long to set up and clean the machine. To prepare a single cup of coffee, insert a T disc into the brewing compartment and press the start button. With regular maintenance and cleaning, you’ll be able to enjoy coffee and other hot drinks on a regular basis!
Things You Should Know
- The water tank is on the back, and must have sufficient water in it to brew a full cup of coffee; if there isn’t enough water, the empty cup symbol on the machine will illuminate.
- To make a cup, turn the machine on and wait for the standby button on the front of the machine to light up, which indicates that the machine is ready.
- Tassimo coffee makers use a pod system, and you must use pods that fit the machine to make a cup of coffee; Tassimo sells reusable pods if you want to brew with specific beans.
- Press the round button on the front of the machine to brew a cup; if your specific mug doesn’t fit, you can slide the platform out to make more room.
- There is a service disc that typically comes with the machine, and you should run a cleaning cycle at least once a week to keep your coffee tasting great.
Steps
Cleaning the Machine Before Use
-
1Plug in your coffeemaker wherever you plan to use it most. Unbox your Tassimo and find a long cord attached to the back of the device. Once you’ve arranged your new coffee maker on the countertop or other surface of your choice, plug the cord into the nearest wall socket. [1]
- It might be easiest to place your Tassimo in the kitchen area, or another section of your home that gets a lot of traffic.
-
2Remove the back water tank and rinse it out. Look behind the brewing portion of the coffee machine to find the water tank. Use the top handle to pull it out of its compartment, then bring the container over to a sink. Using lukewarm tap water, fill the tank and dump it out repeatedly to ensure an even rinse. Don’t use any dish soap, as this container doesn’t require an in-depth cleaning.[2]Advertisement
-
3Fill the tank with tap water and place it in the machine. After you’ve finished rinsing the back water tank, refill the container once more. Check for a label or groove on the tank that states “MAX,” and pour the water up to that marking. You don’t need to fill the container with hot water, as the machine will automatically heat up the water during the brewing process.[3]
- Don’t overfill the water tank, or the machine might not work properly.
- Refill the water tank whenever you see the empty cup LED illuminated on the control panel. Whenever this icon is lit up, remove the back water tank and refill the container up to the “MAX” line.[4]
-
4Install the water filter if your Tassimo has one. Rinse the filter by submerging it in a bowl of water, then shake it lightly to get rid of any lingering air bubbles. Next, stick the filter into the bottom of its plastic container, pressing it in until you hear a clicking sound. To get the filter operating, place it into the water tank. After you fill the tank with water and dump it out 3 times, the filter will be ready for use.[5]
- When you fill the tank 3 times, you only need to submerge the filter.
-
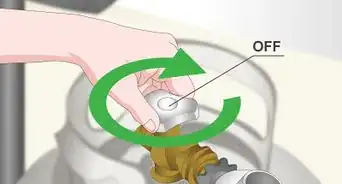
5Press the power button to turn on the machine. Look to the rounded side button panel to find the coffee machine’s controls. Beneath this panel, find the power button towards the bottom of the machine. Press and hold this button for 1 second, or until the display lights up.[6]
- When you press this button, the LEDs will light up orange.
- This is the same button you use to turn off the machine.
-
6Open the brewing head and place the service disc in the slot. Grasp the metallic edge of the brewing unit and pull it upwards. Search around this opening for an open circular slot that accepts T discs. Once the service disc is in place, press the brewing lid firmly down until you hear a click.[7]
- The service disc looks like a normal T disc, but it causes the Tassimo to dispense water instead of coffee.
- If you don’t hear a click, the brewing unit hasn’t closed securely.
- Run a rinse cycle through your Tassimo with your service disc whenever you brew a cappuccino or some other creamy drink.
-
7Place a mug beneath the brewing spout. Take a mug or cup of your choice and set it on the adjustable stand. Check that the cup is large enough to hold 200 millilitres (6.8 fl oz) of fluid, so the machine doesn’t spill and overflow during the cleaning process.[8]
- Since you’re only cleaning the machine, you won’t be drinking anything that the machine brews during the service cycles.
-
8Start a quick brewing cycle by pressing the round button. Look to the right control panel, which is made of a circular button surrounded by LEDs. To start cleaning the machine, press the center, circular button and wait for the machine to start working.[9]
- This round button serves as both the start and stop button, and is what you’ll be using the most when you operate your Tassimo.
- Since the cup is only brewing water, you don’t need to clean your mug afterwards.
-
9Repeat the brewing cycle until the LED cup light isn’t blinking. Keep an eye on the rectangular LED display in the top right corner of the machine. As the machine brews with the service disc, watch the blinking orange cup. Dump out the filled cup and repeat the brewing process, pressing the center button to clean the machine. Keep dumping out the water and doing cleaning cycles until the orange cup LED is solid.[10]
- You’ll probably have to go through the cleaning process about 3-4 times.
-
10Store the service disc in the bottom of the machine. After the machine is no longer cleaning itself, lift the lid on the brewing unit and remove the service disc. Look along the bottom edge of the machine, around the adjustable cup stand. Find the disc storage slot hidden in this area, and store the service disc inside.[11]


Brewing a Beverage
-
1Move your cup platform up or down to hold the right mug size. Pinch the small groove on the side of the stand and slide it in a counter-clockwise direction to raise the cup ledge. Make this type of adjustment whenever you’re brewing a smaller beverage that’s 75 millilitres (2.5 fl oz) or 150 to 200 millilitres (5.1 to 6.8 fl oz). If you’re trying to brew a large, 300 millilitres (10 fl oz) drink, pull the cup stand out of the machine altogether.[12]
- You can fill a rounded, 500 mL (17 fl oz) sized coffee pot using the default height setting.
Did you know? Different types of drinks require different cup sizes. If you’re brewing a cup of espresso, check that your cup can hold at least 75 millilitres (2.5 fl oz). If you’re trying to make cafe crema or filtered coffee, use a cup that can hold at least 150 millilitres (5.1 fl oz).
Creamier drinks and teas require a 200 millilitres (6.8 fl oz) cup, while lattes and macchiatos need a 300 millilitres (10 fl oz) mug.
-
2Press the center button to turn on the machine. Simply click the center button to wake up the machine. Then, wait until the steaming cup LED is lit up.[13]
-
3Place a T disc into the brewing slot on the machine. Open the lid of the brewing unit by pulling up on the metallic handle. Next, take the flavor disc of your choice and place it in the open slot. Make sure that no other discs are in the machine, as this will impair the coffee-making process.[14]
- Try storing your T discs near your machine.
- Always keep your cleaning disc in the bottom compartment of the machine.
-
4Close the brewing lid until you hear a clicking sound. Push or pull down the top lid, securing your T disc of choice. Continuing pushing or pulling on the lid until you hear a distinct clicking noise. If you can’t hear this sound, then you haven’t closed you brewing unit completely.[15]
- If you don’t hear a clicking noise, lift up the brewing lid again and try closing it.
-
5Press the central round button to start the brewing process. Use the start button and wait for the LED display to light up. Wait at least 20 seconds for your drink to fully brew. Keep in mind that larger drinks like macchiatos and lattes will take longer to brew than filtered coffees and cafe creams.[16]
- Don’t remove the cup until the “automatic” and “manual” LEDs are no longer lit up.
-
6Adjust your drink strength using the center button. When the cup LED is blinking, press and hold it to adjust the strength. You can make your drink larger and milder by extending the brew time or smaller and stronger by shortening it. For a standard, moderately flavored beverage, don’t press the start/stop button at all while your drink is brewing.[17]
- This LED is known as the “automatic” light. When the “automatic” light is blinking, then the machine is brewing your coffee with standard settings specified by the T disc.
- This setting is best for people with on-the-go schedules.
-
7Check the brewing lid or water tank if you have any issues. Don’t panic if your Tassimo doesn’t immediately prepare a cup of coffee. Before looking to your manual for troubleshooting options, examine the LED display for any warnings. Always check the water tank is full before brewing a new cup or jug of coffee. You might also have brewing difficulty if you don’t descale your machine frequently.[18]
- Check online or in your user manual for troubleshooting solutions if your machine still doesn’t work. If no solution seems to work, call Bosch customer service at 1-877-834-7271.[19]


Performing Regular Maintenance
-
1Clean the machine with the service disc each week. Extend the life of your device by keeping the brewing unit in good functioning condition. Remove the service disc from the bottom compartment and place it in the brewing slot. After placing the cup on the stand, press the start button to clean the machine.[20]
- If you don’t clean your machine frequently, the coffee maker could get clogged, or not work as efficiently.
- Try running a cleaning cycle after each creamy drink you prepare (e.g., latte, macchiato).
-
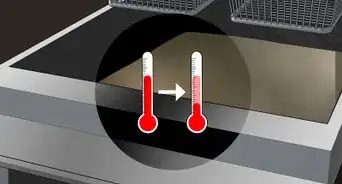
2Descale your coffee maker once every 3 months. Check the LED display frequently to see if the descaling icon is lit up. When the time comes to descale your device, pour 500 millilitres (17 fl oz) of descaling fluid into the back water tank. Place a large cup or mug beneath the brewing spout, then press the center button to run a cycle.[21]
- If you don’t descale your machine, you might notice the quality of your brews go down.
-
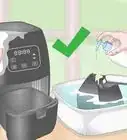
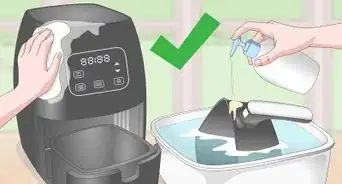
3Wipe off the exterior with a damp cloth as needed. Wet a paper towel with warm water and gentle soap, then clean off the outer surface of your Tassimo. Focus on any stained areas or especially sticky spots to keep your coffee maker looking and feeling beautiful.[22]
- While you don’t need to wipe down your machine every day, try cleaning it at least once per month.
Tip: Clean the T disc holder in the dishwasher, but hand wash the piercing needle. Don’t clean any of these parts immediately after brewing a cup of coffee, as you could end up burning yourself!
To keep your brews as fresh as possible, rinse out your water tank once every 3 months at minimum.[23]


Things You’ll Need
- Mug or cup
- Descaling solution
- Paper towel
- Gentle soap
- Service cleaning disc
- T discs
- Water


References
- ↑ https://www.manualslib.com/manual/274444/Bosch-Tas4011gb.html?page=5#manual
- ↑ https://www.manualslib.com/manual/274444/Bosch-Tas4011gb.html?page=5#manual
- ↑ https://m.youtube.com/watch?feature=youtu.be&v=1hnar8OyXvo&t=0m28s
- ↑ https://www.tassimo.com/media/Vivy2_First%20time%20use_WEB.pdf
- ↑ https://m.youtube.com/watch?feature=youtu.be&v=1hnar8OyXvo&t=1m29s
- ↑ https://m.youtube.com/watch?feature=youtu.be&v=1hnar8OyXvo&t=0m35s
- ↑ https://m.youtube.com/watch?feature=youtu.be&v=1hnar8OyXvo&t=0m39s
- ↑ https://www.manualslib.com/manual/274444/Bosch-Tas4011gb.html?page=6#manual
- ↑ https://m.youtube.com/watch?feature=youtu.be&v=1hnar8OyXvo&t=048s
- ↑ https://m.youtube.com/watch?feature=youtu.be&v=1hnar8OyXvo&t=1m2s
- ↑ https://m.youtube.com/watch?feature=youtu.be&v=1hnar8OyXvo&t=1m8s
- ↑ https://www.manualslib.com/manual/274444/Bosch-Tas4011gb.html?page=8#manual
- ↑ https://www.manualslib.com/manual/274444/Bosch-Tas4011gb.html?page=8#manual
- ↑ https://www.manualslib.com/manual/274444/Bosch-Tas4011gb.html?page=10#manual
- ↑ https://www.manualslib.com/manual/274444/Bosch-Tas4011gb.html?page=9#manual
- ↑ https://www.manualslib.com/manual/274444/Bosch-Tas4011gb.html?page=9#manual
- ↑ https://www.manualslib.com/manual/274444/Bosch-Tas4011gb.html?page=8#manual
- ↑ https://www.tassimo.com/media/Vivy2_First%20time%20use_WEB.pdf
- ↑ http://www.tassimodirect.com/system-maintenance.html
- ↑ http://www.tassimodirect.com/system-maintenance.html
- ↑ http://www.tassimodirect.com/system-maintenance.html
- ↑ https://www.manualslib.com/manual/274444/Bosch-Tas4011gb.html?page=11#manual
- ↑ https://www.manualslib.com/manual/274444/Bosch-Tas4011gb.html?page=11#manual