This article was co-authored by wikiHow Staff. Our trained team of editors and researchers validate articles for accuracy and comprehensiveness. wikiHow's Content Management Team carefully monitors the work from our editorial staff to ensure that each article is backed by trusted research and meets our high quality standards.
The wikiHow Tech Team also followed the article's instructions and verified that they work.
This article has been viewed 172,062 times.
Learn more...
This wikiHow teaches you how to adjust your computer's cursor properties, and customize your pointer for your personal needs. If you're a PC user, Windows allows you to choose from a selection of stock cursor sizes, colors, and schemes. On Mac, you can natively change your cursor's size, but not it's color or shape. If you're not satisfied with your computer's stock cursor sets, you can download custom cursors online, and add them to your computer. While Windows makes it easier to add custom cursors in the Mouse Properties menu, Mac users will need to use a third-party app to apply custom pointers and cursors.
Steps
Using PC Settings on Windows
-
1
-
2Click the gear icon on the bottom-left. This is your Settings button in the lower-left corner of the Start menu. It will open your PC Settings in a new window.
- On some older versions of Windows, you can open Control Center from the Start menu, select Ease of Access here, and click Change how your mouse works. This will give you the same options as here.
Advertisement -
3Click Ease of Access in the Settings window. This will open your accessibility options on a new menu.
-
4Click Mouse on the left-menu. You will find a navigation menu on the left-hand side of the Ease of Access menu. Select Mouse here to see your mouse and cursor options.
-
5Select the size of pointer you want to use under "Pointer size." Click one of the three options here to change your cursor's size.
- You can select a small, medium or large cursor here.
-
6Select a color for your cursor under "Pointer color." Just click the option you want to use under this heading to change your cursor's color. You can select a:
- White pointer, which will always be white.
- Black pointer, which will always be black.
- Inverting pointer, which will automatically adapt to the background color to look white on darker backgrounds, and black on lighter backgrounds.


Using Mouse Properties on Windows
-
1
-
2Type Mouse on your keyboard. This will search your system, and show the matching results on the menu.
-
3Click the Mouse Settings (Win 10) or Mouse option at the top. Your mouse settings should be the top result in the search.
-
4Click Additional mouse options (Win 10 only) at the bottom. This is a blue link at the bottom of the Mouse Settings window on Windows 10. It will open Mouse Properties.
- You can skip this step if you're using an older version of Windows.
-
5Click the Pointers tab at the top of Mouse Properties. This button is next to Buttons at the top of the Mouse Properties window.
-
6Click the drop-down menu below "Scheme." This will open all your cursor options in a drop-down menu.
-
7Select the cursor set you want to use. You can select an option on the menu here to preview the entire set.
- If you have a custom, third-party cursor or cursor set downloaded to your computer, click the Browse button on the bottom-right of this window, and select the custom cursor on your computer.
- You can find free cursor packs at various web sites such as http://www.rw-designer.com/cursor-library and https://www.deviantart.com/customization/skins/windows/cursors/popular-all-time.
-
8
-
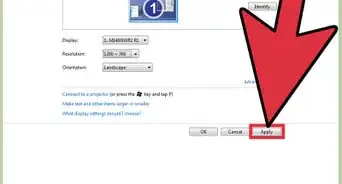
9Click the Apply button. This button is in the lower-right corner of the pop-up window. It will apply your new settings, and change your cursor to the selected scheme.


Changing Mouse Size on Mac
-
1
-
2Click System Preferences on the menu. This will open your Mac's settings panel in a new window.
-
3Click the Accessibility option in System Preferences. This option looks like a white human icon in a blue circle. You can find it on the fourth row of options.
- On older Mac versions, this option may be named Universal Access.
-
4Click the Display option on the left-menu. In the Accessibility menu, find and click the Display option on the sidebar on the left-hand side.
-
5Click and drag the Cursor size slider. This slider allows you to manually adjust your cursor's size to your liking.
- Your new settings will be saved automatically. You can close System Preferences when you're done adjusting.
-
6


Downloading Custom Cursors on Mac
-
1Open http://www.rw-designer.com/gallery in your internet browser. Type or paste this URL into your browser's address bar, and press ⏎ Return to open the RW-Designer cursor gallery.
- This is an online, community-driven cursor gallery. You can find and download a variety of popular cursor icons here.
- Alternatively, you can check out other websites and online galleries to find different cursor icons.
-
2Click a cursor to see its details. When you find a cursor pack you like, click on it to see the pack details on a new page.
-
3Scroll down and click the cursor you want to download. You can download and use any cursor that ends with the ".cur" format extension.
- Make sure to select a ".cur" cursor here. Animated cursor designs with the ".ani" format will not work on Mac.
-
4Click the Download button. This will download the selected cursor design to your Downloads folder.
- You will now have to use a third-party app to apply this custom design to your cursor.
- You can use Mousecape - a tiny, free, open-source app to use these custom cursor images on Mac. You can check out the following methods to find out how.


Creating a Mac Cursor in Mousecape
-
1Open https://github.com/alexzielenski/Mousecape/releases/tag/0.0.6b2. Type or paste this link into your browser's address bar, and press ⏎ Return to open the Mousecape page on GitHub.
- Mousecape is a free, open-source app for Mac OS computers to use custom cursor designs.
- This link will open the latest version of Mousecape available (0.0.6b2). You can always check the https://github.com/alexzielenski/Mousecape/releases page to see if a newer version comes out.
-
2
-
3Open the "Mousecape_0.0.6b2.zip" file in your Downloads folder. This will extract the Mousecape app to your computer.
-
4Double-click the Mousecape app. After extracting the downloaded ZIP file, open the Mousecape app to use it on your Mac.
-
5Click the File tab on the menu bar. After opening the Mousecape app, click this button on the menu bar in the upper-left corner of your screen.
-
6Click New Cape on the "File" menu. This will create a new "Unnamed" entry in the Mousecape window.
-
7Right-click the new "Unnamed" entry in Mousecape. This will open your right-click options.
-
8Click Edit on the right-click menu. This will open the new entry's properties in a dialogue box.
- This will open a new window to customize this new cursor cape.
- Make sure to check out the following methods in order to find out how to customize and use new cursors with Mousecape on Mac.


Customizing a Cursor in Mousecape
-
1Enter a name for your new cursor in the "Name" field. In the editing window, you can delete "Unnamed" in the Name box, and give a custom name to your new cursor.
-
2Click the + button on the bottom-left. This will add an "Unknown" cursor to this entry on the left menu.
-
3Click Unknown on the left menu. You can add your custom cursor design here.
-
4Click the Type drop-down. This will open a list of all the different cursor types and functions you can customize.
-
5Select Arrow in the drop-down. When this option is selected, you can change your pointer cursor arrow's design.
-
6Drag and drop your downloaded ".cur" cursor design to the "1x" box. Find the ".cur" custom cursor you downloaded on your computer, and drag it to the "1x" box at the bottom of the Mousecape editing window.
- The new cursor design will now show up in the "1x" box here.
- Optionally, you can change the numbers in the "Size" box here, and adjust your custom cursor's size.
-
7Click the red close button on the top-left of the editing window. You will be asked if you want to save changes to your new design.
-
8Click Save in the pop-up. This will save your new cursor design to Mousecape.
- You can now apply this new cursor, and start using it any time you want.


Using Mousecape
-
1Find the cursor you want to use in the Mousecape window. All your custom cursors are saved and listed here.
- Once you create a custom cursor design, it's saved in Mousecape. You can always go back and switch between different cursors any time you want.
-
2Right-click a cursor entry in the Mousecape window. You will see your right-click options on a drop-down menu.
-
3Click Apply on the right-click menu. This will instantly change your cursor to the selected design.
-
4Click File on the menu bar. This will open a drop-down menu.
-
5Click New Cape on menu. This will create a new, blank "Unnamed" entry in the Mousecape window.
-
6Right-click the new "Unnamed" cursor entry. This will open your options on a right-click menu.
-
7Click Apply on the right-click menu. This will switch your cursor to Mac's default design.
- You can also right-click a cursor entry here, and select Remove to delete the selected design from your computer.


Community Q&A
-
QuestionI couldn't find the cursor folder. Any ideas?
 Community AnswerClick the Windows Start button, then click Run. Type in "Windows" then click enter and you will be in the "Windows" folder. The cursor folder should be somewhere in there.
 -
QuestionI changed my cursor with Custom Crust and now I can't get it back. How do I set my cursor back to default?
 Community AnswerIn Mousecape, make a new cape with no picture. Use that and don't change it.
 -
QuestionWhen I click away, why does the cursor go away?Community AnswerMake sure that you right-clicked the cape and pressed apply. That should work.
Warnings
- Avoid any banner ads or pop-ups that advertise cursors. These are often gateways for adware. Stick to trusted cursor libraries on reputable sites.⧼thumbs_response⧽


About This Article

1. Open the Start menu.
2. Click the gear or Settings button.
3. Click Ease of Access.
4. Click Mouse on the left-menu.
5. Select a cursor size.
6. Select a pointer color.