This article was co-authored by wikiHow Staff. Our trained team of editors and researchers validate articles for accuracy and comprehensiveness. wikiHow's Content Management Team carefully monitors the work from our editorial staff to ensure that each article is backed by trusted research and meets our high quality standards.
This article has been viewed 132,112 times.
Learn more...
Using the right technique is essential when you change a motorcycle tire. Installing motorcycle tires improperly can not only damage the tire or motorcycle but also put you at serious risk of an accident. Once you know the right technique you save time and money as well as increase road safety.
Steps
Removing Motorcycle Tires
-
1Have all the required materials ready before you start to remove the motorbike tire. These are basic tools required for changing motorcycle tires that you should be able to purchase at a motorcycle shop.
- Spray-on silicone lubricant (or Windex)
- Tire irons
- Breezer tire tool
- Valve core tool
- Bead breaker (or two C-clamps)
- Compressed air pump
- Rim protector (optional)
-
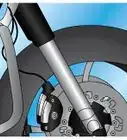
2Let all the air out of the tire with the valve core tool. This tool is either snapped on or screwed into the valve to keep it open.[1] The force of the air coming out is usually quite strong, so you will need to hold the valve core tool tightly.
- This loosens the tension in the tire, making it much easier to work with.
Advertisement -
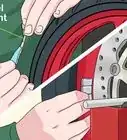
3Draw an arrow at the edge of the rim with your pencil so you can see the direction of the spin of the wheel. If you're unsure. hold the tire back up to the motorcycle, the way you took it off. Note how the wheel needs to spin, as this is essential when putting the next tire on.
- Wheels spin towards the direction the bike is going.
-
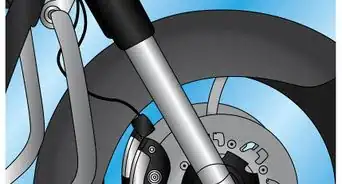
4Detach the bead (the inner edge of the tire) from the rim using the bead breaker tool. This is a metallic tool that can be inserted between the tire and wheel rim.[2] You will hear a pop sound when the bead breaks loose. Continue to separate the tire from all edges of the rim on both sides.
- A "bead" is a curved lip of the tire that goes right where the tire meets the rim and hold it in place.
- If the bead isn't coming out, try to push more air out of the tires.
-
5Spray silicone lubricant on the tire bead to help it come out. This will allow you to slip the tire off the rim easily by entering tire irons under the bead and pulling the tire away from the rim. Remove both sides of the tire until the tire can slip off completely.
- Every time you expose some of the tire bead, give it a spray. It will prevent it from re-sticking and making you start over.
- You can also use some Windex.
-
6Alternatively, use two C-clamps to push the bead out. Take a large clamp and set it over the tire, right before the tire tucks into the rim. Tighten it so that the tired presses down and the bead starts to bend off. Then add one more clamp 6-8" to the side of the first and repeat. Once they're both on, pull them towards the edge of the tire to pop the bead out. You might need to move both clamps a quarter turn down the wheel or so and repeat once more to get the whole bead off.
- When down, the tire should sit just outside of the rim.
-
7Use two tire levers to pry the bead up and over the rim. Tire levers are simply long metal tabs. You shove them under the bead, so that the back side sits against the rim, and then push down to pull the tire up. The rim acts like a fulcrum, allowing you to pop the tire up and over the rim. Move in a circle around the tire until the tire is off.
- This may chip or nick your rim if you're not careful -- buy some rim protectors, little foam pieces that fit between the tire iron and the rim, to protect it if you're worried.[3]
-
8Break the bead and pry out the tire on the other side to remove the rim. Repeat the procedure on the opposite side to take the wheel out completely. It should be easier on this side.


Installing Motorcycle Tires
-
1Lubricate the inner walls of the new tire thoroughly. Use your lubricated spray or Windex. As you work with the new tire, keep spraying it to keep it slippery and easier to work with.[4]
-
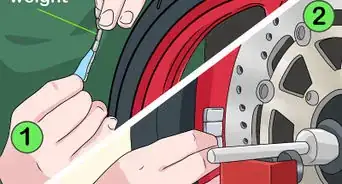
2Place the new motorbike tire so its spin direction matches the direction you marked earlier on the rim. There is also a red dot on the tire that should be located next to the valve stem. Make sure you note this dot and the spin of the tire and set it up
-
3Attach one side of the tire to the rim, using the tire irons to pry it in. This time, the tire wall will be placed between the tire iron and the rim so the tire iron can push the tire into the rim. The bead of the tire acts as the fulcrum, with you pushing away from the center of the tire to ease the bead under the rim.
- Repeat on the other side once the first is in.
-
4Pump some air into the tire using a compressed air pump, but do not inflate it fully. You just want to pump until you hear a small "pop." This indicates the bead has popped in.
- You can also take a small hammer and hit the tire around the bead as you fill it up. This will shift the tires slightly as it fills, making it more likely that it slips into the bead.
-
5Seal the tire bead into the rim using the Breezer tire tool if you can't get the "pop" while inflating. You can use this tool to press the bead in and then rotate the tire to get the bead in from all edges.
- Do not keep pumping up if you can't get the bead in. Let some air back out, then re-pump and use the tool.
- When the tire is not fully inflated, you can usually rotate it a bit still. Make sure that red dot is balanced with the valve stem.
-
6Pump some ceramic dust into the tire. Squirt a bit of ceramic dust (made for tires) into the tire valve. It keeps the tire balanced and equalizes some of the weight, balancing out any issues. Do this before putting the valve stem back on.
-
7Use a valve stem tool to reinsert the valve stem. Tighten it back on and make sure it doesn't move.
-
8Inflate your new tire to the recommended pressure. Pump the tire up to normal and you're good to ride!


Things You'll Need
- Pencil
- Spray-on silicone lubricant
- Tire irons
- Breezer tire tool
- Valve core tool
- Bead breaker
- Compressed air pump


References
About This Article

To change a motorcycle tire, start by letting the air out, detaching the inner edge of the old tire from the rim, and removing the tire completely. Then, lubricate the inner walls of the new tire so it’s easier to work with, and use tire irons to attach the tire to the rim. Next, pump air into the tire just until you hear a small “pop,” which means the inner edge of the tire is all the way in. Finally, squirt some ceramic dust into the tire valve to keep the tire balanced, put the valve stem in, and inflate the tire to the recommended pressure. For tips on how to use tire levers or C-clamps to free the inner edge of the tire from the rim, read on!