This article was co-authored by Walter Brant. Walter Brant is a wikiHow community member and contributor who has been repairing and restoring houses with over 30 years of experience. He works with homeowners to make a wide variety of improvements to make their homes more comfortable and liveable.
This article has been viewed 72,536 times.
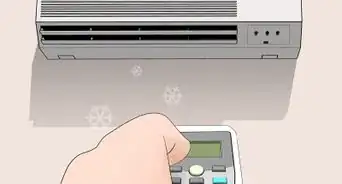
Air blowing across the coils in your air conditioning system can cause dust and other debris to stick to the coils. Systems with dirty coils use more energy than those with clean coils and cool spaces less efficiently. By annually cleaning the evaporator coils of air handling units before the cooling season starts, you can increase your A/C system's cooling efficiency and overall life expectancy! Note that regardless of which cleaning method you choose, you will need to start with preparing the air handling unit, and end with restoring power to the air handler and turning on the system.
Steps
Preparing the Air Handling Unit
-
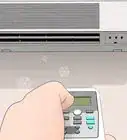
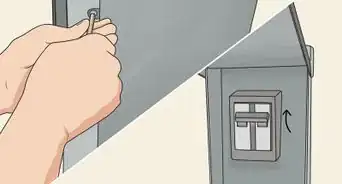
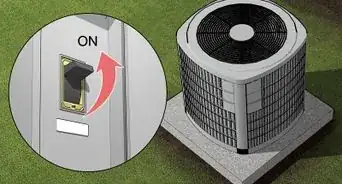
1Turn the A/C system off and shut off the electricity to the air handler. Air handler units are located indoors, usually in a closet or attic. Turn off power to the air handler by flipping the toggle switch near the air handler (the switch looks like a light switch). If you cannot locate the toggle switch, shut off the electricity at the circuit breaker handle.[1]
- Don’t confuse air handlers with air conditioners. Air conditioners contain the condenser and are usually set outside the home. Both air handlers and air conditioners are part of the A/C system.[2]
-
2Remove the access panel of the air handler unit. Screws and other fasteners on the panel can be removed with a socket wrench, nut driver, or screwdriver. If there is any tape, a reflective metal foil along the panel edges, it should also be removed.
- Place the panel and screws aside where they won’t get lost or separated.
- If you have difficulties locating the panel, try checking your air conditioning system owner’s manual.
Advertisement -
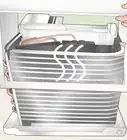
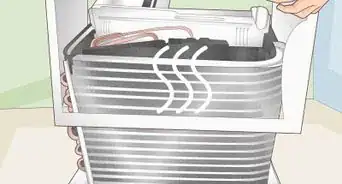
3Locate the evaporator coils. These are usually on the air intake side of the fan coil or the outlet side of the furnace. Coils are typically made of copper, steel, or aluminum, and consist of tubes bent in U-shapes and set into an A-frame design of two panels.[3] These panels are lined with thin pieces of aluminum called fins.


Using a Pump Sprayer and Brush
-
1Purchase a pump sprayer, professional cleaning solution, and brush. Professional-grade alkaline cleaning solution for evaporator coils will loosen dirt and mold from inside the coils, the spray wand will reach the tight spaces within the unit, and the bench brush will grab and hook dirt inside the unit.
- The pump sprayer should be 1 US gal (3.8 L) to 2.5 US gal (9.5 L) and new, as old pump sprayers may have been used for poisons like weed killer or insecticide.
- 1 US gal (3.8 L) sprayers work for routine cleaning and lightly soiled coils, while larger sprayers are best for heavy cleaning.
-
2Mix the cleaning solution and spray the coils. Follow product instructions for making the cleaning solution. 1 US gal (3.8 L) of spray should be sufficient for a routine cleaning. The spray wand should be adjusted to a narrow .25 in (0.64 cm) spray, but the jet should not be so forceful that it bends the coil fins. This is typically a concern with pump sprayers larger than 2 US gal (7.6 L).
- Afterwards, give the coils a few minutes to dry.
- Make sure you can see the dirty cleaning solution running down to the condensate drain pan.
- To peel off clumps of debris, you may have to direct the spray at the coils from a low angle.
-
3Brush the coils, rinsing the brush often. The brush should be rinsed in a new bucket of clean water to ensure there are no residual chemicals or dirt being added to the coils. The brush picks off chunks of dirt and debris too stubborn to be removed by the spray. Never brush across the fins, which can cause them to fold and bend. This will result in blocked air flow.
- Short brush strokes ensure your brushing motions will be precisely straight up and down.
- To remove loose dirt after brushing, respray both sides of the coils with the cleaning solution.
- Alternatively, you can use the brush attachment on a vacuum to remove and suck up all of the dust.[4]
-
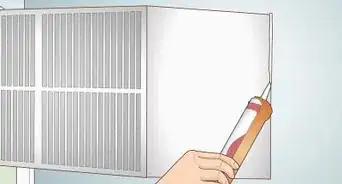
4Reattach the evaporator coil access panel and seal with HVAC tape. The metal foil tape should be placed on the top and bottom seams of the panel. Do not tape over the access panel’s manufacturer's label, as service technicians may need that information later.
- HVAC stands for heating, ventilation, and air conditioning.


Cleaning with Mild Detergents and Water
-
1Mix warm water and dishwashing detergent in a spray bottle. Use only a few drops of detergent, and make sure the detergent is not highly acidic. Acidic cleaners can cause corrosion to the copper and other metals used in the coil and shorten the life of the coil.[5]
- You can also use a hand sprayer or garden sprayer.
-
2Spray the water/detergent solution onto the evaporator coils. Give the solution a few seconds to a few minutes to soak in and loosen debris. Reapply if needed. You can allow the coil to either drain naturally, or lightly rinse it with some water.[6]
-
3Wipe away loose material with a soft cloth or brush. Be careful not to bump the fins on the A-frame, as this may bend them. If you choose to wipe the fins, never wipe them horizontally, as they may fold and later block air flow.[7]


Spraying with Commercial Cleaners
-
1Purchase a commercial cleaner for cleaning evaporator coils. There are several brands available at most home improvement stores. The majority of the cleaners are a foaming type intended to break down debris, then drain away into the unit’s drainage system.[8]
-
2Spray the cleaner directly on the coils. Coat the surfaces evenly and thoroughly. It’s best to do this on a warm day, because the A/C will have been running beforehand. That will help rinse the coils with condensate water.
-
3Pour 1 US qt (0.95 L) of a bleach/water solution into the drain pan. The bleach and water solution should be half household bleach and half water. This ensures the drain line is free of algae and unclogged. Then, when the foam rinses itself off and drains away, it will properly collect in your unit.
- Alternatively, you can buy time-release algae tablets to drop in the drain pan.
-
4Pour water down the condensate drain tube. This tube leads away from the drain pan. This will help you verify the tube is draining properly. If it seems the tube is blocked (indicated by something like standing water in the drain pan), discontinue use of the air conditioning system and call an HVAC contractor to clear the blockage.
-
5Reapply the cleaner. Repeat until the coils are clean and free of buildup. Make sure you wait until the cleaner liquifies the debris and drains away before applying more cleaner.[9]


Expert Q&A
-
QuestionWhat can I use to clean my evaporator coil?
 Walter BrantWalter Brant is a wikiHow community member and contributor who has been repairing and restoring houses with over 30 years of experience. He works with homeowners to make a wide variety of improvements to make their homes more comfortable and liveable.
HandymanAttach the brush attachment to your vacuum and go over the evaporator coil a few times to clean off the dust build-up.
References
- ↑ Walter Brant. Handyman.
- ↑ https://www.serviceexperts.com/blog/air-conditioner-versus-air-handler-whats-the-difference
- ↑ https://blackdiamondtoday.com/blog/clean-ac-evaporator-coils
- ↑ Walter Brant. Handyman.
- ↑ https://www.carrier.com/residential/en/us/products/air-conditioners/air-conditioner-coil-cleaning/
- ↑ https://blackdiamondtoday.com/blog/clean-ac-evaporator-coils
- ↑ https://blackdiamondtoday.com/blog/clean-ac-evaporator-coils
- ↑ https://blackdiamondtoday.com/blog/clean-ac-evaporator-coils
- ↑ https://blackdiamondtoday.com/blog/clean-ac-evaporator-coils
About This Article