This article was co-authored by wikiHow Staff. Our trained team of editors and researchers validate articles for accuracy and comprehensiveness. wikiHow's Content Management Team carefully monitors the work from our editorial staff to ensure that each article is backed by trusted research and meets our high quality standards.
There are 7 references cited in this article, which can be found at the bottom of the page.
This article has been viewed 48,529 times.
Learn more...
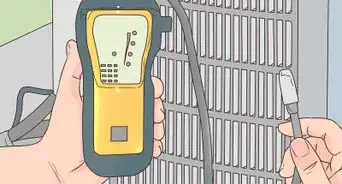
If your home has some kind of air conditioner or fan, you’ll want to make sure that it’s working effectively. The best way to do this is to measure the air flowing through it to see if its airflow reading in cubic feet per minute (CFM) aligns with the manufacturer’s rating. The idea of measuring air flow may seem a bit daunting at first. However, you can easily use an anemometer, a balancing hood, or even a box and credit card to simply measure air flow in your home!
Steps
Working with an Anemometer
-
1Go with an anemometer that measures air flow in cubic feet per minute. Nearly all anemometers measure air speed in feet per minute (FPM), but they don’t always measure air flow specifically. Although you can technically convert FPM to cubic feet per minute (CFM), it’s much easier to use an anemometer that will do this for you.[1]
- You can typically an anemometer online or at most home improvement stores.
- To convert FPM to CFM, multiple the FPM by pi times the radius of the duct squared. You can also use an online converter tool to convert FPM to CFM.
-
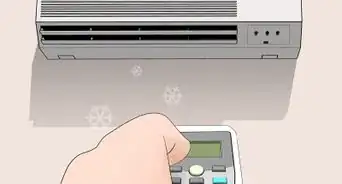
2Turn on the anemometer and set it to measure air flow. If you just recently purchased your anemometer, insert batteries or plug it in to power it up. Once it’s on, change the measurement settings to CFM so you can measure air flow.[2]
- A typical anemometer will have a button that reads “Unit” or “Units.” Toggle this button to switch the measurement settings of your anemometer.
- If your anemometer doesn’t have a CFM measurement option, switch it to FPM and use an online converter tool to convert your FPM reading to CFM.
Advertisement -
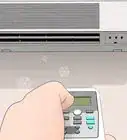
3Hold the vane wheel next to the fan or duct you want to measure. Align the vane wheel with the direction of airflow in order to get the most accurate readings. Move the vane wheel around in order to see the airflow readings at different points in your duct or in front of your fan.[3]
- Keep the axis of the vane wheel within 20 degrees of the direction of airflow at all times to ensure accurate readings.
-
4Press “Hold” to pause the anemometer on a particular reading. The readings on your anemometer will constantly fluctuate as air flows past the vane wheel reader. Pressing “Hold” will allow you to freeze the meter on one specific airflow reading and record it.[4]
- Some anemometers will also allow you to digitally save and record your reading to the device when you hit “Hold.”
-
5Toggle the “High/Low” button to see the highest and lowest readings. This feature will allow you to gauge the highest and lowest amount of airflow you’re getting in your duct or fan. Note that this will only tell you the highest and lowest readings that you get, which may not be the highest or lowest airflow overall.[5]
- In other words, the anemometer can only tell you the lowest airflow reading that it measures, not the lowest that your duct or fan has ever produced.


Using a Box and Credit Card
-
1Use scissors to cut a rectangular hole in the side of a cardboard box. Choose a box that’s large enough to fix completely over the top of your exhaust fan grille. Cut the hole to be slightly smaller than a credit card. For best results, cut the hole so that the long side is oriented vertically.[6]
- For example, if the credit you’ll use is 2 inches (5.1 cm) long and 1.5 inches (3.8 cm) across on its side, then cut the hole to be 1.5 inches (3.8 cm) long and 1 inch (2.5 cm) across.
- An exhaust fan grille typically looks like a square or rectangular piece of metal with long slats covering a fan or the opening of an air duct. They’re typically located on the floor or wall close to the ground or on the ceiling.
-
2Tape a credit card over the hole on the inside of the box. Tape 1 of the long sides of the credit card so that it swings inward like a door. Be sure to use strong adhesive tape or duct tape that will keep the credit card from falling off.[7]
- This method won’t work if the airflow pulls the card right off the box!
- Be sure to tape the long side of the credit card instead of the short side so that you get a more accurate measurement of airflow.
-
3Place the cardboard box securely over the exhaust fan grille. Make sure the fan is operating and that the box fully covers the grille. Note that the box has to be firmly set against the grille for this method to work.[8]
- If the box is too loose and allows air to flow from the surrounding environment, the inside won’t be completely pressurized and the credit card movement won’t accurately reflect airflow.
-
4Use a caliper or ruler to measure how far the credit card swings. If all works well, the credit card should swing inward once you place the box over the grille. Measure how far in inches the card swings inward to get a sense of the fan’s airflow. The rough airflow measurements for different inches are:[9]
- 25 cfm for 1.5 inches (3.8 cm)
- 35 cfm for 2 inches (5.1 cm)
- 48 cfm for 2.5 inches (6.4 cm)
- CFM stands for “cubic feet per minute,” which is how airflow is measured. Most exhaust fans should have an airflow reading of somewhere between 40 and 60 cfm to operate efficiently.


Using a Balancing Hood
-
1Set the balancing hood to read in exhaust mode. Your air balance hood will likely have several different modes that it can be set to. Follow the manufacturer’s instructions to make sure your hood is set to exhaust mode in order to ensure an accurate air flow measurement.[10]
- You can typically rent an air balancing hood from many home improvement stores or online retailers. Unless you’re a professional, it’s not usually cost effective to buy your own hood.
- Some manufacturers may recommend that you set the hood to a different mode, based on the context in which air flow is being measured. Be sure to follow their recommendations for how to best use their equipment.
-
2Place the balancing hood firmly over the grille. You will have to apply a steady amount of slight upward pressure to keep the hood over the grille. Make sure air is not able to escape from the top of the hood, as this will make your air flow measurement less accurate.[11]
- You’ll typically find the exhaust fan grille on the ceiling. It will look like a square or rectangular piece of metal with slats running across it.
-
3Read the screen on the bottom of the hood to get your measurement. The reading on the screen will give you an air flow reading in cubic feet per minute (CFM) units. Depending on your hood model, you can also change the settings to get a reading in meters cubed per hour.[12]
-
4Be aware that your readings may fluctuate over time. Unfortunately, air volume is not constant as it moves through a grille. Instead, it changes constantly along with surrounding environmental conditions. To counter this, take several measurements and average them out for a single usable reading.[13]
- In some instances, it’s also ok to simply go with the highest reading you’ve obtained.


References
- ↑ https://www.contractingbusiness.com/service/4-ways-measure-airflow
- ↑ https://www.youtube.com/watch?v=VCcW2E5iias#t=55s
- ↑ https://www.youtube.com/watch?v=w8Tw2BYSER0#t=51s
- ↑ https://www.youtube.com/watch?v=w8Tw2BYSER0#t=55s
- ↑ https://www.youtube.com/watch?v=w8Tw2BYSER0#t=58s
- ↑ https://www.greenbuildingadvisor.com/article/simple-methods-for-measuring-air-flow
- ↑ https://www.greenbuildingadvisor.com/article/simple-methods-for-measuring-air-flow
- ↑ https://www.greenbuildingadvisor.com/article/simple-methods-for-measuring-air-flow
- ↑ https://www.greenbuildingadvisor.com/article/simple-methods-for-measuring-air-flow
About This Article