X
wikiHow is a “wiki,” similar to Wikipedia, which means that many of our articles are co-written by multiple authors. To create this article, 12 people, some anonymous, worked to edit and improve it over time.
This article has been viewed 52,829 times.
Learn more...
If you tend to collect "stuff" and need a place to store it on a budget, this shelter is ideal. In addition, this handy shelter can also double as a carport, since a vehicle can easily drive through it.
Steps
-
1Build two parallel four foot fences, thirty feet long. They need to have a distance of 13' 6” between the outside of the walls. In addition, make sure that they are exactly opposite each other so if there was an enclosure between each end, it would form a perfect rectangle. This means that the distance between diagonal opposite ends should be the same (32'11”).
-
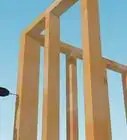
2Find the four end posts that will create the imaginary rectangle. Use 8' posts (you will cut the extra off after all posts have been placed). Dig the four corners a foot square, and two feet deep. Place the posts so that the outside of each post is 13'6” from the outside of the post on the other fence. The length outside of the post should be 30'. Place nails or screws in the end of the posts to lock them into the concrete.Advertisement
-
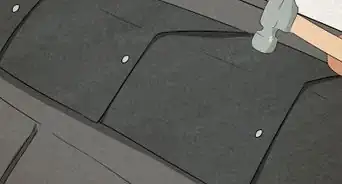
3Brace the posts when the positions are correct and the posts are plumb. They should be braced in at least two directions. See photo.
-
4Using a wheelbarrow, mix three sixty pound bags of concrete and water until you have a wet (but not watery) batch of concrete. Fill the first hole and repeat the procedure for the three remaining holes. After setting overnight, fill in the intermediate post at 10' centers between the ends, using the above procedure.
-
5Find the post with the highest ground elevation, and measure from the ground 4' up the post. Mark that position with a felt tipped pen. Tie a string at the mark, and using a line level, mark each post at a position level with the first post. If this is done correctly, all the remaining posts will be greater than 4' off the ground. Cut excess post length off at the marks.
-
6Using your 10' pressure-treated 2”x4”s, cut them to the exact length between each post. Attach support blocks to each post so that the tops are 3'10.5” from the top of the post. You can also lay a scrap 2”x4” on top of the post and measure down 4'. Attach the bottom rails between the posts. Now attach the top rails.
-
7Place intermediate 2”x4” members on 8' centers from one end post, so that they are able to accept the 4'x8' plywood panels. Attach the plywood to the sides, cutting the last panel to fit.
-
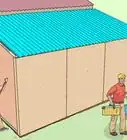
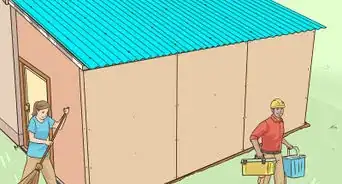
8Paint the outside and top of the fence with a good outdoor primer and paint.
-
9Cut 8 24” pieces from one of the fence top rails. You can cut these yourself, or have the fence dealer make all the cuts for you, although they will charge you extra for this service. Two 1/4” holes must be drilled in each piece no closer than 7” from one end. Use a center punch to create a dimple to start the drill hole.
-
10Drill the holes with a drill press or a portable hand drill. Drill all the way through the pipe; making a smaller 1/8” hole first will make drilling the 1/4” hole easier.
-
11From the center of the first post, mark along the wall every 10', and then mark a line using a framing square 22” down the wall. This is where the 24” top rail will be secured. Clamp the pipe to the wall covering the line with the top flush with the top of the wall. Using the existing holes in the pipe, drill through the pipe about one inch into the wall and post.
-
12Secure the pipe to the wall using a 4” lag screw and a thick washer between the pipe and wall; do this in only the top hole – do not completely tighten. Do this for the remaining 10' sections and add the connectors as shown in the photo. Pivot the short pipe on the top screw to an angle that allows the connectors to slide on top of it.
-
13Once all the connectors and 118” top rail pipes have been connected, go back and secure the bottom lag screw and washer and tighten both. Do the same on the other wall.
-
14Gather four 56” top rail pipes and two end midway connectors and a peak connector. With the assistance of an 8 or 10 stepladder, assemble the pipe lengths and connectors from each side of the end of the wall, placing the peak connector last.
-
15Add a 56” top rail pipe into the second wall connector (1,2). Place a 118” top rail pipe (3) into the second connector, up on the end. The longer the pipe, the more flexibility you have to move the ends of the pipe, so place a mid way connector on the end of the 118” pipe (4), and move it away from the end of the 56” pipe until you can slide it over and into position. Do the same on the other side (6,7). Last of all, insert the 118” pipe into the peak end connector (9) and place an intermediate peak connector on the other end (10). Flexing the long pipe, attach it to the two 56” pipes (6,8).
- This photo shows the order of placement. Repeat for each additional segment until completed.
-
16Unfold the cover in a large location so that it can accommodate the 20'x 30' size. Roll or fold the cover so that it is 30' long. Transport it to the shelter site, and lay it along the outside of one fence.
-
17Attach 30' ropes in three or four places along the length of the cover through the grommets. Throw the ropes over the tubular framework to the other fence.
-
18Pull each rope three or four feet, pulling the cover over the framework. Tie it off and move to the next rope doing the same. Continue to do this until you have pulled the cover all the way over the framework.
-
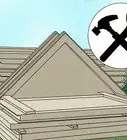
19Using a stepladder, secure the center of the cover at the frameworks peak, using a bungee ball at two locations. Do the same at the other end. Secure each corner in both directions. Now go back and secure the remaining grommets to the 118” rail near the top of the fence. Alternate between each fence so the cover isn't stretched to one side more than the other. Using the ladder, finish the end grommets.


Advertisement
Warnings
- The cover is slightly smaller than the stated size. 19'4" x 29'4" instead of 20x30. This will leave a gap between the end of the cover and rail. You could figure out how to make this up by shortening the pipes or as done here by inserting a 4" vertical blind through the bungees and the rail.⧼thumbs_response⧽
Advertisement
Things You'll Need
- 8 4"x4"x8' pressure treated posts
- 6 2"x4"x10' pressure treated boards
- 6 2"x4"x10' boards
- 8 4'x8'x1/2" plywood or OSB
- 12 21'x13/8" Chain link fence top rails
- 1 20'x30' Barn style canopy kit
- 16 60lb Bags ready-mix concrete
- 16 1"x2"x4' Wood stakes
- TOOLS AND EQUIPMENT
- Shovel
- 30' Tape measure
- 40' Tape measure
- Wheelbarrow
- Circular saw
- Hammer
- Clamps
- Socket wrench
- Level
- String level
- String
-
Optional:
- Concrete mixer
- Nail gun
- 10" Cut off saw
- Pipe cutter
- Hole digger
- Impact wrench
- Post level

About This Article
Advertisement