This article was co-authored by wikiHow staff writer, Jack Lloyd. Jack Lloyd is a Technology Writer and Editor for wikiHow. He has over two years of experience writing and editing technology-related articles. He is technology enthusiast and an English teacher.
The wikiHow Tech Team also followed the article's instructions and verified that they work.
This article has been viewed 418,669 times.
Learn more...
This wikiHow teaches you how to create a form in a Microsoft Excel document. A spreadsheet form allows you to enter quickly large amounts of data into a table or list of cells. If you want to create a form with which other people can interact, you can use options found on the Developer tab of Excel to do so. Keep in mind that the data entry form feature is only available in Excel for Windows computers.
Steps
Creating a Data Entry Form
-
1Open Excel. Click or double-click the Excel app icon, which resembles a white "X" on a dark-green background.
-
2Click Blank workbook. It's in the upper-left side of the page.Advertisement
-
3Add the "Form" button to Excel. By default, the "Form" button isn't included in Excel. You can add it to Excel's list of "Quick Access" icons that appear in the top-left corner of the window by doing the following:
- Click File.
- Click Options in the bottom-left side of the window.
- Click Quick Access Toolbar on the left side of the window.
- Click the "Choose commands from" drop-down box at the top of the window.
- Click All Commands.
- Scroll down until you reach Form, then click it.
- Click Add >> in the middle of the window.
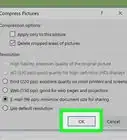
- Click OK.
-
4Enter your column headers. Type the name of the column into which you want to add data into the top cell in each column you want to use.
- For example, if you're creating a form that lists different baked items, you might type "Pumpkin Bread" into cell A1, "Muffins" into cell B1, and so on.
-
5Select your column headers. Click and hold the left-most column header, then drag your mouse right to the right-most column header. You can then release your mouse button.
-
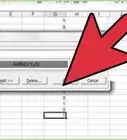
6Click the "Form" button. It's the box-shaped icon in the upper-left side of the Excel window, just right of the right-facing "Redo" button.
-
7Click OK when prompted. Doing so opens the Form pop-up window.
-
8Enter the data for your first row. Type whatever you want to add into each column header's text box.
-
9Click New. It's in the upper-right side of the pop-up window. Doing this will automatically enter your typed data into the spreadsheet under the appropriate column headers.
-
10Enter subsequent rows of information. Each time you finish filling out the data entry fields, clicking New will enter your data and start a new row.
-
11Close the data entry form. Click Close on the right side of the window to do so. Your data should now be completely entered below the appropriate column headers.


Creating a Custom Form
-
1Open Excel. Click or double-click the Excel app icon, which resembles a white "X" on a dark-green background.
-
2Click Blank workbook. It's in the upper-left side of the page.
-
3Enable the Developer tab. The Developer tab is where you'll find the option to insert form buttons, but it isn't included in Excel by default. To enable it, do the following:[1]
- Windows — Click File, click Options, click Customize Ribbon, check the "Developer" box, and click OK.
- Mac — Click Excel, click Preferences..., click Authoring under the "View" heading, and click Developer tab. You can then close the window.
-
4Enter your form's data. Type in whatever data you want users to be able to select in your form.
- This step will vary depending on the information you want to use in your form.
-
5Click the Developer tab. It's at the top of the Excel window.
-
6Click Insert. This option is in the "Controls" section of the Developer toolbar. Clicking it prompts a drop-down menu to appear.
- Skip this step on a Mac.
-
7Select a form control. Click the type of control you want to use for your spreadsheet.
- For example, if you want to add a checkbox to your form, you would click the checkbox icon.
-
8Click anywhere on the spreadsheet. Doing so will place your control button on the spreadsheet.
- You can click and drag your control to the location in which you want to anchor it.
-
9Right-click the form control icon. A drop-down menu will appear.
- On a Mac, hold down Control while clicking the icon.
-
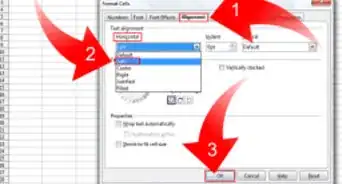
10Click Format Control…. It's at the bottom of the drop-down menu.
-
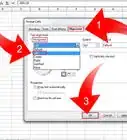
11Edit your form control button. Depending on the button you selected, your options will vary; in most cases, you'll be able to select a cell range or a target cell by clicking the arrow to the right of the "Cell range" or "Target cell" text box and then selecting cells (or a cell) that contain your form's data.
- For example, if you wanted to create a drop-down menu with a list of numbers, you would click the arrow to the right of the "Cell range" text box and then click and drag your mouse down a column of numbers in your spreadsheet.
-
12Click OK. It's at the bottom of the window. Doing so saves your settings and applies them to your spreadsheet.
- At this point, you can proceed with adding other form buttons to your spreadsheet.
-
13Protect your spreadsheet. Once you've finished adding form buttons to your spreadsheet, you can prevent people from moving or removing the buttons by protecting the spreadsheet:
- Windows — Click Review in the Excel toolbar, click Protect Sheet, make sure that any options other than "Select locked cells" and "Select unlocked cells" are unchecked, enter a password to unlock the document, and click OK. You can then re-enter the password when prompted to finish locking the sheet.
- Mac — Click Tools at the top of the screen, select Protection, click Protect Sheet in the pop-out menu, make sure that any options other than "Select locked cells" and "Select unlocked cells" are unchecked, enter a password to unlock the document, and click OK. You can then re-enter the password when prompted to finish locking the sheet.


References
About This Article
1. Open a blank workbook.
2. Add the "Form" button to Excel.
3. Create column headers.
4. Select the column headers.
5. Click Form.
6. Click OK.
7. Enter the first row data and click New.
8. Enter additional rows.
9. Click Close.