wikiHow is a “wiki,” similar to Wikipedia, which means that many of our articles are co-written by multiple authors. To create this article, volunteer authors worked to edit and improve it over time.
This article has been viewed 31,800 times.
Learn more...
Snowy trees are a familiar sign to many around the holiday season. The crystal icy sparkling wonderland can inspire many to want to recreate this effect indoors for their holiday decorations. One option can be just go to a store in person or on the web and purchase what is called a flocked tree. Another way is to buy what is called spray snow or flocking snow but who wants to go through the hassle, mess and fumes of using that stuff? Thankfully this article will show you a very clever way to get the flocked snowy tree look without the hassle or the cost.
Steps
Planning and Preparing
-
1Think how snow falls and looks. The goal of this project is to produce an effect that resembles the Winter Wonderland that comes with a winter day. If you're in a winter climate, step outside and admire how the ice traces every little branch or paints the items it touches, how fresh fallen snow glistens or how snow clumps on the evergreens. If you don't live in such a climate, research books and web galleries for ideas.
-
2Consider how snowy your tree is going to look. You might just want to add a few glimmers of silver or white here and there with some crystals to create just a "kiss of ice" look. Or you might want to all go out with almost covering the tree with clusters and clumps of white ornaments for a snowy mountain look. Here you are not limited to the selections, amounts of "snow" on the tree as well as what it covers or the prices of flocked trees available in stores. In fact you'll be surprised at how easy it is to create a high end flocked look without the high end price.
- Make note of the different forms of flocking available. All flocking is not the same. Some is the fine powder stuff that is like chalk which gives a "frosted" look. Others are more chunky which can be anything from micro Styrofoam beads, shredded paper, tiny shipping peanuts, and micro glass beads.
Advertisement -
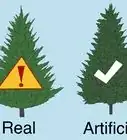
3Choose what kind of tree to use.
- You might want an artificial tree. While any plain green artificial tree will be adequate for this project , a tree with needles in a grayish, silvery, or bluish-green color will really make the frosty look really authentic.
- Alternatively, you can use a fresh cut tree. When choosing a natural tree you can always just choose any tree kind that you want, but if you want a really frosty look consider the silvery blue spruce. Another option is the Fraser Fir with it's dark green needles up-swept revealing a silvery gray underside. Other options include the soft needled white pines or other silvery fir species.


Mounting The Tree Securely To Prevent It From Falling
-
1Consider the final display area for the tree and the stand that'll support the weight of it and all the decor on it. Different stands suit different trees of different kinds. Artificial trees are very versatile and don't require water and can be set up in pieces depending on how it's constructed. Fresh trees need stands and containers that can resist rust, rot, sap and the heavier weight. Potted or "plant-after" living trees can be treated like houseplants.
- Ideas for tree containers include:
- Popcorn or cookie tins.
- Decorative urns or flower pot.
- Glass vases.
-
2Mount the tree in it's attractive yet sturdy container (optional). You can skip this if you're using a tree skirt to cover or the tree stand is attractive. You can any container you want as long as it supports the weight of the weight of the tree and all the decor on it.
- Artificial trees with stands or base/containers : Find a container that is wider and taller than the stand itself. Set the entire tree into the container and add heavy items to cover the stand filling the container to support the tree.
- Artificial trees without stands or for container that is too small for a stand. There is floral putty the florist uses mount heavy topiary arrangements, flowers and stems in pots without falling over. Also unlike plaster or concrete it's not permanent.
- Fresh cut trees tend to be heavy and with required water that adds more weight. Put tree in the stand first then place the tree in a container that's wider than the stand. This is more suitable for smaller trees.
- Make sure the tree is secure! Push and tug the tree to test for resistance and that it's straight. It's no fun watching a decorated tree fall down or trying to readjust a crooked one after decorating.


Adding The Core Decorations
-
1Choose the lights in the color scheme you desire. Classic white lights are always a safe choice. It's a great idea to use lights of different shapes, sizes and textures in the same colors to add interest. Some have bulbs that come in frosted and other finishes with all the lights the same shape. Some sets have different shapes and sizes within one set.
- Multicolored or many solid colors can look excellent in snowy tree schemes. Blue and cool blue really bring home the winter frosty feel. Cool bluish green bulbs like teal or peacock also can have the same effect. Rainbow lights can really give a snowy tree a Gingerbread or Toy Store feeling.
- Because of the new LED lights out there there are more options of colors including the whites. Cool whites have blue and warms are more yellowish. Pure whites have no colors in them like white printing paper. However the color of the white as well as the brightness of the set, even with the same name, varies by brand, so you should experiment with different brands to find the tone of white or any other color that you are looking for or try to see the set lit in person.
- You could also paint plain bulbs in a desired color. This would be like stained glass using special paints that are made to stick to glass. However read manuals carefully and keep in mind some are flammable.
-
2Place the lights on the tree evenly and neatly. There are many ways and opinions on the web and books, magazines to do this. Despite all claims there is no magic number of lights per foot you need to put on it. How you do it is up to you as each different size or shape of bulb, kind of bulb, length of the strand requires a different technique. The shape of the tree and its fullness will also affect how you put your lights on it. Just arrange the bulbs evenly and make sure the wires and plugs are as hidden as possible. Remove those annoying spare bulb and/or fuse packages and the UL labels if they are too obvious.
- Use wires in colors that closely match the colors of the tree. Or the wires will look busy and distract from the beauty of the tree.
-
3Place the tree topper on. After doing the top lights of the tree (or all your lights) do the tree topper now so there's no risk of a decorated tree falling down with your decorations being destroyed.Many tree toppers come with white lights and gorgeous textures including faceted bulbs that resemble gemstones or pearls or are made of shells called capiz shells which resemble mother of pearl which make excellent choices for a frosty look.
-
4Cover the stand with an attractive tree skirt(optional). If your tree stand is attractive you can skip this step. If it's not you can purchase a yard of fancy fabric or humble felt or satin and wrap it around the tree stand. Or you can purchase a ready made tree skirt or sew your own. For a very snowy look consider anything white,grey, silver, turquoise, mint green.
- You also disguise the stand with a ring of plants, toys, anything around the tree.


Adding Snow-Flocked Decorations
-
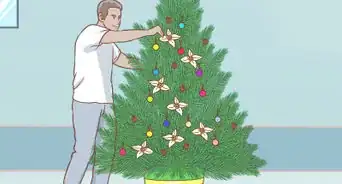
1Assemble an assortment of flocked ornaments, floral bushes, floral picks, garlands to fill the tree. Look around for glittery, snowy, flocked decorations found in many stores. You also find artificial wreathes, garlands, swags already flocked you can break apart using wire cutters and wire them to the tree using floral wire or a thick jewelry wires. You can also just tuck these decorations in the tree. Also available in stores are bowl fillers which can can made of feathers, sticks, or be a collection of pine cones, white flowers or fruit.
- You can also snake ready made flocked floral garlands in the tree by going around and around the circumference of the tree and tucking those deep within up against the trunk of the tree.
- Be also on the look out for floral picks with variegated holly and other plants which can really make an unique effect. Variegated means white on green leaves. There are also picks with soft velvety greenish gray leaves ( Sage, Dusty Miller) and also grayish, silvery ferns that can really resemble a fresh dusting of snow or frost.
- Make sure the majority of the markings on the leaves are white and not cream. Use cream sparingly if you want a really authentic snowy look.
-
2Neatly arrange garlands in rows or swags in the tree. These are the garlands that are not the floral ones (crystals, beads, ribbons, roping, tinsel). The more wavy the pattern is the longer length of garlands you are going to need. For shorter garlands and precision in placing the garlands in exact areas use ornament hooks. This prevents sliding and slipping as well.
- Choose your garlands with care. The more intricate in shape a garland is the more easier it is to get tangled! Also garlands with items on the ground like snowmen and trees will look wacky with those items upside down. Also intricate garlands can make the tree look too busy.
- Try hanging too short garlands vertically like icicles. Snowflake garlands look really pretty like this. Icicle garlands not so much.
- White or silver tinsel velvet ribbon or pure white or silver velvet,satin, white feather boas, tulle or whatever material will look lovely with a flocked tree effect.
- A cute idea is to take icicle garlands and swag them around the very bottom of the tree which makes it look like it's wearing a fringe skirt.
-
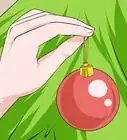
3Use basic ornaments in silver, white, gray colors, and translucent (cloudy), transparent (clear) opacity, as the base for your tree. These are the ornaments you have a lot of. One of the most popular options is simply the ball (or other shapes) ornaments that are made of glass or plastic that come in a multitude of finishes and textures. But you don't have to jump on this bandwagon. Why not try chandelier pendents, crochet snowflake ornaments, snowmen, or all icicles? For a fun musical tree consider purchasing silver metal bells and instruments instead of glass or plastic versions and using those as the basic ornaments.
- Play with textures and randomness. The snow and ice outside is not just one texture and icicles are not all one perfect shape. Cloning gets repetitive and boring. Forget the "Murder She Wrote" snowflake clones you see every where. Use ones with individuality just like nature does.
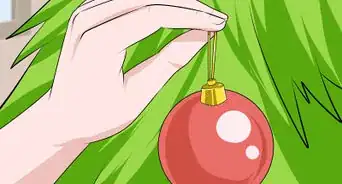
- You don't have to use the boring ornament hooks for your ornaments that are on the outer branches of the Christmas tree. Look around for ribbon, pipe cleaners or/and decorative cording you can tie to your ornaments to in the form of a loop and hang it by the ribbon. This also makes the ornaments less likely to fall and eliminates sharp wire edges.
-
4Add your original ornaments you treasure to the arrangement. Don't be afraid to become creative and adjust the suggestions in this article to your own desires. The snow outside doesn't choose a specific color to cover outside.


Creating Your Own Snow-Flocked Decorations
-
1Paint your desired decoration in wintery colors. Basic white paint is the obvious as the snow is outside but you can add other colors. Consider cool greys, minty blue-greens, icy turquoise blues. Instead using just silver as a metallic consider steel and pewter options.
- There are also different mediums and glazes the give various effects that can mimic snow outside. These are either already mixed in the paint when you purchase it or you can purchase the medium and paint separately.
- Iridescent mediums the surface has a rainbow color play reflected when viewed under a light. Like a bath bubble.
- Stone or rock if you can find any in a white marble effect. You can easily create the sparkly crystalline texture of snow.
- Chalk Paint resembles fine powder snow and needs to by protected with protective sealers.
- Crackle Finish Consider using white and silver in combination to create the effect of crackle ice on a solid surface.
- Many paints and some glues have glitter or other materials already mixed in. You may also want to consider painting with other paints not normally used in crafts like acrylic nail polishes and lacquers. Go out and experiment.
- Be careful when choosing specific shades of white to get a pure white or bluish white. Warm white lights with brown or yellow-like ivory or cream decorations will result in a tree that looks like mayonnaise and not snow. Avoid greenish whites, or you'll end up with a cream of pea soup or green alien blob invasion.
-
2Cover your desired decorations with the diverse forms of white and/or silver glitter. Glitter comes in many form and textures now. Those fruit decorations you see in the department stores are all covered in what is called glass glitter or glass microbeads. If you are not finding the glitter you want try shopping online on eBay, Etsy or a craft shop.
- If the normal glitter in the crafts department is too coarse (big particles) consider purchasing body glitter used in make up. This glitter is very fine like salt or sugar.
-
3Spray the flocking on the decor yourself. This way you can take the messy flocking/spray snow stuff outside and avoid the huge cleanup and harmful fumes inside.
-
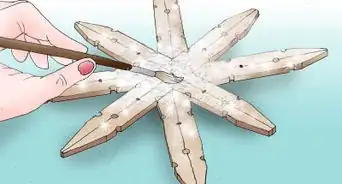
4Consider doing a number of snowy Christmas decoration crafts. Using glue and strings as well as balloons you can create lovely string structure ornaments that are really cool. Take plain styrofoam balls and cover them with paper mache, clay, plaster, Mod Podge, paint white and roll in glitter. Another approach is taking the same balls and covering them with white or silver shimmering fabric, and/or gluing and pinning on ribbons, sequins, buttons, rhinestones, pearls, cotton balls, decorative trimmings other jewels until the ball is completely covered. If you are into jewelry you can easily find or make ornaments of icicles and snowflakes with beads and wires. Look around for ideas in books or on the web.
- Make a String Ornament
- Make a Yarn Pompom using sparkling white yarn.
- Make Borax Crystal Ornaments
- Make Tassels using sparkling white yarn.
- Crochet a Snowflake if you're interested in sewing and knitting.


Warnings
- If using regular incandescent lights or some older led light sets that give off heat use these sparingly on a fresh cut tree to avoid fire hazard. This rule applies to some artificial trees which are not made with flame retardant materials.⧼thumbs_response⧽
- Plastic or glass decorations can become brittle overtime and shatter into sharp pieces. Be careful when handling glass, metal, porcelain with sharp and or/rough edges.⧼thumbs_response⧽
- Do not store materials in spray cans near any heat source or fire. These materials stored in spray cans can easily explode under such conditions. If you use spray products or use other flammable materials in close range of a flame or heat current the volatile fluids can flare up into flames quickly.⧼thumbs_response⧽
- If you have pets or children, hang your ornaments securely to the tree so they aren't yanked off. Place fragile ornaments up higher or deep inside up against the trunk of the tree.⧼thumbs_response⧽
- You might want to use polyester batting or webbing for snowy effects however some brands of this is very dangerous when exposed to flames. Batting also looks not very attractive and webbing can become a tangle mess and get all over the other decor on the tree. Use cotton instead.⧼thumbs_response⧽
- Make sure the glue or paint you use will not harm the materials it's used on. Many spray paints and other coverings will melt Styrofoam or burn fabrics and natural materials. The same materials can also be flammable or cause injury to humans and animals as well.⧼thumbs_response⧽
- Some flocked decor has a fume to it that can cause allergic reactions and medical conditions for some people.⧼thumbs_response⧽
- Do not use salt (table or rock) or sugar as snow flocking. Many professionals do this; however, not only is it a waste of food, but also salt can corrode the materials of an artificial tree, or burn the needles of a real fresh tree as well as damage furniture and floor finishes. Sugar will attract critters, bugs, as well as encourage pets or kids to lick the tree. Sugar will make a sticky mess as well.⧼thumbs_response⧽
- Don't place Styrofoam, polyester, or any other potentially flammable material directly on the bulbs of the light set that gives off heat or on anything that gets hot like the "converters" on a LED light set or the controls of a multi functional light set.⧼thumbs_response⧽