This article was co-authored by wikiHow Staff. Our trained team of editors and researchers validate articles for accuracy and comprehensiveness. wikiHow's Content Management Team carefully monitors the work from our editorial staff to ensure that each article is backed by trusted research and meets our high quality standards.
The wikiHow Video Team also followed the article's instructions and verified that they work.
This article has been viewed 45,841 times.
Learn more...
Origami is fun and creative pastime for people of all ages. Plus, origami projects make great gifts. If you are new to origami, start with some easy origami, such as a crown, fortune teller, or heart. For any of these projects, you will need square sheets of paper that are 6 by 6 inches (15 by 15 cm) in size. You can purchase origami paper or make your own.
Steps
Creating an Origami Crown
-
1Gather 6-7 pieces of paper. In order to make this crown, you will need several pieces of square paper, 6 by 6 inches (15 by 15 cm) in size. For a child-sized crown, you will need 4-5 pieces. For an adult crown, you will need 6-7 pieces.[1]
- Sturdy paper (like construction paper or craft paper) will work best.
-
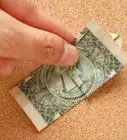
2Create a cross crease. Fold the paper in half horizontally. Use your finger to make a sharp crease and unfold the paper. Then fold the paper in half vertically. Make a sharp crease using your finger, and unfold your paper again.[2]Advertisement
-
3Create a point on top. Fold the top left corner in to meet the center crease, followed by the right. Use your finger to tighten each crease. At this stage, your paper will look like a little house.[3]
-
4Bend the bottom edge up to meet the center. Make a good crease with your finger. At this stage, your paper will look like a sailboat.[4]
-
5Fold the bottom edge upward again. Fold the rectangle you made upward, so that it overlaps 1 more time. You have now completed your first modular crown section.[5]
-
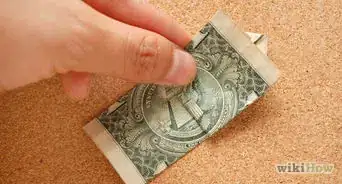
6Create 3-6 more crown pieces and fit them together. Repeat this method to create more modular crown pieces. Slide the bottom rectangular part of 1 piece inside the rectangular fold of another. Wiggle the pieces together as far as they will go, until the bottoms of the triangles overlap. Finally, connect the first and last pieces together to form a ring.[6]
- Adjust your crown to be the proper size by adding or removing crown pieces.

Folding an Origami Fortune Teller
-
1Start with square white paper. For this project, you need a single sheet of square white paper, about 6 by 6 inches (15 by 15 cm) in size. You will also need some crayons and markers.[7]
-
2Create an “X” crease. Fold the paper in half so that the top right corner meets the bottom left corner. Use your finger to make a good crease and unfold the paper. Then fold the paper the opposite way, joining the top left corner with the bottom right. Make a good crease and unfold.[8]
-
3Make a cross crease. Fold the paper in half again, meeting the bottom edge up with the top edge. Make a crease, then unfold. Repeat this along the vertical axis, make a crease, and unfold the paper.[9]
-
4Fold all 4 corners to meet the center. Fold each point so that it touches the center crease point. You should end up with a smaller square than you had before.[10]
-
5Turn your paper over and fold all 4 corners to the center again. Once again, fold each corner so that it touches the center crease point. You will now have an even smaller square.[11]
-
6Decorate your fortune teller. You now have 8 triangles (4 triangular flaps that are divided in half by folds). Color each of the 8 triangles with different colors. Write a fortune on the underside of each triangle.[12] Fortune ideas include:
- You will have a wonderful day today.
- A friend will call you tomorrow.
- You will get an A on your next test.
- Be careful on Wednesday.
-
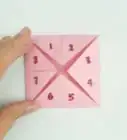
7Place your hands inside the fortune teller. Fold the bottom half of the fortune teller up to the top. Tuck the forefingers and thumbs of both of your hands into the openings below. When you look down at your fortune teller, it should resemble a flower.[13]
-
8Play with your fortune teller. Tell a friend to choose a number from 1-8. Open and close the fortune teller that number of times. Next, tell the friend to choose 1 of the four colors they see. Lift up that color flap, and read your friend their fortune.[14]

Making an Origami Heart
-
1Fold the paper in half from corner to corner. Set a square piece of paper on a flat surface so that it is shaped like a diamond (with a point at the top). Fold the paper so that the top right corner meets the bottom left corner. Crease this line and unfold the paper. Fold the top left corner to meet the bottom right, crease, and unfold.[15]
-
2Bend the top corner to meet the center. Carefully bend the top point so that it reaches the center crease. Use your finger to tighten the fold. You will now have a flat line on top.[16]
-
3Fold the bottom point to meet the top. Bend the bottom corner so that the point reaches the flat line at the top. Don’t make the mistake of measuring the bottom point to the center crease; make sure it goes the top of your paper.[17]
-
4Pleat both sides in toward the center. Bend the right side of your paper so that it overlaps inward. The bottom right side of your paper should match up with your center crease. Repeat this on the left side.[18]
-
5Flip the paper over and fold in the points. Turn your paper so that it is face down. You will see 2 points on the top, and 1 point on each side. Fold each of the points over to create flat lines. This will make your creation into a heart.[19]
- Flip the paper back over to reveal your origami heart.
Community Q&A
-
QuestionAre there any other origamis I can do?
 Community AnswerNinja stars are fairly simple to do. There are origami flowers that may be slightly more difficult, but still doable. You might also like to try making a simple piano or house.
 -
QuestionHow do I put my hand into the fortune teller?
 Quinlan O'DriscollCommunity AnswerFirst, turn the fortune teller upside-down so it looks like an egg basket with four pockets in it. Then, put your thumbs into the top two, and put your two pointer fingers into the bottom two. Finally, turn it back around with your fingers still in the pockets.
References
- ↑ http://www.origami-instructions.com/easy-origami-modular-crown.html
- ↑ http://www.origami-instructions.com/easy-origami-modular-crown.html
- ↑ http://www.origami-instructions.com/easy-origami-modular-crown.html
- ↑ http://www.origami-instructions.com/easy-origami-modular-crown.html
- ↑ http://www.origami-instructions.com/easy-origami-modular-crown.html
- ↑ http://www.origami-instructions.com/easy-origami-modular-crown.html
- ↑ https://www.origamiway.com/how-to-make-a-paper-fortune-teller-2.shtml
- ↑ https://www.origamiway.com/how-to-make-a-paper-fortune-teller-2.shtml
- ↑ https://www.origamiway.com/how-to-make-a-paper-fortune-teller-2.shtml
- ↑ https://www.origamiway.com/how-to-make-a-paper-fortune-teller-2.shtml
- ↑ https://www.origamiway.com/how-to-make-a-paper-fortune-teller-2.shtml
- ↑ http://www.origami-fun.com/origami-fortune-teller.html
- ↑ https://www.origamiway.com/how-to-make-a-paper-fortune-teller-2.shtml
- ↑ http://www.origami-fun.com/origami-fortune-teller.html
- ↑ http://www.origami-instructions.com/easy-origami-heart.html
- ↑ http://www.origami-instructions.com/easy-origami-heart.html
- ↑ http://www.origami-instructions.com/easy-origami-heart.html
- ↑ http://www.origami-instructions.com/easy-origami-heart.html
- ↑ http://www.origami-instructions.com/easy-origami-heart.html
About This Article

To make an easy origami fortune teller, fold a square piece of paper diagonally in both directions to create an X crease. Unfold, then make a cross crease by folding the paper along the length and width. Next, fold all four corners in to meet the center, then turn the paper over and fold the corners again. Decorate your fortune teller by coloring the 8 folded triangles different colors and writing fortunes underneath each. To use, fold the bottom half up to the top and tuck your thumbs and index fingers into the openings. If you want to learn how to make a simple origami crown or heart, keep reading the article!


-Step-19-Version-4.webp)