This article was co-authored by wikiHow Staff. Our trained team of editors and researchers validate articles for accuracy and comprehensiveness. wikiHow's Content Management Team carefully monitors the work from our editorial staff to ensure that each article is backed by trusted research and meets our high quality standards.
There are 8 references cited in this article, which can be found at the bottom of the page.
wikiHow marks an article as reader-approved once it receives enough positive feedback. In this case, 82% of readers who voted found the article helpful, earning it our reader-approved status.
This article has been viewed 372,624 times.
Learn more...
Body piercing is a beautiful and unique way to express your personal style and individuality. It's been around for over 5,000 years and your options are numerous.[1] Whether you're piercing your ears, nose, eyebrow, tongue, belly button, or lip, it's always best to visit a professional. However, if you're committed to doing the piercing yourself, there are some ways to make it as sanitary, pain-free, and safe as possible.
Steps
Cleaning and Preparing
-
1Sanitize your hands and the area to be pierced. Scrub your hands well with an antibacterial soap, and dry them with a clean towel. After your hands are clean, you must clean the area you are piercing. Pour some rubbing alcohol onto sterile gauze and clean the skin thoroughly. Alcohol wipes also work for this.[2] To avoid contaminating the piercing site, after you've cleaned the area, don't touch it again.
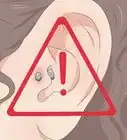
- The easiest piercings to do at home are your earlobes. Nose and belly button piercings can also be done at home with minimal risk. When it comes to doing a piercing near your mouth (such as tongue or lip), near your eye, or at the top of your ear, it is best to see a professional. You can end up with permanent scarring, damage to the body part, and even deformities. Do not risk it.
- If possible, after washing your hands you could wear sterile gloves to prevent infection.
-
2Disinfect the piercing needle. Ideally, you should use a piercing needle that has never been used. Take it out of the packaging only when you are ready to use it.[3] If you have a piercing needle that's been opened or used, you will need to sanitize it well. Soak it in rubbing alcohol before you use it to pierce. The more you disinfect the area and the needle, the lower the chance of infection.
- You must use a piercing needle for this, not a sewing needle or any other type. Piercing needles are the proper size and sharpness for the task, and anything else can cause unnecessary pain or damage to your skin.
- You can purchase piercing needles on Amazon.
EXPERT TIPKarissa Sanford is the Co-owner of Make Me Holey Body Piercing, a piercing studio based in the San Francisco Bay Area that specializes in safe and friendly body piercing. Karissa has over 10 years of piercing experience and is a member of the Association of Professional Piercers (APP).Body Piercing Specialist Karissa Sanford
Body Piercing SpecialistTake every precaution while cleaning, and be sure to use professional-grade products! Piercing studios may be the cleanest place to get a piercing because they sterilize everything, but that doesn't mean you can't get close to studio levels. By using professional-grade disinfectants, however, you can get as close to a studio's standard as possible.
Advertisement -
3Choose your jewelry. It is important that you use a high quality piece of jewelry, to reduce the risk of infection, irritation, or allergic reaction. Professional piercing staff suggest choosing a piece that is made of surgical steel, 14-karat or 18-karat yellow gold, 18-karat white gold, niobium, or titanium.[4] Don't buy a cheap piece of jewelry in an effort to cut costs. Invest in a good piece of jewelry for your immediate wear after piercing, and you may be able to tolerate lower-quality jewelry once you are all healed.
- Clean your jewelry with rubbing alcohol.
-
4Mark your skin where you want your piercing. Use a pen to draw a little dot where you want your piercing to go, making sure you choose the spot where it will look best. If you're piercing your ears, make sure that they're symmetrical. Look at the mark from all angles and make sure that it's in the exact place you want it. This mark is a guide for your piercing needle.[5]
- If you're not quite sure if you want the piercing or the position of the piercing, use a permanent marker and just keep a mark there for a few days. See how you react when you see it in the mirror. This will help you determine if you like the look of a potential piercing before taking the leap.
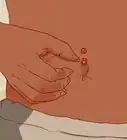
- If you're piercing your belly button, pinch your skin above it. Draw your dot on the topside of this skin fold. When you're actually piercing it, it's best to do it from the bottom. In other words, poke the needle up through this fold of skin, and line it up so it goes through the dot you've drawn.[6]
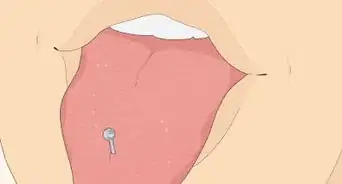
- It's obviously tricky to draw a dot on your tongue. Take this as a sign that you really shouldn't pierce your own tongue. It can be tempting to try to save money and time, but it is not worth it when it comes to the organ you need for speaking and tasting.


Piercing
-
1Line the needle up with the dot. Make sure you have a steady grip on the needle. It should be at the same angle that you want your jewelry to go. In other words, the needle should go through your ear like an earring would, or through your belly button like a belly ring would. Piercing your skin at an odd angle will make it difficult to get jewelry inserted, so take your time lining the needle up.
- If you want, apply a bit of numbing gel onto your ear before you pierce. Make sure you give it time to start working.[7]
-
2Take a deep breath and push the needle. It should be one fast, fluid motion. If you push a little, stop, push a little again, and so on, you're more likely to rip the skin. One, smooth puncture will make a smooth hole and also make the healing process easier.[8] Push the needle until it is halfway through your ear. Leave it in for about 20 minutes to ensure that the hole remains there long enough to get an earring in when the needle is removed.
-
3Remove the needle and quickly replace with your jewelry. After the needle has been in the hole for about 20 minutes, it's time to put something much better looking in. The hole will heal up quickly, so it's important to have the jewelry ready to go before you remove the needle. Pop your clean jewelry into the new hole you created. It's okay to use a little bit of pressure to get the jewelry through your skin, but don't force it.


Cleaning
-
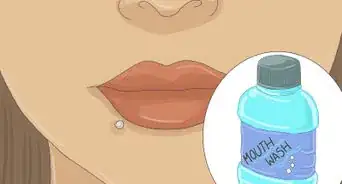
1Clean your ear piercing with a saline solution. While it was appropriate to clean your piercing equipment and skin with rubbing alcohol prior to piercing, it can dry out your new piercing now. A saline solution is gentler and won't dry the hole out. You can purchase a saline solution at the drug store, or make your own. Try to physically let your pierced body part soak in the solution, like in a shallow bowl or cup.[9] If you're unable to do this, use a tissue or Q-tip to apply the solution to the piercing.
- If you choose to make your own solution, use non-iodized, fine-grain sea salt. Some grocery stores stock this with the regular table salt, or you may need to buy it online.
- Mix 1/4 teaspoon of salt into one cup of filtered or bottled water. Reduce the amount of salt if your skin becomes dry.
-
2Avoid touching your piercing. It can be tempting to fiddle with your new jewelry, but this greatly increases your chance of infection. Try not to touch it at all, unless you're doing one of your daily cleanings. Never touch your piercing at all unless your hands have been thoroughly washed.
-
3Keep your original jewelry in while you heal. Even if you have an entire collection of awesome, high-quality body jewelry, changing your jewelry while the hole is still healing will increase your chances of getting an infection. Depending on the area that you've pierced, this can take anywhere from one month to a year.[10]
- You can learn more about your specific piercing area by doing a Google search.


Understanding The Risks
-
1Know that your piercing may bleed. The tongue contains blood vessels and a large vein near the front that will bleed excessively if punctured. Do not pierce your tongue yourself. While the tongue may bleed the most, other areas will still certainly bleed.[11] Again, it is best to go to a professional, who can ensure that the blood loss is minimal.
-
2Understand you might get unwanted scar tissue. If you pierce yourself, you are at a higher risk for infection and unsightly scarring.[12] Even if you remove the piercing later, the scar can last forever. Consider this before you go at your nose, ear, eyebrow, lip, tongue, or belly button with a needle. While going to a professional piercing salon will cost time and money, it will have your risk of getting a permanent scar.
-
3Be aware that serious infections can occur. There are severe complications that can arise from a piercing. Piercings can cause an array of nasty infections. Infections that aren't treated can lead to sepsis, toxic shock syndrome, and blood poisoning.[13] It is incredibly important to understand potential consequences before you pierce yourself.
- Whether you pierced yourself or got it done professionally, it's important to know what issues to look for. If your piercing is producing discharge, you should see a medical professional. If your piercing is red, painful, and swollen for longer than 3 days, you should also see a medical professional. If something seems wrong with your piercing, don't wait long to get it checked out..

Community Q&A
-
QuestionWhat if the area has become swollen and it feels like there is fluid inside?
 Community AnswerIt's infected! Most infections aren't too serious, but definitely get it checked out, you may need antibiotics. Make sure to keep the area clean, and wash your hands before touching it at all.
 -
QuestionWhat if I pierced my cartilage with a push pin?Community AnswerYou want to pierce your cartilage with hollow piercing needle. And don't use an earring -- use a barbell meant for your cartilage.
-
QuestionHow can you sanitize a sewing needle? I'm piercing my tongue web at home, but I have no idea how to sanitize the needle. Please help!
 Community AnswerStep 2 explains this. Just soak it in rubbing alcohol.


References
- ↑ http://www.marieclaire.com/beauty/a8791/history-of-piercings/
- ↑ http://www.medhealthdaily.com/how-to-pierce-your-nose/
- ↑ http://www.medhealthdaily.com/how-to-pierce-your-nose/
- ↑ http://www.pamf.org/teen/health/bodyart/piercing.html#Signs%20of%20Sensitivity%20to%20the%20Jewelry
- ↑ http://www.medhealthdaily.com/how-to-pierce-your-nose/
- ↑ http://anavelpiercing.com/how-to-pierce-your-belly-button/
- ↑ https://www.youtube.com/watch?v=6gv8bcGXBQQ
- ↑ http://www.medhealthdaily.com/how-to-pierce-your-nose/
- ↑ https://www.piercingbible.com/saline-soaks
About This Article

Although it’s always better to go to a professional, if you’re going to do a self-piercing at home, you’ll want to do it safely. Use a piercing needle, not a sewing needle, since sewing needles can be more painful and damaging to your skin. When you're ready to get started, wash your hands with soap and water. Then, soak the needle you're using in rubbing alcohol to disinfect it. Mark your piercing site with a pen or marker, line the needle up with the mark, and push it through in one quick motion. Leave the needle in for 20 minutes, then quickly replace it with some jewelry so the hole doesn't close. Use jewelry made out of surgical steel, niobium, or titanium to reduce the risk of infection. For more tips, including how to keep your new piercing clean, read on!