This article was co-authored by wikiHow Staff. Our trained team of editors and researchers validate articles for accuracy and comprehensiveness. wikiHow's Content Management Team carefully monitors the work from our editorial staff to ensure that each article is backed by trusted research and meets our high quality standards.
This article has been viewed 352,943 times.
Learn more...
Hidden shoelaces are an interesting fashion statement you can try with any type of shoe.[1] Hiding your laces can make your look more sleek and clean. It can also help if you don't like the lace color of the shoes you've bought and want to make them less visible. By lacing the shoes with straight "bars" instead of crosses, you can reduce the amount of lace that can be seen on the top of the shoe. Or, if you don't mind standard criss-crossed lacing but don't like a big floppy bow, you can knot your laces inside the toe of your shoe instead.
Steps
Doing Hidden Knot Lacing
-
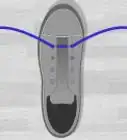
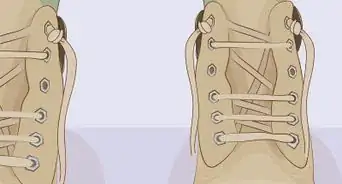
1Put the ends of the laces into the holes closest to your toe. Remove the laces from your shoe. Put both ends of the lace in the bottom holes going from the outside to the inside. This should create a bar across the bottom two holes on the outside of the shoe. Pull the ends of the lace up to tighten it. Make sure the lace is centered and that both ends are the same length.[2]
-
2Make your first "bar" by bringing the left shoelace up and across to the right. Bring the left shoelace up through the second hole from the bottom. This should be the hole just above the hole it went into. Then bring the lace across and push it down through the hole straight across from it. This should make a bar across the front of the shoe on the outside. [3]Advertisement
-
3Make your second "bar" by bringing the right shoelace up and across to the left. Bring the right shoelace up through the third hole from the bottom. This should be the hole just above the hole the left lace went into. You will then thread the right lace down through the hole immediately across from it, the same as you did with the left end. This should make the second bar.
-
4Continue making "bars" up the front of the shoe. Continue to thread the laces according to this pattern: bring the left lace up through the hole just above the previous hole you worked with, and down into the hole straight across. Then bring the right lace up out of the hole just above the hole the left lace went into, and bring the right lace down into the hole straight across. [4]
- On the underside, your laces should run alongside the tongue of the shoe without crossing it.[5]
-
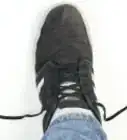
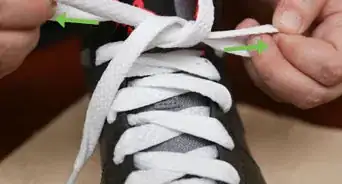
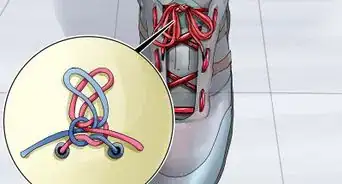
5Tie a bow on the inside of the shoe. Make a bow as you normally would, but hide it under the tongue of the shoe. Cross the left lace over the right lace, and bring it down to twist the laces. Now make a loop with the right lace, and wrap the left lace around the back of the loop, bring it forward, and push it through the hole under the loop. Grab the original loop and the loop you have just made, and pull them until the bow is tight.[6]
- Some people find having the bow under the tongue makes their shoes painful to wear. If this is uncomfortable for you, you can try pushing the bow under the sole of the shoe or to one side of your foot instead.


Using Normal Criss-Cross Lacing with an Invisible Bow
-
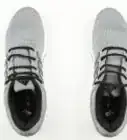
1Start threading your laces at the end closest to your toe. Remove the laces from your shoes. Put both ends of the lace in the bottom holes from the inside to the outside. This should create a bar across the bottom two holes on the inside of the shoe. Pull the ends of the lace up to tighten it. Make sure the lace is centered and that both ends are the same length.
- Criss-cross lacing is the most common type of shoe lacing. Most shoes will already be laced this way when they are purchased. Save yourself some time by checking to see whether they are already laced in a criss-cross pattern before you remove them.[7]
-
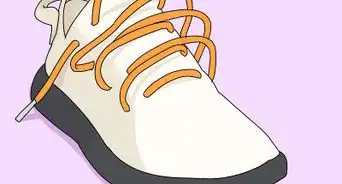
2Make criss-cross lacing by crossing the right lace over the left lace. Cross the right lace over the left and thread it up through the hole second to the bottom on the left. Now thread the left lace up through the second hole to the bottom on the right to make an X. Repeat this action, crossing the right lace over the left lace and bringing each end up through the next set of holes, until you reach the top of the shoe.[8]
-
3Have the laces going into the shoe at the top. When you reach the top set of holes, thread the laces into the holes downward instead of upward. Instead of coming up out of the shoe, the laces should be going down into the shoe. This will leave the long ends inside the shoe.
-
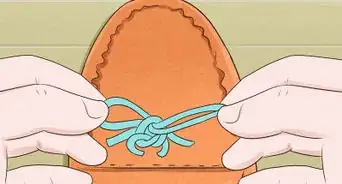
4Cross right over left, then left over right to tie a square knot in the laces. Pull the shoelaces down to the toe of the shoe. Keeping the laces loose, cross the right lace over the left lace at the toe of the shoe, then bring the end of it under the place where the two laces cross to make a twist in the laces. Do not pull too tight, because you want this twist to stay at the toe of the shoe. Next, cross the left lace over the right lace and bring it under the place where the laces cross, above the first twist you created.[9]
- Remember to keep the laces loose as you do this. The knot should land just inside the point of your shoe. It should fit in the space in front of your toes.
-
5Tuck the knot all the way inside your shoe. Make sure that the knot goes all of the way down to the toe so that it will not rub your feet as you walk. Check that the knot is in the proper place each time you put the shoes on.


References
- ↑ https://www.youtube.com/watch?v=ysKntI7-fh8
- ↑ https://www.fieggen.com/shoelace/hiddenknotlacing.htm
- ↑ https://www.fieggen.com/shoelace/hiddenknotlacing.htm
- ↑ https://www.fieggen.com/shoelace/hiddenknotlacing.htm
- ↑ https://www.fieggen.com/shoelace/hiddenknotlacing.htm
- ↑ https://www.youtube.com/watch?v=ysKntI7-fh8
- ↑ https://www.fieggen.com/shoelace/crisscrosslacing.htm
- ↑ https://www.fieggen.com/shoelace/crisscrosslacing.htm
- ↑ https://boyslife.org/outdoors/outdoorarticles/147528/how-to-tie-a-square-knot/
About This Article