This article was co-authored by Jacob Pischer. Jacob Pischer is a Home Improvement Specialist and the Owner of Helpful Badger, a home repair service in Portland, OR. With over four years of experience, Jacob specializes in a variety of handyman services including pressure washing, cleaning gutters, repairing drywall, fixing leaky plumbing fixtures, and repairing broken doors. Jacob studied at Madison Area Technical College and has a background in real estate investment.
There are 13 references cited in this article, which can be found at the bottom of the page.
wikiHow marks an article as reader-approved once it receives enough positive feedback. In this case, several readers have written to tell us that this article was helpful to them, earning it our reader-approved status.
This article has been viewed 128,802 times.
In a lot of garages, the only thing protecting the inside from the elements is a thing sheet of metal or wood. If you spend a lot of time in your garage or have living spaces sitting over your garage in your home, this thin layer of protection may become very noticeable in extreme temperatures. By measuring your garage door properly and using either foam board or a garage door insulation kit, you can reduce your energy bills, make your garage more comfortable, and easily insulate your garage door.
Steps
Choosing the Best Insulation for Your Garage
-
1Go with foam board or reflective paneling for lighter insulation. Foam board and reflective paneling are usually the cheaper and lighter options for insulation.[1] If you live in an area without extreme temperatures, install foam board or reflective panelling on your garage door to insulate it.[2]
- Foam board is thicker than reflective paneling, so it will be more effective and may also be more expensive.
- Both foam board and reflective paneling should be available from your local hardware store.
-
2Get a garage door insulation kit for more effective insulation. While insulation kits are normally more expensive and less customisable than foam board, they are also much more effective. Pick a garage door insulation kit if you need a lot of insulation in your garage, or if you live in an area with that gets very hot or very cold often.[3]
- Garage door insulation kits will usually come with fiber batting, which will have a much higher R-value than other options. The higher R-value an insulation option has, the more effective it will be at insulating.
Advertisement -
3Face the foiled side in the direction you want to reflect the most heat. Some insulation will only have foil on 1 side, meaning you’ll need to choose which way you want it to face. Install it with the foil facing into the door to keep the garage cooler, or install it with the foil facing into the garage to keep more heat inside.[4]
- If you install the insulation with the foil facing into the garage, it will reflect the heat inside the garage back and keep the room warmer. Use this method if you live in a colder area.
- If you install the insulation with the foil facing outward, it will reflect the heat from the sun away from the door, keeping your garage cooler. Use this in an area that gets hotter more often.
- If you live in an area without extreme temperatures, or you want to be able to regulate the inside of your garage more easily, try and find insulation with foil on each side.


Insulating with Foam Board or Reflective Paneling
-
1Clean your garage door with a household cleaner and paper towels. Removing the layers of dirt, grime, and grease that are built up on your garage door will help your insulation adhere to the door itself. Use a household spray cleaner and some paper towels to spray down the entire inside of the door and wipe it clean, swapping out the paper towels anytime they become dirty.[5]
- It may also help to spray your garage door down with a garden hose, the same way you would clean a car. Spray it down and then wipe it dry with a rag or spare towel to clean your door further.
- You could also clean your garage door with a pressure washer if you have one available. Test it on a small space first to make sure it doesn’t damage the door, before cleaning the whole door. Use a rag or spare towel to dry the garage door once finished.
- Make sure your garage door is completely dry before you begin installing any insulation.
-
2Measure the dimensions of your interior door panels. Most standard garage doors will be made up of several smaller panels which should be easily visible from the inside. Use a measuring tape to measure the dimensions of each panel, noting each measurement down as you work. Gather the height, width, and depth of the panels to determine how much insulation you will need.[6]
- Always measure the panels individually, as they may be different dimensions in different places across the garage door. Measure each panel and take a separate measurement.
- If your garage door doesn’t have panels built into it or is just a singular flat surface, you can still use foam board insulation. Measure the internal size of your entire garage door for a guideline on how much insulation board you will need.
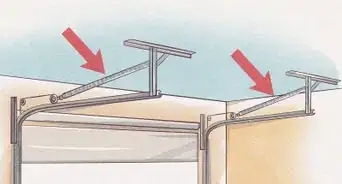
- If you have a garage door that rolls up into the ceiling, foam board and most other easy types of insulation will be too bulky for the mechanisms holding your door. Talk to a garage door specialist to investigate your options, or to look into replacing your door with a pre-insulated one.
-
3Purchase your insulation. Foam board and reflective paneling are some of the more effective types of insulation for the very low price that they can be found at.[7] Look online or ask at your local hardware store to find foil-backed expanded polystyrene foam boards around the same thickness as the depth of your garage door panels, or a long roll of reflective bubble insulation paneling. Purchase enough to adequately cover your garage door.[8]
- Some hardware stores will offer to cut the boards to size for you. Bring the measurements you’ve taken of the door with you in case your local hardware store offers this service.
-
4The capacity for a material to insulate is measured by its “R-value”. The higher the R-value, the better insulated your garage door will be. Purchase insulation with the highest R-value you can find for the best results.
- Foam board and reflective paneling won’t often have exceptionally high R-values, but they are the cheapest and easiest options for the level of insulation you get with it. If you live in a place without a lot of extreme temperatures, either should be enough.
- The foil backing will work to help reflect the heat, helping to keep your garage insulated further.
-
5Cut the foam board or reflective paneling to the right size. Working one panel at a time, use a craft knife or a small hand saw to trim a piece of insulation to the measurements you collected. Use a straight edge such as a metal rule to ensure that your cuts are straight and the corners are square.[9]
- If the sides of your foam board are slightly crooked or uneven, grind them along a hard surface like the concrete floor of your garage to sand them down and even them out.
- If you have a circular saw or something similar, you can use this to easily cut the foam boards to size.
- You don’t need to cut all the way through the foam board to trim it to size. Cut at least halfway through on a straight line, and bend the board to snap it evenly along that line.
- Cut the reflective paneling on a piece of cardboard or something similar to avoid dulling the blade as you cut through it.
-
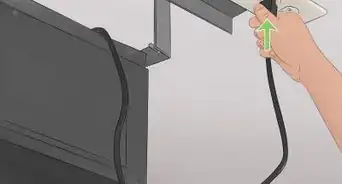
6Press the insulation into place if you have panel railings. Many garage doors will have metal railings 1 or 2 inches (2.5 or 5.1 cm) deep that can be used to hold the insulation in place. With the foiled side facing towards you, slide one edge of the insulation into one side of the railings to hold it firm. Bend the foam board slightly to push it behind the railings on the other sides of the panel until it pops securely into place.[10]
- Depending on the size and shape of the metal railings, you may need to make some relief cuts into the edges of the foam board so that it can slide into place easily. Use a craft knife or something similar to cut down the edges of your foam boards so they fit into place.
- If you cannot get the foam boards into the metal railings, you can cut the board in half lengthways and try to fit the two halves in independently. This will give you a straight edge to work with, and shouldn’t reduce the effectiveness of the insulation as long as the board remains snug.
- If you are using reflective paneling, add some double-sided tape to the door first to help it hold securely for longer.
-
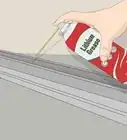
7Use a strong adhesive for a door without panels. If your door is entirely flat, use a strong adhesive such as Liquid Nails to hold the foam board in place. Place several drops of your chosen adhesive around on the non-foiled side of your insulation, roughly 1 inch (2.5 cm) from the edges and 3 inches (7.6 cm) apart. Making sure not to touch the adhesive, press the board or paneling into place on the door.[11]
- Make sure you leave around 1 inch (2.5 cm) of space between the foam board and any hinges that the door will bend on. The door should be able to close without different panels of foam board touching each other.
- For extra security, you can also put adhesive over the center of your foam board or paneling.
-
8Repeat until your garage door is covered. Once you’ve placed and secured one piece of foam board or reflective paneling, you need to repeat the same process of cutting, trimming, and either pressing or adhering the insulation into place. Work one panel at a time to make sure the fit is accurate.[12]


Using a Garage Door Insulation Kit
-
1Clean and dry the garage door. Use a household cleaner and some paper towels to clean off any dirt, grime, and grease on the inside of your garage door. Wipe it down, swapping out paper towels whenever they become dirty. Use a garden hose to spray away any remaining dirt or residue, wipe away the excess water, and leave the door to dry for 3 to 4 hours.[13]
- Make sure your door is completely clean and dry before you begin installing insulation. Any dirt or grime on the inside of the door will prevent the insulation from sticking, and any will be trapped behind the insulation once it’s installed.
- You could also use a pressure washer to clean the garage door. Test it on a small area first to make sure it doesn’t damage the door, before spraying down the entire surface. Use an old towel or a rag to wipe away excess water before leaving it to dry completely for 3-4 hours.
-
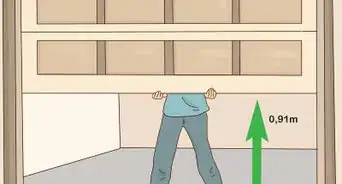
2Measure the height and width of your door. The dimensions of your door will be a key factor in determining which insulation kit to buy, or even how many kits you need to buy to get the job done. Use a tape measure to measure the height and width of your garage door, noting down all of the dimensions as you go.[14]
- If your door is broken up into panels that are separated by a metal railing, measure each of the panels individually rather than measuring the whole door.
-
3Purchase a garage door insulation kit. These should be available from your local hardware store or online and will come with the fiber batting and retaining pins needed to insulate the door. Purchase a kit that comes with enough batting to cover your garage door.[15]
- Depending on the size of your door, you may need to purchase two insulation kits. If you have a double garage, for example, it’s likely you’ll need multiple kits to insulate the whole door.
- Purchase the insulation kit with the highest R-value for the best insulation.
- If you’re unsure about which kit to buy for your door, feel free ask someone at your local hardware store for assistance.
- You may be able to buy the individual parts of the kit independently, but this will often be more difficult than purchasing the right kit. Ask at your local hardware store to look into your options.
-
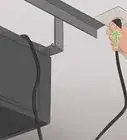
4Install the retaining pins across your door panels. For each of the panels on your door, mark two points in the middle of the panel and roughly 12 inches (30 cm) from each side. Peel the adhesive backing off of the retaining pins in your kit and stick them onto these points, pressing in firmly to make sure they adhere fully.[16]
- The retaining pins will be long plastic or metal spikes on a wide and flat base that can be stuck to your door. They will help hold your insulation in place.
- The pins don’t need to be lined up perfectly, as long as they are roughly evenly spaced and divided across each panel.
- If you don’t have panels on your garage door, use the sheets of batting insulation as a guide to break your door up into different sections. Install your retaining pins in the same method, but spread out over these sections rather than across prebuilt panels.
-
5Cut the batting to the size of your door panels. Unroll the insulation batting from your garage door kit and lay it on a flat surface. Use a pencil or pen to mark out the dimensions of each of your garage door panels, before cutting the batting down to size with a craft knife. Work one panel at a time until you have enough trimmed batting for the entire door.[17]
- If your door is without panels and you installed the retaining pins based on the size of the batting, you shouldn’t need to trim it down at all.
- For extra safety, wear cut-resistant gloves while working with the batting.
-
6Press the batting onto the retaining pins. Lift one piece of batting up and press it onto the retaining pins in one section or panel of the garage door, making sure it is straight and centered. Tuck the edges of the batting into the metal railings surrounding the panel to help keep them held in place. Repeat this process until all of the insulation is in place.[18]
- If your batting is only covered in foil or plastic on one side, make sure it is that side that is facing towards you when installing the batting. This will both make the finished door look better, as well as improving the insulation.
- If you don’t have metal railings surrounding the panels or sections of your door, you can simply press the batting onto the retaining pins to hold it steady as you continue working.
-
7Make a cross-shaped incision over the pins. Use your hand to feel underneath the batting and locate the retaining pin sticking out. Press down on the batting around the pin and use a craft knife to cut through the batting. Make 2 small cuts across the tip of the pin, roughly 1 inch (2.5 cm) in length to create a small cross that the pin can stick through.[19]
- If there is foil or plastic on both sides of the batting, make a deeper incision so that the pin can push through both layers of protection and emerge on the other side.
-
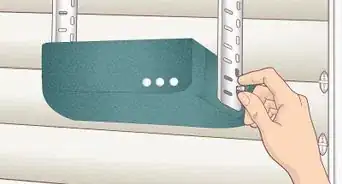
8Secure the batting in place with a fastener. The fasteners should come with the insulation kit and will be metal or plastic sleeves that slip over the retaining pins to keep the insulation in place. Press a fastener onto each of the pins, pushing down until it clicks into place.[20]
- The fasteners will stop the batting from falling out, as well as softening the tips of the retaining pins.
- Different kits will have different retaining pins and fasteners. Check the manufacturer’s instructions for your specific garage door insulation kit for advice on how to attach your fasteners.
-
9Use aluminum foil tape to hold any loose edges. If there are any edges on the batting that are popping out of the metal railings on the door, or that can’t be tucked under any railings, you can use aluminum foil tape to keep them from coming loose. Run strips of tape over the loose edges to secure them together, or to hold them to an exposed fitting on the door itself.[21]
- Aluminum foil tape will hold the batting place and help insulate the gaps between each piece of batting. It should be available at your local hardware store or online.


Community Q&A
-
QuestionIs there risk of toxic gases being emitted from rigid polystyrene foam when direct sunlight heats up the garage doors?
 Community AnswerYes. The heat from the sun causes a chemical reaction in the polystyrene foam, creating a gas known as tetraethyl dithiopyrophosphate. This gas is very poisonous, as it takes the place of oxygen in your red blood cells, causing your body to suffocate. Uninstall the polystyrene foam and replace it with a safer alternative.
 -
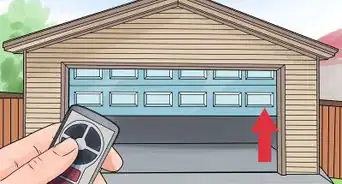
QuestionCan I fix the tension spring on a garage door opener?
 Community AnswerWhile springs cannot be fixed due to metal fatigue, they can be replaced. Going to your local hardware store and buying a replacement would be the best option.
 -
QuestionWill insulating the garage door make it too heavy for the automatic opener?Community AnswerIt depends on what kind of automatic door opener you have. Check the weight limit on it first.
Things You’ll Need
Insulating with Foam Board
- Household cleaner
- Paper towels
- Garden hose
- Towel or rag
- Measuring tape
- Pencil
- Paper
- Foam board insulation
- Craft knife
- Straight edge
- Adhesive, such as Liquid Nails
Using a Garage Door Insulation Kit
- Household cleaner
- Paper towels
- Garden hose
- Towel or rag
- Measuring tape
- Pencil or pen
- Paper
- Garage door insulation kit
- Craft knife
- Aluminum foil tape


References
- ↑ Jacob Pischer. Home Improvement Specialist. Expert Interview. 4 September 2020.
- ↑ https://youtu.be/zFELTFj5aK0
- ↑ https://www.familyhandyman.com/garage/exactly-how-to-insulate-a-garage-door/view-all/
- ↑ https://www.houselogic.com/organize-maintain/diy-repair/how-to-insulate-a-garage-door/
- ↑ https://youtu.be/Eyz-9lXkNbo
- ↑ https://youtu.be/Ramv7X2UPwg?t=85
- ↑ Jacob Pischer. Home Improvement Specialist. Expert Interview. 4 September 2020.
- ↑ https://www.houselogic.com/organize-maintain/diy-repair/how-to-insulate-a-garage-door/
- ↑ https://youtu.be/RML2ID4QVDs?t=18
- ↑ https://youtu.be/RML2ID4QVDs?t=51
- ↑ https://youtu.be/Ramv7X2UPwg?t=217
- ↑ https://youtu.be/RML2ID4QVDs?t=65
- ↑ https://youtu.be/Eyz-9lXkNbo
- ↑ https://www.familyhandyman.com/garage/exactly-how-to-insulate-a-garage-door/view-all/
- ↑ https://www.familyhandyman.com/garage/exactly-how-to-insulate-a-garage-door/view-all/
- ↑ https://youtu.be/zJzFxnzLNA0?t=62
- ↑ https://www.familyhandyman.com/garage/exactly-how-to-insulate-a-garage-door/view-all/
- ↑ https://www.familyhandyman.com/garage/exactly-how-to-insulate-a-garage-door/view-all/
- ↑ https://youtu.be/zJzFxnzLNA0?t=125
- ↑ https://www.familyhandyman.com/garage/exactly-how-to-insulate-a-garage-door/view-all/
- ↑ https://www.bobvila.com/articles/how-to-insulate-a-garage-door/
About This Article

To insulate a garage door, you can use foam board or a garage insulation kit from your local hardware store. If you use foam board, get some with the highest R-value you can find, which is a measurement for how well a material insulates. Then, cut it to size and press it into place on your garage door using the panel railings on the door. If your garage door doesn't have panels, use a strong, rubber-based adhesive to apply the foam to the door. To learn how to install a garage door insulation kit, scroll down!