X
wikiHow is a “wiki,” similar to Wikipedia, which means that many of our articles are co-written by multiple authors. To create this article, volunteer authors worked to edit and improve it over time.
This article has been viewed 43,209 times.
Learn more...
Are you tired of having to purchase countless batteries or spend a ton of time charging your batteries for your headset? Believe it or not, you can turn your wireless gaming headsets into a wired one, and avoid the hassle of batteries. The steps below are for a Turtle Beach Earforce X42 but should be possible with other headsets, too.
Steps
Part 1
Part 1 of 2:
Preparing the Wire
-
1Buy a DC-DC step-up step-down module. You can find them cheaply online. You'll need a few more tools, too, listed below.
-
2Cut the USB cable about 6" - 10" from the end that plugs into your PC or console. This is where we'll connect the step-up step-down module.Advertisement
-
3Use the utility knife to slice the insulation of the USB cable, about an inch down from where you cut it, on both sides. Pull out the tiny wires inside.
-
4Cut away the other wires and excess insulation. We only need the red and black wires in the cable.
-
5Use your wire cutters to strip about half of the each exposed wire. Be careful not to use too much pressure. The wires are very small; too much pressure and you'll cut the wire instead of stripping it.
-
6Twist the bare stranded copper and insert them into the module. The end that goes into the PC/console gets screwed to the "IN" terminals and the other end for the headset gets screwed to the "OUT" terminals. Red wire for the positive and black wire for the negative.
-
7Adjust the voltage output of the module. To do this, plug in the USB cable into your PC or console. You'll be using the USB ports on the PC or gaming console as your power source, but really you could even plug it into a phone charger and use that as your power source. This particular module can take any input of 3.5-28V and give an output of 1.25V-26V. Once it's plugged in you'll need to use our 1.4mm screwdriver to adjust the small screw on the module. Using your multimeter to read the voltage, turn the screw until the output of the module reads 3V.
-
8Cut the other end of the USB cable off (the end that would plug into a phone or something).
-
9Use the utility knife and slice the insulation about 3" - 4" down from the cut. Pull out the wires.
-
10Cut away the excess wires and insulation. Strip the ends of the red and black wires. Set the cable aside for now.


Advertisement
Part 2
Part 2 of 2:
Taking Apart the Headset
-
1Remove the ear pad from the side that the batteries insert into.
-
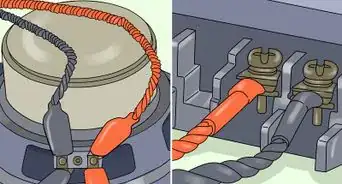
2Use a small screwdriver (or T6 Torx if you're working on the X42) to remove the screws and reveal the wires insides. Be careful of the part with the speaker in it. It is only connected by two small wires that could pull out of their soldered joint.
-
3Take off the cover for the batteries and insert the end of the USB cable in through the opening by the spring. (Alternatively, you can drill a hole through the side to insert the cable through. Use a bit slightly larger than you USB cable. Use silicone, or more preferably, a hot glue gun to keep the wire in place.)
-
4Using the soldering iron, solder the red wire to the positive terminal. There should be a speaker wire connected here.
-
5Solder the black wire to the negative terminal (the one with spring on the other side). Make sure you solder it to the one with speaker wire as well. Keep in mind you aren't soldering these wires to either of the terminals that has the red wire connecting the positive and negative terminals.
-
6Close it all back up and put the ear pad back on. You've just turned your wireless headset into a wired headset!
- Just remember we aren't replacing any receiver, just the batteries, so don't throw it out!


Advertisement
Things You'll Need
- A soldering iron and solder
- Flux (optional; You don't need to use it, but it makes soldering a bit easier)
- Utility knife
- Wire cutters
- 1.4mm precision screwdriver
- A USB cable long enough to accommodate your need
- Multimeter
- The step-up step-down module.
- T6 Torx bit/screwdriver, if needed for your headset screws


About This Article
Advertisement